

 800+ IT
News
als RSS Feed abonnieren
800+ IT
News
als RSS Feed abonnieren📚 Creating .NET Core global tools on macOS
💡 Newskategorie: Programmierung
🔗 Quelle: devblogs.microsoft.com
One of the really cool aspects about .NET Core is the support for global tools. You can use global tools to simplify common tasks during your development workflow. For example, you can create tools to minify image assets, simplify working with source control, or perform any other task that you can automate with the command line. After developing your tool, you can distribute it on NuGet.org, or any other NuGet repository, to share the tool with others. Since .NET Core is cross platform, your global tools will also work cross platform, assuming your code doesn’t contain any platform specific code. You can find existing global tools here. You can also create local tools, those that are associated with specific projects and not available globally. For more info on local tools see the .NET Core Tools — local installation section in Announcing .NET Core 3.0.
In this post we will discuss how you can create global tools when developing on macOS as well as how to prepare them to distribute using NuGet. Let’s get started with our first global tool. Today, we will be using Visual Studio for Mac, but you can follow similar steps if you are using a different IDE or editor. To ensure you have everything you need to follow this tutorial, download Visual Studio for Mac. The code we will be reviewing in this post is available on GitHub, a link is at the end of this post.
Hello World
Let’s create a very basic global tool that will print “Hello World” to the user. To create our tool, we will work through the following steps:
- Create the project
- Modify the project file to make it a global tool
- Implement our code
- Test our new global tool
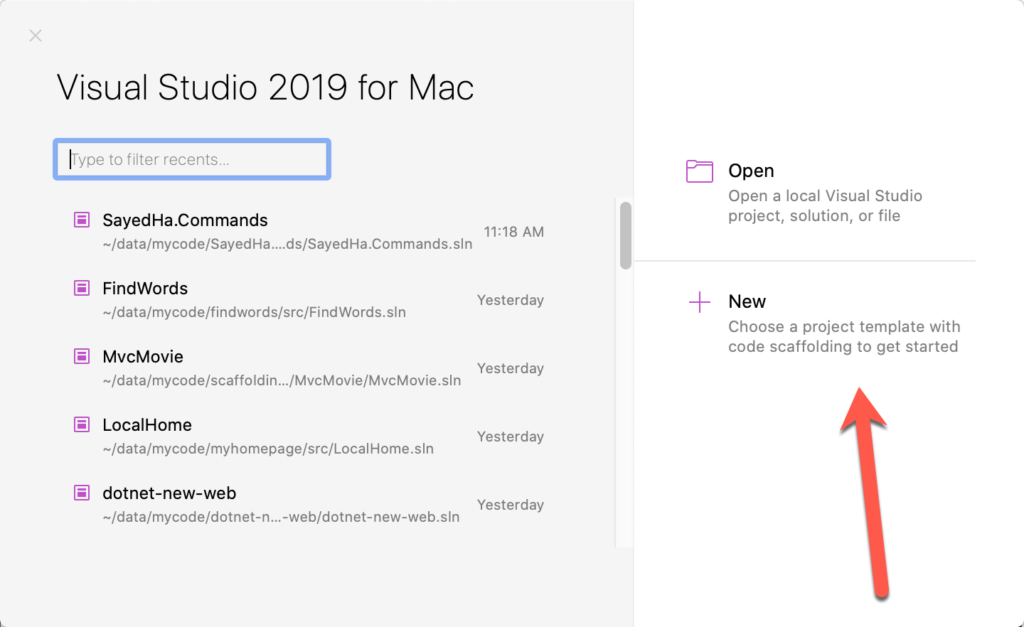
The first thing you’ll want to do when creating a global tool is to create a project. Since global tools are console applications, we will use the console project template to get started. After launching Visual Studio for Mac you’ll see the dialog below, click New to begin creating the project. If you already have Visual Studio open, you could also use the ⇧⌘N shortcut to open the new project dialog.
From here we will create a .NET Core Console project by going to .NET Core > App > Console Application.
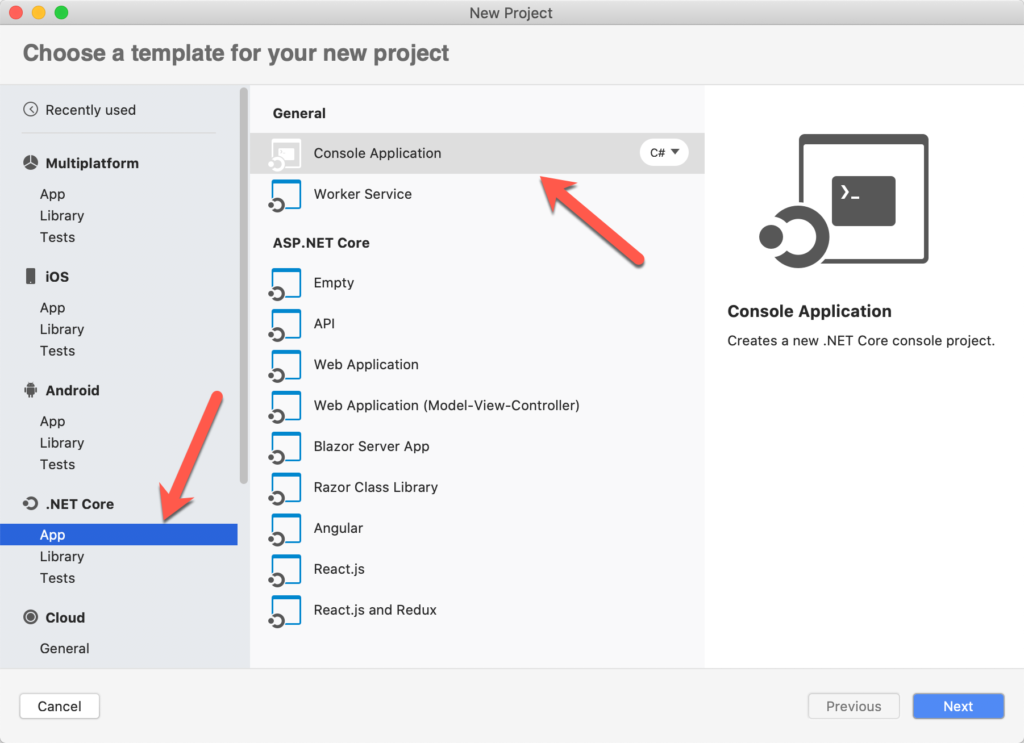
After selecting Console Application, click Next to select the version of .NET Core. I have selected .NET Core 3.1. Click Next after selecting that, and then provide the name and location for the project. I have named the project HelloTool.
Customize the project for NuGet
Now that we’ve created the project, the first thing to do is to customize the project file to add properties that will make this a global tool. To edit the project file, right click on the project in the Solution Pad and select Tools > Edit File. This is demonstrated in the following image.
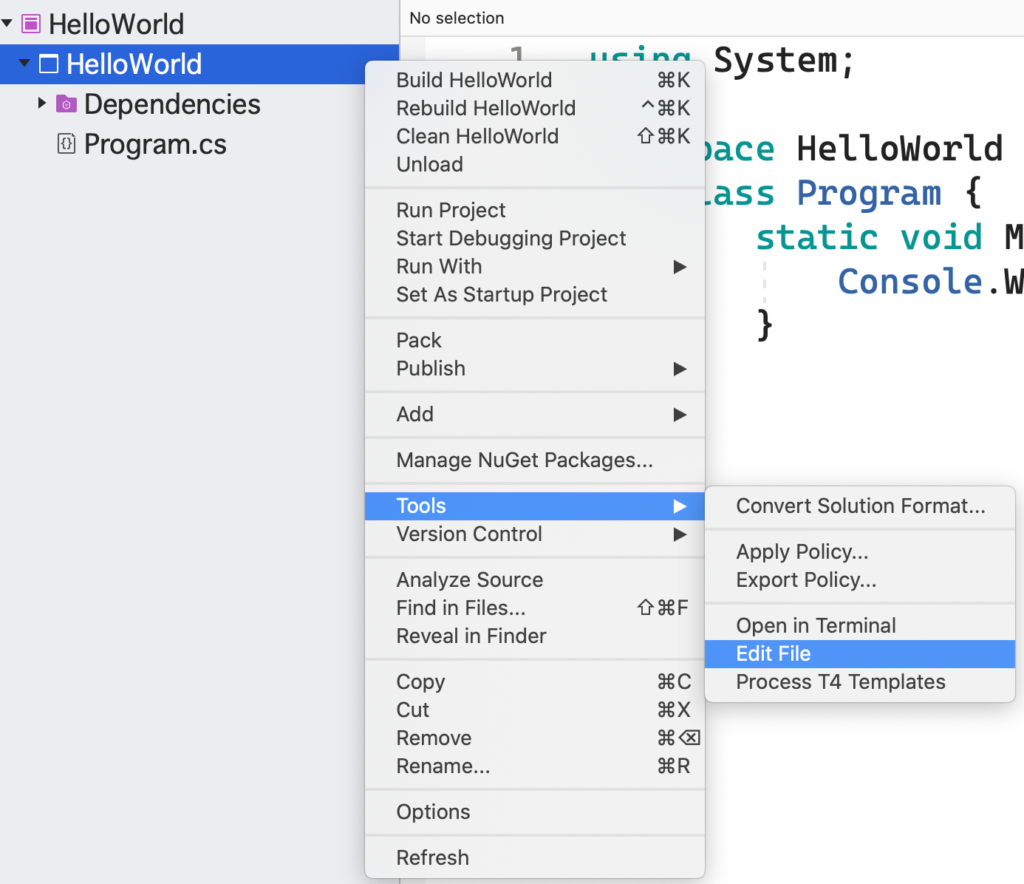
Note: the menu option to edit the project file is moving to the top level in the context menu as Edit Project File soon.
The .csproj file, an MSBuild file that defines the project, will be opened in the editor. To make the project into a global tool, we must enable the project to be packed into a NuGet package. You can do this by adding a property named PackAsTool and setting it to true in the .csproj file. If you are planning to publish the package to NuGet.org you will also want to specify some additional properties that NuGet.org will surface to users. You can see the full list of NuGet related properties that can be set over at NuGet metadata properties. Let’s look at the properties I typically set when creating a global tool. I’ve pasted the .csproj file below.
<Project Sdk="Microsoft.NET.Sdk">
  <PropertyGroup>
    <OutputType>Exe</OutputType>
    <TargetFramework>netcoreapp3.1</TargetFramework>

    <!-- global tool related properties -->
    <PackAsTool>true</PackAsTool>
    <ToolCommandName>hellotool</ToolCommandName>
    <PackageOutputPath>./nupkg</PackageOutputPath>

    <!-- nuget related properties -->
    <Authors>Sayed Ibrahim Hashimi</Authors>
    <Description>My hello world global tool</Description>
    <Version>1.0.0</Version>
    <Copyright>Copyright 2020 © Sayed Ibrahim Hashimi. All rights reserved.</Copyright>
    <PackageLicenseExpression>Apache-2.0</PackageLicenseExpression>
    <RepositoryUrl>https://github.com/sayedihashimi/global-tool-sample</RepositoryUrl>
    <RepositoryType>git</RepositoryType>
    <PackageType>DotNetCliTool</PackageType>
  </PropertyGroup>
</Project>
There are two sections of properties that I have added here. Below you’ll find a description of each of these properties.
| Property Name | Description |
| PackAsTool | Set this to true for all global tools, this will enable packing the project into a NuGet package. |
| ToolCommandName | Optional name for the tool. |
| PackageOutputPath | Path to where the .nupkg file should be placed. |
| Authors | Name of the author(s) of the project. |
| Description | Description that will be shown in nuget.org and other places. |
| Version | Version of the NuGet package. For each release to nuget.org this must be unique. |
| Copyright | Copyright declaration. |
| PackageLicenseExpression | An SPDX license identifier or expression. |
| RepositoryUrl | Specifies the URL for the repository where the source code for the package resides and/or from which it’s being built. |
| RepositoryType | Repository type. Examples: git, tfs. |
| PackageType | For tools specify this as DotNetCliTool. |
It’s a good idea to specify these properties now, so that you can focus on the code for the global tool. If you’re just creating a tool to play around, or for personal use, I recommend just setting PackAsTool, ToolCommandName and PackageOutputPath. Now let’s take a closer look at the code.
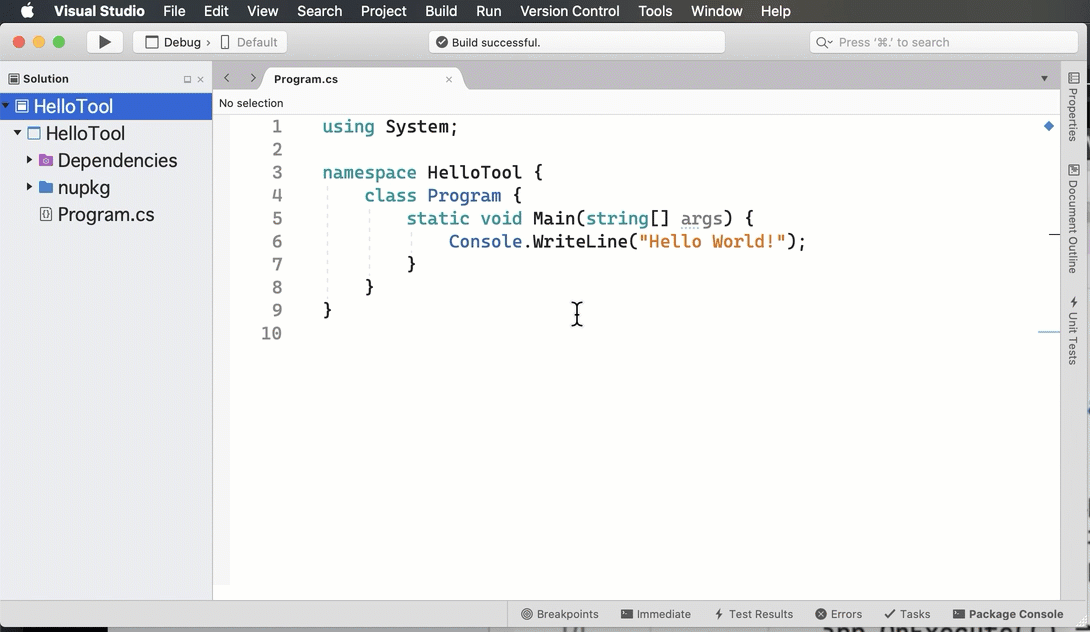
In the Program.cs file you’ll find that the following code was added when we created the project.
using System;

namespace HelloWorld {
    class Program {
        static void Main(string[] args) {
            Console.WriteLine("Hello World!");
       }
    }
}
Since the code is already printing “Hello World!”, we can use this as is with no modifications for now. Let’s move on to try executing this as a global tool at the command line. We will first need to package this as a NuGet package.
Pack and Test the tool
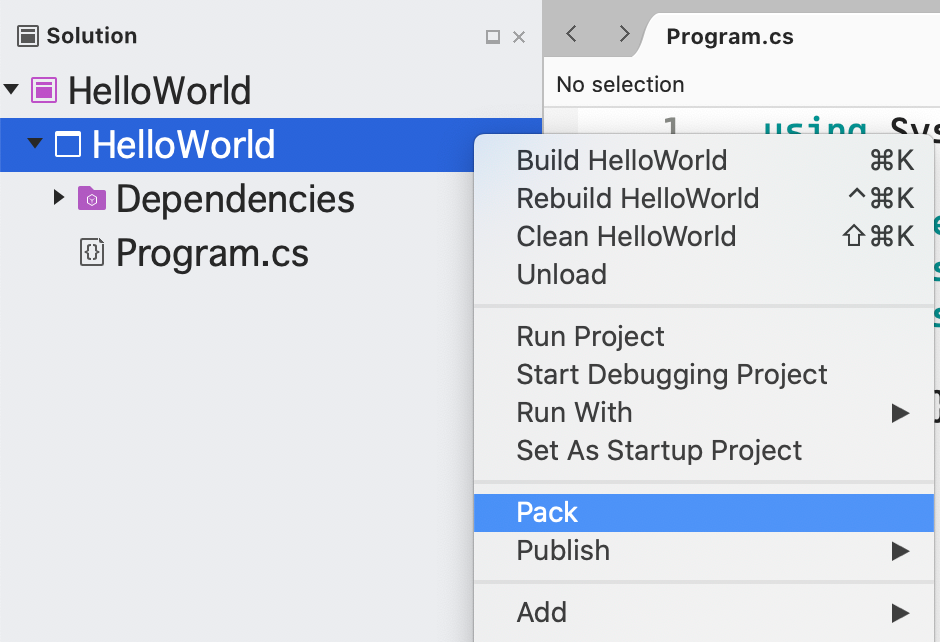
To create a NuGet package from this project you can use the built in Pack command offered by Visual Studio for Mac. To get there, right-click your project and then select Pack as seen in the next image.
After you invoke the Pack command, the NuGet package (.nupkg file) will be created in the directory we specified in the PackageOutputPath property. In our case it will go into a folder named nupkg in the project folder. Now that we have created a NuGet package from the project, we will register the global tool and try it from the command line.
To install and test the global tool, first open the Terminal app, or your favorite alternative. You’ll want to change directory into the project directory and run the commands from there. You will need to register the package as a tool using the following command.
dotnet tool install --global --add-source ./nupkg HelloTool
Here we are calling dotnet tool with the install command to install the tool. By passing –global, the tool will be available from any folder on your machine. We passed –add-source with the location to the folder where the .nupkg file is located so that our new tool can be located and installed. After executing this command, you should see output like the following:
You can invoke the tool using the following command: hellotool

Tool 'hellotool' (version '1.0.0') was successfully installed.
Let’s try to invoke the tool with hellotool to see if it’s working.

If you run into a command not found error, you may need to modify your PATH variable. You should ensure that the full path to ~/.dotnet/tools is include in the PATH variable. By full path, I mean the ~ should be expanded, for example /Users/sayedhashimi/.dotnet/tools in my case. Now that we have seen how to get started with a tool, let’s do something more interesting by adding some code to the project.
Adding parameters using DragonFruit
To make this more realistic we want to add some features like; adding support for parameters, displaying help and more. We could implement all of this directly by using System.CommandLine, but the .NET Core team is working on a layer that will simplify it for us called DragonFruit. We will use the DragonFruit to help us create this command quickly.
Note: DragonFruit is currently an experimental app model for System.CommandLine. This information is subject to change as it is being developed.
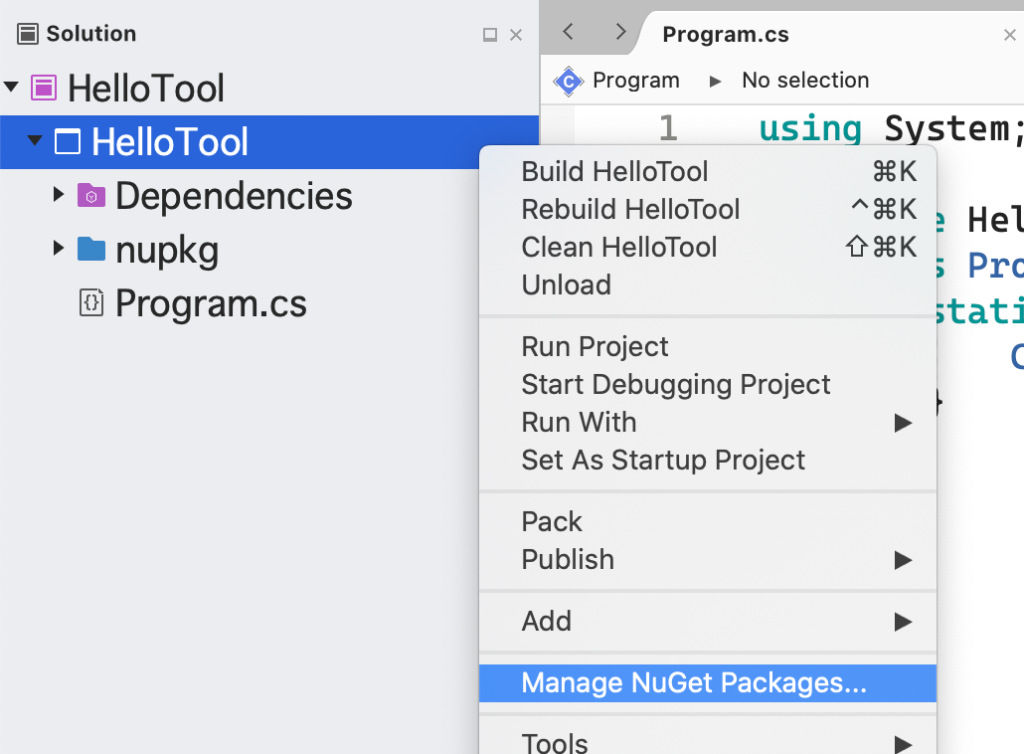
Now we want to add a couple of parameters to the app to make it more realistic. Before we do that, let’s first add the DragonFruit NuGet package to the project and then go from there. To add the NuGet package right click on your app and select Manage NuGet Packages.
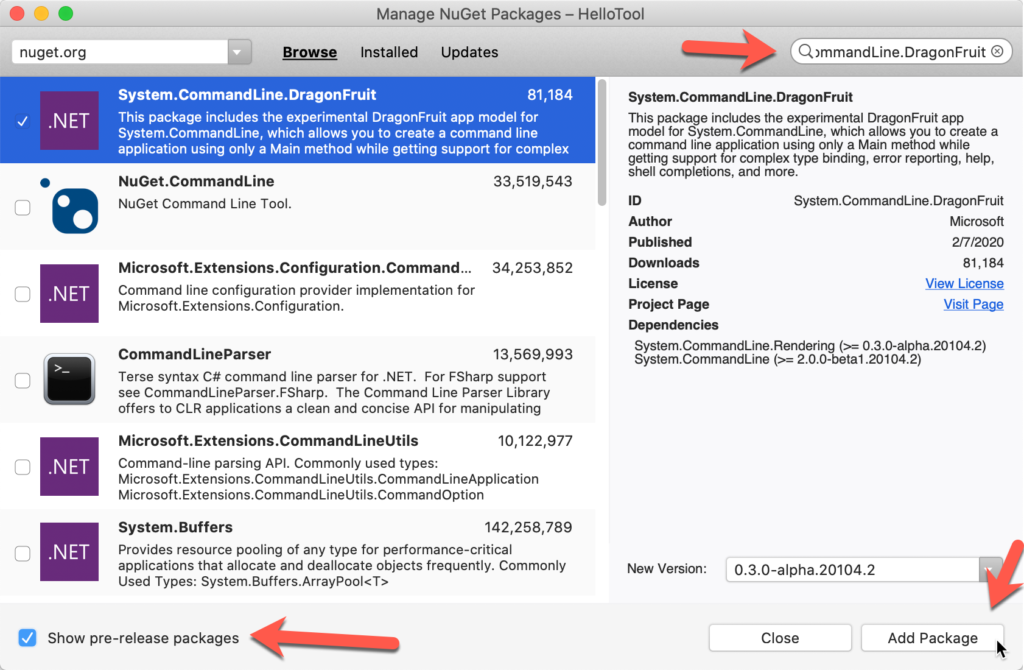
When the Manage NuGet Packages dialog appears, first check the checkbox to Show pre-release packages in the lower left, and the search for System.CommandLine.DragonFruit. After that click on the Add Package button to add the package to your project. See the following image.
Now that we have added the package, we are ready to add some parameters to the global tool. With DragonFruit it’s really easy to add parameters to your tools, you just declare the parameters as arguments in the main method itself. Let’s add a name and age parameter to this global tool. The updated code for Program.cs is shown below.
using System;

namespace HelloTool {
    class Program {
        static void Main(string name = "World", int age = 0) {
            string message = age <= 0 ? $"Hello there {name}!" : $"Hello there {name}, who is {age} years old";
            Console.WriteLine(message);

        }
    }
}
In the code above we have added the parameters as arguments in the Main method, and then we craft a new message using those values. Now we want to test that the changes that we have made are working correctly before making further changes. If you want to just run the app you can use Run > Start without Debugging, or Run > Start Debugging from the menu bar to run it as a vanilla console app. What we want to do is to test it as a .NET Core global tool as well. To do that we will follow the steps below.
- Pack the project in Visual Studio for Mac
- Uninstall the global tool
- Install the global tool
- Run the tool
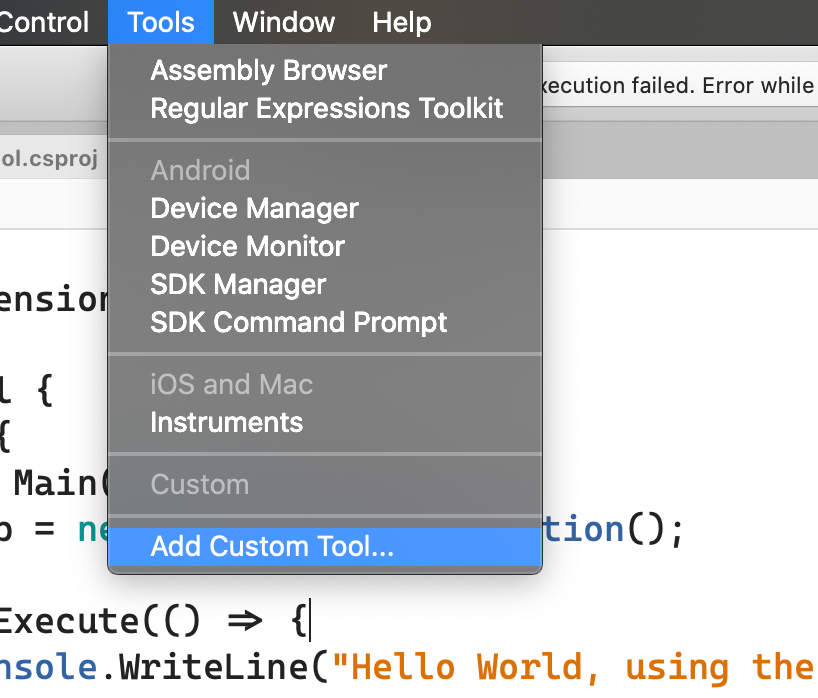
Since we will need to install/uninstall the tool often, we can simplify that by creating a new Custom Tool in Visual Studio for Mac to facilitate this. To get started go to Tools > Add Custom Tool.
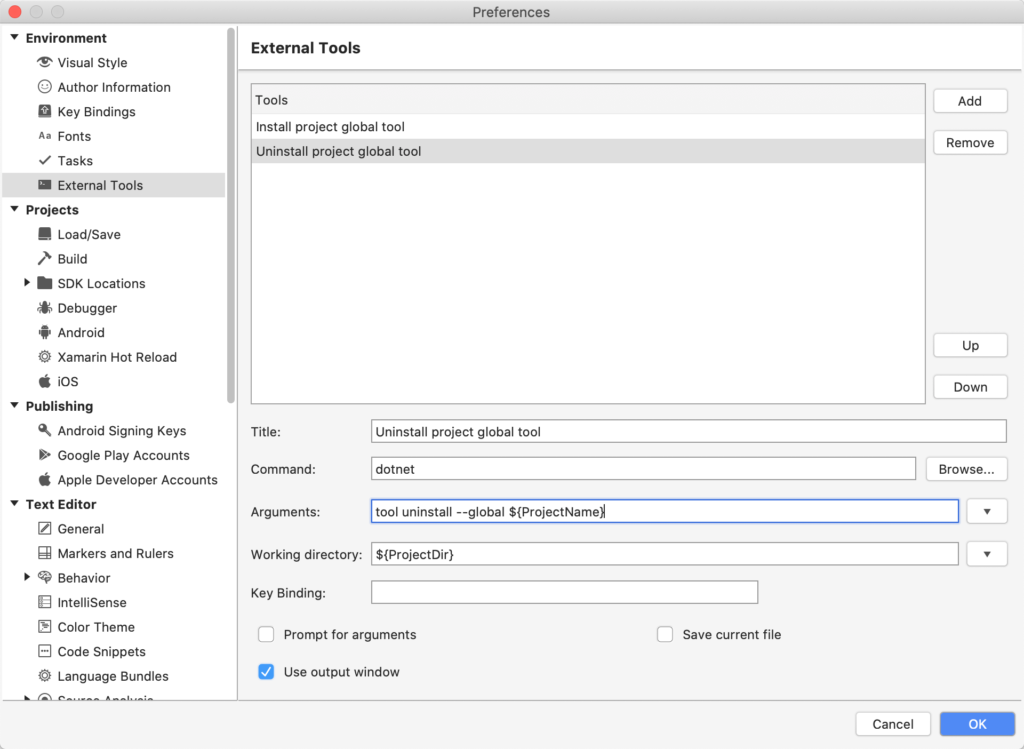
This will bring up a new dialog where we can create the two custom tools to handle install/uninstall. To start, click the Add button and then configure each tool.
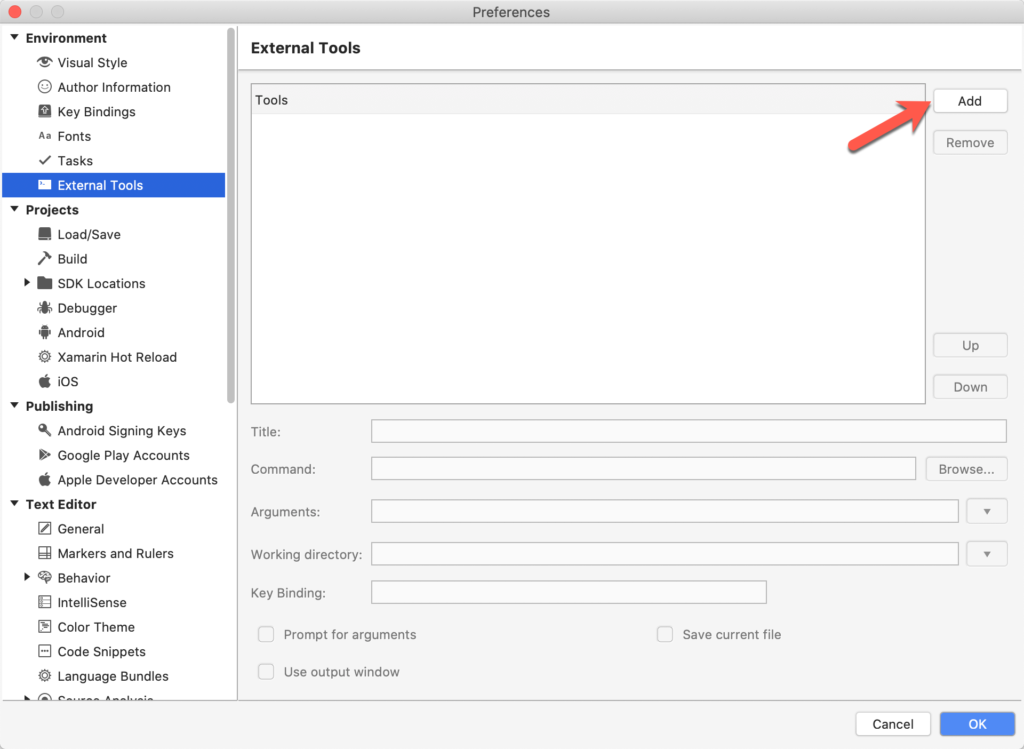
We want to create two tools with the following values:
Install Tool
- Title = Install project global tool
- Command = dotnet
- Arguments = tool install –global –add-source ./nupkg ${ProjectName}
- Working directory = ${ProjectDir}
Uninstall Tool
- Title = Install project global tool
- Command = dotnet
- Arguments = tool uninstall –global ${ProjectName}
- Working directory = ${ProjectDir}
The Uninstall tool, for example, should look like the following:
After adding these tools you’ll see them appear in the Tools menu as shown below.
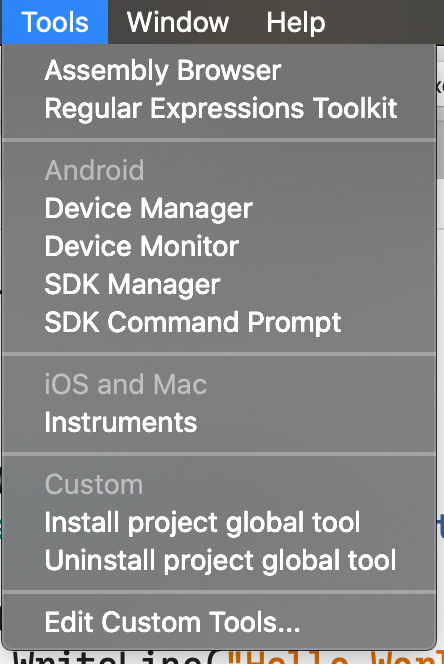
To invoke these newly added tools, you can simply click on the command. Since we authored these tools using the parameter ${ProjectName} these commands should work on your other global tool projects assuming the tool name is the same as the project name. Let’s try the uninstall command. Take a look at the experience in the animate gif below, which shows the tool being invoked and the output being displayed in the Application Output Pad.
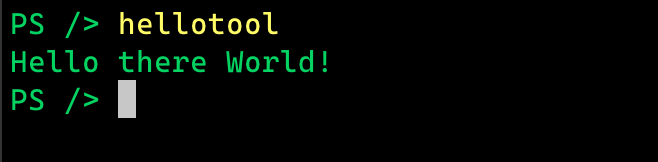
We can see that the tool was successfully installed. Now we can go back to the terminal to test the global tool itself. Go back to the terminal and execute hellotool, and verify that you see the message Hello there World!
The drawback to this approach is that you have to perform three separate steps in the IDE; pack, uninstall and install. You can simplify this by modifying the project file, the .csproj file. Add the following target to your .csproj file immediately before </Project>.
<Target Name="InstallTool" DependsOnTargets="Pack">
    <Exec Command="dotnet tool uninstall --global $(ToolCommandName)" IgnoreExitCode="true"/>
    <Exec Command="dotnet tool install --global --add-source $(PackageOutputPath) $(ToolCommandName)"/>
    <Exec Command="$(ToolCommandName) --help" />
</Target>
This is an MSBuld target that we can call to take care of all three steps for us. It will also call the tool to display its help output after it’s installed. After adding this target to your .cspoj file, you can execute it with dotnet build -t:InstallTool. In Visual Studio for Mac you can create a new Custom Tool with the following properties to invoke this target.
- Title = Install tool
- Command = dotnet
- Arguments = -t:InstallTool
- Working directory = ${ProjectDir}
Then you can invoke this new custom tool instead of the three steps we outlined. Since it’s not always feasible to edit the project file, this doc will continue using the previous approach.
Help output
Now let’s take a look at the default help output that we get when the DragonFruit package is in the project. Let’s execute hellotool -h, the output is shown below.
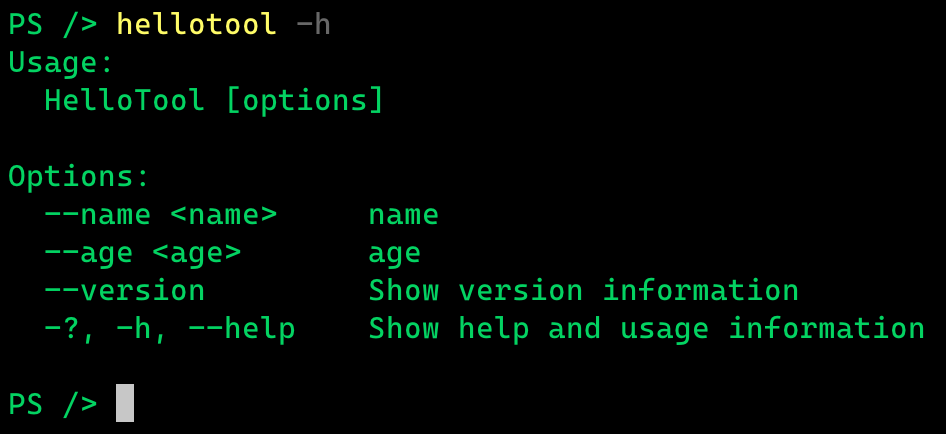
With the default help output, the names of the parameters are shown as the description. This is helpful, but not ideal. Let’s improve it. To do that all we need to do is to add some /// comments to the main method, with the descriptions. The updated code is shown in the following code block.
using System;

namespace HelloTool {
    class Program {
        /// <summary>
        /// A simple global tool with parameters.
        /// </summary>
        /// <param name="name">Your name (required)</param>
        /// <param name="age">Your age</param>
        static void Main(string name = "World", int age = 0) {
            string message = age <= 0 ? $"Hello there {name}!" : $"Hello there {name}, who is {age} years old";
            Console.WriteLine(message);
        }
    }
}
All we have done is add some descriptive comments to the Main method for each parameter. DragonFruit will take care of wiring up for us. Now let’s go through the flow of pack, install, uninstall and test one more time. After going through that when you invoke hellotool -h the output should be as shown below. If you are still seeing the old output, ensure you’ve used the Pack command for the project before install.
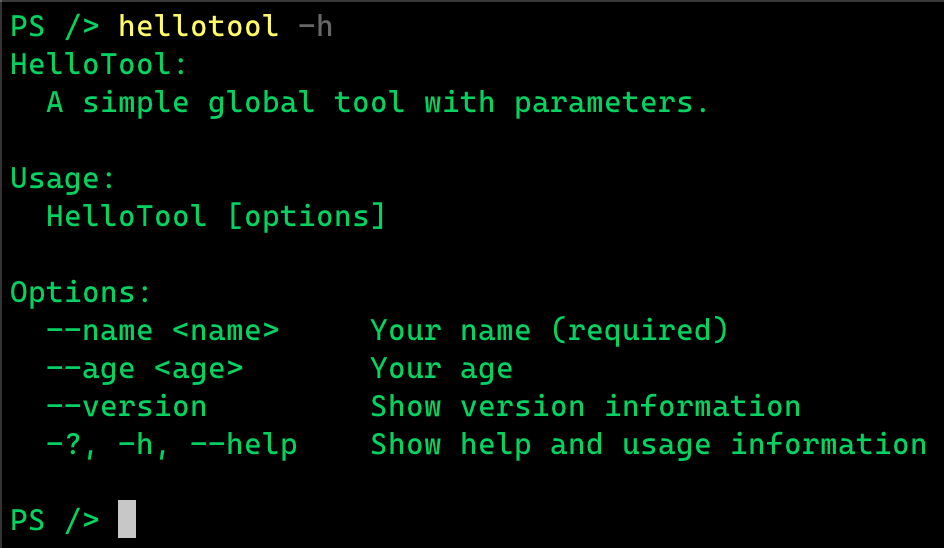
Now we can see that the help output contains some descriptive text. This is looking much better now! Let’s invoke the tool and pass in some parameters. Let’s invoke hellotool –name dotnet-bot –age 5 and examine the output.

It looks like the tool is behaving as expected. From here you can continue developing your command line tool and then publish it to NuGet.org, or another NuGet repository, to share it with others. Since we have already configured the NuGet properties in the project we can upload the .nupkg that is created after invoking the Pack menu option. After you have published the NuGet package, users can install it with the following command.
dotnet tool install --global <packagename>
This will download the package from the NuGet repository and then install the tool globally for that user. The uninstall command that users will use is the same as what you’ve been using during development. When you make changes to your tool and republish to NuGet.org, remember to change the version number in the .csproj file. Each package published to a NuGet repository needs to have a unique version for that package.
Summary & Wrap Up
In this post we covered a lot of material on how to create a .NET Core global tool. If you’d like to learn more about creating global tools, take a look at the additional resources section below. If you have any questions or feedback, please leave a comment on this post.
Additional Resources
Join us for our upcoming Visual Studio for Mac: Refresh() event on February 24 for deep dive sessions into .NET development using Visual Studio for Mac, including a full session on developing Blazor applications.
Make sure to follow us on Twitter at @VisualStudioMac and reach out to the team. Customer feedback is important to us and we would love to hear your thoughts. Alternatively, you can head over to Visual Studio Developer Community to track your issues, suggest a feature, ask questions, and find answers from others. We use your feedback to continue to improve Visual Studio 2019 for Mac, so thank you again on behalf of our entire team.
Documentation links
- Download Visual Studio for Mac
- Code from this post is available at https://github.com/sayedihashimi/global-tool-sample
- .NET Core global tools overview
- Create a global tool
The post Creating .NET Core global tools on macOS appeared first on Visual Studio Blog.
...