

 800+ IT
News
als RSS Feed abonnieren
800+ IT
News
als RSS Feed abonnieren📚 [TIL] Helm: Quickstart guide
💡 Newskategorie: Programmierung
🔗 Quelle: dev.to
This topic was created in #todayilearned style as a quickstart guide for beginners. When you finish it you will understand what Helm is, what it can do, how to use it and what you can learn next. We will discuss Helm 3 and contrast it with Helm 2 where they differ in interesting ways.
The article contains a practical part, so it is expected that you're familiar with Linux command line, basic Kubernetes abstractions (service, deployment, pod, configmap, secret) and kubectl tool.
However, let's start with some theory and the problem statement in particular.
How to deploy to a cluster?
Natively, the simplest way is to create some .yaml files for required Kubernetes abstractions and deploy them using apply command.
It works when the amount of abstractions is not big, but in real life even one service can be represented by several abstractions (deployment, configmaps, service, ingress, secrets, persistent volume, etc). When we talk about huge projects, the number of abstractions may exceed several thousands. It becomes almost impossible to support it manually. Just imagine that you need to edit a label in all manifests.
Of course, we can use sed or envsubst or another tool for batch file editing and it will work.
We can go even further and use Kubernetes module in Ansible, Kustomize or Jsonnet.
Talking about Ansible, it uses Jinja2 as a template language and all customization is based on environment variables. Kustomize and Jsonnet both operate wit configuration files.
In other words, all these instruments have a similar core concept:
- Set of application manifests (and they can be templated: contain placeholders instead of values)
- Config file (values stored here)
- Way to deploy to a cluster
Also, all the instruments mentioned are kubectl-based. It means that after some updates, we will need to apply changes using kubectl.
What if we need to roll back?
Using kubectl only, we're limited with the command kubectl rollout undo and it works in a pretty restricted way: it can rollback only a deployment's revision (but not service, ingress, etc).
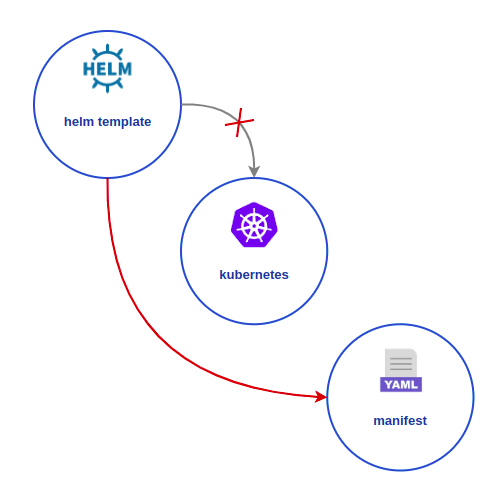
We didn't just mention at the very beginning a possibility to apply changes to abstractions like right from files. For now, we can solve the problem of rollback using it. What if we archive the previous version of all manifests and save it before doing some updates and reapply them in case a rollback is needed? Viola! This is what Helm actually does 😊
Helm literally gets the manifests for the current release and saves them to the secrets (Base 64 encoded archive).
Alternative
For years, Helm has been the industry standard (or some Helm-based tools). But there is another thing you need to pay attention to. GitOps is a concept based on synchronization between the master branch and the cluster state. One of the most popular DevOps tools at the moment is ArgoCD. This concept is becoming popular rapidly, so keep your finger on the pulse!
Why Helm?
- Helm is a package manager and it supports rollbacks (Kustomize and other don't)
- Cloud Native Computing Foundation supports Helm. As part of the Linux Foundation, CNCF provide support, oversight and direction for fast-growing, cloud native projects, including Kubernetes and Prometheus
- Helm provides declarative and idempotent commands
- Helm has important things for CI/CD:
- Watch (tracks status of deployments, wait for timeout)
- Rollback (auto in case of error)
- Hooks (ability to deploy manifests in exact order)
- Helm supports plugins
Charts
Helm is a package manager, and in terms of a Helm package has a special name – chart.
What is a chart? It is just a .tgz archive, which contains:
- Batch of templated manifests
- File with values
- Metadata (version, developed by, etc)
Go template syntax
Helm uses Go template syntax in manifests (see more).
Look at the example:
apiVersion: v1
kind: ConfigMap
metadata:
  name: {{ .Release.Name }}-configmap
data:
  myvalue: "Hello World"
  drink: {{ quote .Values.favorite.drink }}
  food: {{ quote .Values.favorite.food }}
In the last string, we try to get the value for the field food from Helm's variable (described in the file or command line). Obviously, variables can also have some nested levels, so we use dots for navigating deeper through the structure.
A default file with values usually has name values.yaml.
What Helm can do?
As a package management tool, Helm does the following:
- Create new charts from scratch
- Package charts into chart archives (.tgz files)
- Interact with chart repositories where charts are stored
- Install and uninstall charts into an existing Kubernetes cluster
- Manage the release cycle of charts that have been installed with Helm
Basic Helm commands logically evolved from the goals above:
helm create – create a new chart
helm search – search for a chart
helm install – install chart
helm upgrade – upgrade chart
helm pull – download chart
helm show – show the information about chart
helm list – show list of installed charts
helm uninstall – uninstall chart
etc
Practical task
It's time to practice!
Starting from here, I'd like to offer to setup the environment, create our own chart and do several primitive actions with it.
During the practice, I'll try to cover basic commands, flags, scenarios of usage and pitfalls, share some useful links, etc.
What are we going to do?
- Setup environment: Microk8s and it's addons
- Create new chart:
createcommand and chart structure - Configure new chart:
values.yamlfile - Pre-install steps:
lint - Pre-install steps:
--dry-runandtemplate - Deploy chart to Kubernetes:
installcommand - Run tests:
testcommand - Upgrade chart: adding new features,
upgradecommand - Do changes:
--setattribute, changes in ConfigMaps, rollout - Rollback changes:
history,rollback, how to work with revisions - Prepare to distribution:
packagecommand - Repositories: local, external, registries
- Install chart from an external repository
Setup environment: Microk8s and it's addons
Microk8s - is the simplest production-grade upstream K8s. Lightweight and focused. Single command install on Linux.
Run from the terminal to install:
sudo snap install microk8s --classic
Kubectl - Microk8s comes with its own packaged version of the kubectl command for operating Kubernetes. By default, this is accessed through Microk8s, to avoid interfering with any version which may already be on your host machine.
We will use embedded kubectl like this:
microk8s kubectl
Helm - Microk8s supports addons including Helm. There are two addons in default repository: helm alias stands for Helm 2 and helm3 – stands for Helm 3. Helm 2 support ended in 2020, so we will use helm3. If you're interested in differences between Helm versions, please take a look at this straightforward and informative article.
Run next commands from the terminal to prepare Helm addon:
microk8s enable helm3
microk8s helm3 init
Create new chart: create command and chart structure
The create command is used to generate basic chart's structure from scratch. Of cause, you can create it manually, so the command just make this process easier:
root@helm-training# microk8s helm3 create mychart
Creating mychart
As a result we have a new folder mychart generated with other folders and files inside. This is the typical structure for a Helm chart; almost all charts you'll meet have the same.
./mychart/

├── charts # A directory containing any charts upon which this chart depends.
├── Chart.yaml # A YAML file containing information about the chart: name, description, version, dependencies, etc. Required for a chart.
├── templates # A directory of templates that, when combined with values, will generate valid Kubernetes manifest files.
│   ├── deployment.yaml # Deployment manifest.
│   ├── _helpers.tpl # Contains a set of rules about naming and versioning for the chart and k8s abstractions. Can be customized for your purposes.
│   ├── ingress.yaml # Ingress manifest.
│   ├── NOTES.txt # A plain text file containing short usage notes. Will be printed in the console after the installation.
│   ├── serviceaccount.yaml # Serviceaccount manifest.
│   ├── service.yaml # Service manifest.
│   └── tests # A directory containing tests that validate that your chart works as expected when it is installed.
│       └── test-connection.yaml # Test sample does wget to the chart's host:port.
└── values.yaml # A file containing values for parametrizing templates.
Configure new chart: values.yaml file
The service we're going to build needs to be quite simple, so make it a single nginx replica that can respond with a welcome page upon request.
The manifest files contain Go templates that will be replaced by some real data from the values.yaml file. As a result, we must update the values.yaml file in order to customize our Helm chart.
The values.yaml file by default looks like this:
# Default values for test1.
# This is a YAML-formatted file.
# Declare variables to be passed into your templates.

replicaCount: 1

image:
  repository: nginx
  pullPolicy: IfNotPresent
  # Overrides the image tag whose default is the chart appVersion.
  tag: ""

imagePullSecrets: []

nameOverride: ""

fullnameOverride: ""

serviceAccount:
  # Specifies whether a service account should be created
  create: true
  # Annotations to add to the service account
  annotations: {}
  # The name of the service account to use.
  # If not set and create is true, a name is generated using the fullname template
  name: ""

podAnnotations: {}

podSecurityContext: {}
  # fsGroup: 2000

securityContext: {}
  # capabilities:
  #   drop:
  #   - ALL
  # readOnlyRootFilesystem: true
  # runAsNonRoot: true
  # runAsUser: 1000

service:
  type: ClusterIP
  port: 80

ingress:
  enabled: false
  annotations: {}
    # kubernetes.io/ingress.class: nginx
    # kubernetes.io/tls-acme: "true"
  hosts:
    - host: chart-example.local
      paths: []
  tls: []
  #  - secretName: chart-example-tls
  #    hosts:
  #      - chart-example.local

resources: {}
  # We usually recommend not to specify default resources and to leave this as a conscious
  # choice for the user. This also increases chances charts run on environments with little
  # resources, such as Minikube. If you do want to specify resources, uncomment the following
  # lines, adjust them as necessary, and remove the curly braces after 'resources:'.
  # limits:
  #   cpu: 100m
  #   memory: 128Mi
  # requests:
  #   cpu: 100m
  #   memory: 128Mi

autoscaling:
  enabled: false
  minReplicas: 1
  maxReplicas: 100
  targetCPUUtilizationPercentage: 80
  # targetMemoryUtilizationPercentage: 80

nodeSelector: {}

tolerations: []

affinity: {}
All sections (top-level properties) are pretty self-descriptive and have the same names as the main properties of Kubernetes abstractions, so I will not describe each of them in detail and will stay on the changes which we need to do here.
To avoid overcomplication I won't adjust ingress params, settings related to security, autoscaling, pods tolerations, and affinity.
Common properties
In the top section, we will change only image.pullPolicy, nameOverride and fullnameOverride:
Before:
replicaCount: 1

image:
  repository: nginx
  pullPolicy: IfNotPresent
  # Overrides the image tag whose default is the chart appVersion.
  tag: ""

imagePullSecrets: []
nameOverride: ""
fullnameOverride: ""
After:
replicaCount: 1

image:
  repository: nginx
  pullPolicy: Always
  # Overrides the image tag whose default is the chart appVersion.
  tag: ""

imagePullSecrets: []
nameOverride: "helm-hw"
fullnameOverride: "helm-hw"
pullPolicy has several options to setup: IfNotPresent, Latest, and Always. I'd like to use Always here just to avoid any issues with image failure.
Properties nameOverride and fullnameOverride will be used for naming a chart and Kubernetes abstractions according to the rules described in templtes/_helpers.tpl.
Service account properties
Service account provides a user identity to run in the pod inside the cluster. If it's left empty, Helm will generate the name according to templtes/_helpers.tpl rules based on the full name. It is a good practice to have a serviceAccount set up so that the application will be directly associated with a user that is controlled in the chart.
Before:
serviceAccount:
  # Specifies whether a service account should be created
  create: true
  # Annotations to add to the service account
  annotations: {}
  # The name of the service account to use.
  # If not set and create is true, a name is generated using the fullname template
  name: ""
After:
serviceAccount:
  # Specifies whether a service account should be created
  create: true
  # Annotations to add to the service account
  annotations: {}
  # The name of the service account to use.
  # If not set and create is true, a name is generated using the fullname template
  name: "test"
Service properties
Here we will change only service.type:
Before:
service:
  type: ClusterIP
  port: 80
After:
service:
  type: NodePort
  port: 80
There are only two possible options and when ClusterIP type allows access only from inside the cluster or through the ingress (which we will leave disabled) NodePort exposes access to the service through a statically assigned port.
Resource properties
Optional, but it is always a good practice to setup resource settings. Nobody knows how many resources consume your service better than you!
Before:
resources: {}
  # We usually recommend not to specify default resources and to leave this as a conscious
  # choice for the user. This also increases chances charts run on environments with little
  # resources, such as Minikube. If you do want to specify resources, uncomment the following
  # lines, adjust them as necessary, and remove the curly braces after 'resources:'.
  # limits:
  #   cpu: 100m
  #   memory: 128Mi
  # requests:
  #   cpu: 100m
  #   memory: 128Mi
After:
resources:
  # We usually recommend not to specify default resources and to leave this as a conscious
  # choice for the user. This also increases chances charts run on environments with little
  # resources, such as Minikube. If you do want to specify resources, uncomment the following
  # lines, adjust them as necessary, and remove the curly braces after 'resources:'.
   limits:
     cpu: 100m
     memory: 128Mi
   requests:
     cpu: 100m
     memory: 128Mi
Pre-install steps: lint
Helm contains an embedded linter - your go-to tool for verifying that your chart follows best practices. Before installing new or updating charts you can always check syntax and chart structure.
root@helm-training# microk8s helm3 lint ./mychart
==> Linting ./mychart
[INFO] Chart.yaml: icon is recommended

1 chart(s) linted, 0 chart(s) failed
I will remove "name" from Chart.yaml to demonstrate how linter finds an error:
root@helm-training# microk8s helm3 lint ./mychart
==> Linting ./mychart
[ERROR] Chart.yaml: name is required
[INFO] Chart.yaml: icon is recommended
[ERROR] templates/: validation: chart.metadata.name is required
[ERROR] : unable to load chart
validation: chart.metadata.name is required

Error: 1 chart(s) linted, 1 chart(s) failed
I didn't find the default ruleset, so I can only refer you to the corresponding package in Helm's GitHub repository where linting rules are implemented. Historically, there were several request proposals for implementing customizable linting and adding custom rulesets, but they were not implemented, and in case you're looking for something like that I recommend paying attention to 3rd party plugins and projects like Chart Testing.
Pre-install steps: --dry-run and template
Except for linting, it would be great to do one more pre-install step – to parametrize the manifests and render them to validate what we are going to deploy to the cluster.
Out of the box Helm provides two options for how to do it.
Dry-run
Using --dry-run flag with install command Helm sends parametrized manifests to K8s API server, Kubernetes validates it and returns the resulting manifest file.
microk8s helm3 install mychart ./mychart --dry-run

Template
Using template command Helm doesn't call Kubernetes cluster. It handles all validations and rendering tasks by itself.
microk8s helm3 template ./mychart
FYI: To print already installed manifests you can use the following command:
microk8s helm3 get manifest [CHART_NAME]
Deploy chart to Kubernetes: install command
When all pre-install checks are passed we can install our chart to the cluster using install command. It receives a chart name and source directory address as arguments.
root@helm-training# microk8s helm3 install mychart ./mychart
NAME: mychart
LAST DEPLOYED: Wed Dec 01 00:00:59 2022
NAMESPACE: default
STATUS: deployed
REVISION: 1
NOTES:
1. Get the application URL by running these commands:
  export NODE_PORT=$(kubectl get --namespace default -o jsonpath="{.spec.ports[0].nodePort}" services helm-hw)
  export NODE_IP=$(kubectl get nodes --namespace default -o jsonpath="{.items[0].status.addresses[0].address}")
  echo http://$NODE_IP:$NODE_PORT
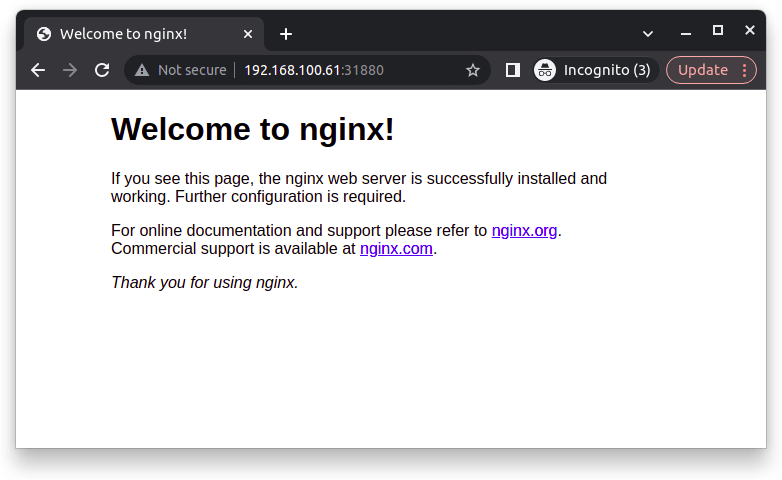
After successful installation, we can see usage notes from NOTES.txt printed. By default, it explains how to get the installed chart's IP-address and port. Let's follow the recommendations to check if our nginx started.
root@helm-training# microk8s kubectl get nodes --namespace default -o jsonpath="{.items[0].status.addresses[0].address}"

192.168.100.61

root@helm-training# microk8s kubectl get --namespace default -o jsonpath="{.spec.ports[0].nodePort}" services helm-hw

31880
Use this host:port combination to open nginx welcome page in a browser:
To see all required Kubernetes abstractions created and started run:
root@helm-training# microk8s kubectl get all

NAME                           READY   STATUS    RESTARTS   AGE
pod/helm-hw-55846c8758-lklsf   1/1     Running   0          12s

NAME                 TYPE        CLUSTER-IP      EXTERNAL-IP   PORT(S)        AGE
service/helm-hw      NodePort    10.152.183.75   <none>        80:31880/TCP   12s

NAME                      READY   UP-TO-DATE   AVAILABLE   AGE
deployment.apps/helm-hw   1/1     1            1           12s

NAME                                 DESIRED   CURRENT   READY   AGE
replicaset.apps/helm-hw-55846c8758   1         1         1       12s
Run tests: test command
At this point, we have a perfect time to run tests. As you remember Helm is already generated one for us. It is quite simple and does nothing but wget request to the chart's host:port, but let's try to run it and look for the report.
root@helm-training# microk8s helm3 test mychart

NAME: mychart
LAST DEPLOYED: Thu Dec 01 00:00:59 2022
NAMESPACE: default
STATUS: deployed
REVISION: 1
TEST SUITE:     helm-hw-test-connection
Last Started:   Mon Dec 01 00:07:53 2022
Last Completed: Mon Dec 01 00:08:34 2022
Phase:          Succeeded
NOTES:
1. Get the application URL by running these commands:
  export NODE_PORT=$(kubectl get --namespace default -o jsonpath="{.spec.ports[0].nodePort}" services helm-hw)
  export NODE_IP=$(kubectl get nodes --namespace default -o jsonpath="{.items[0].status.addresses[0].address}")
  echo http://$NODE_IP:$NODE_PORT
Warning: if the test fails with:
Phase: Failed the problem is most likely in microk8s: kubelet does not have ClusterDNS IP configured by default.
Try to enable dns plugin like:
microk8s helm3 enable dnsand run the test again.
This test created a new pod/helm-hw-test-connection for its purposes and you can find it in Completed state getting all pods from the current namespace:
root@helm-training# microk8s kubectl get pods

NAME                       READY   STATUS      RESTARTS   AGE
helm-hw-55846c8758-lklsf   1/1     Running     0          7m51s
helm-hw-test-connection    0/1     Completed   0          57s
Feel free to delete this pod using:
root@helm-training# microk8s kubectl delete pod helm-hw-test-connection
Upgrade chart: adding new features, upgrade command
It's time to upgrade our chart and bring new functionality. Let's make nginx response with a custom message instead of the default html page. For that purpose, I am going to add a new ConfigMap template to the chart.
Let's create a new configmap.yaml file under templates directory with following content:
apiVersion: v1
kind: ConfigMap
metadata:
  name: nginx-config
data:
  nginx.conf: '
events {
}
http {
   server {
       listen 80;
       location / {
         return 200 {{ .Values.nginx.message | default "Hello world!"}};
       }
   }
}
'
Here we used Go-template to tell Helm that will take the message from the values.yaml or else use the default value "Hello world!".
Now let's configure some custom message in values.yaml adding the following yaml to the bottom:
#...
nginx:
  message: "Foo!"
The last change in templates files is to add the new ConfigMap to our Deployment. For doing that we will open deployment.yaml and configure template property:
#...
template:
    #...
      containers:
      #...
          volumeMounts:
          - name: config-vol
            mountPath: /etc/nginx/
      volumes:
        - name: config-vol
          configMap:
            name: nginx-config
            items:
              - key: nginx.conf
                path: nginx.conf
#...
Keep all data as is but add a new volume under template parameter and new volumeMount under containers. This is how we tell Kubernetes to rewrite /etc/nginx/nginx.conf file which is placed in nginx pod's file system to data from our config-map.
Time to do pre-install checks to validate changes:
root@helm-training# microk8s helm3 lint ./mychart

==> Linting ./mychart
[INFO] Chart.yaml: icon is recommended

1 chart(s) linted, 0 chart(s) failed
root@helm-training# microk8s helm3 template ./mychart

...
# Source: mychart/templates/configmap.yaml
apiVersion: v1
kind: ConfigMap
metadata:
  name: nginx-config
data:
  nginx.conf: '
events {
}
http {
   server {
       listen 80;
       location / {
         return 200 Foo!;
       }
   }
}
'
...
Notice that when we ask Helm to generate a manifest using template command it provided us new ConfigMap with a custom message value. Try to remove the value from values.yaml and run the command again and you will see the default message.
The next command will upgrade our chart and install the new version to the cluster:
root@helm-training# microk8s helm3 upgrade mychart ./mychart --description "Make nginx say Foo"

Release "mychart" has been upgraded. Happy Helming!
NAME: mychart
LAST DEPLOYED: Fri Dec 01 00:12:28 2022
NAMESPACE: default
STATUS: deployed
REVISION: 2
NOTES:
1. Get the application URL by running these commands:
  export NODE_PORT=$(kubectl get --namespace default -o jsonpath="{.spec.ports[0].nodePort}" services helm-hw)
  export NODE_IP=$(kubectl get nodes --namespace default -o jsonpath="{.items[0].status.addresses[0].address}")
  echo http://$NODE_IP:$NODE_PORT
Pay attention to some useful flags which you can add to upgrade command:--description – add a short description for applied changes --dry-run – simulate an upgrade, does no real changes in a cluster --atomic – if set, upgrade process rolls back changes made in case of failed upgrade. The --wait flag will be set automatically if --atomic is used --wait – if set and --wait enabled, will wait until all Jobs have been completed before marking the release as successful. It will wait for as long as --timeout --cleanup-on-fail – allow deletion of new resources created in this upgrade when upgrade fails --install – installs the charts if they are not already installed
Now we can go and check our new message in the browser:

Do you remember that Helm saves old revisions in secrets?
Let's check if is it true by selecting all the secrets filtered by chart name's label:
root@helm-training# microk8s kubectl get secrets -l name=mychart

NAME                            TYPE                 DATA   AGE
sh.helm.release.v1.mychart.v1   helm.sh/release.v1   1      16m
sh.helm.release.v1.mychart.v2   helm.sh/release.v1   1      5m23s
Describe the first:
root@helm-training# microk8s kubectl describe secret sh.helm.release.v1.mychart.v1

Name:         sh.helm.release.v1.mychart.v1
Namespace:    default
Labels:       modifiedAt=1669852845
              name=mychart
              owner=helm
              status=superseded
              version=1
Annotations:  <none>

Type:  helm.sh/release.v1

Data
====
release:  6476 bytes
Here you can find base64 encoded archive with chart files.
Do changes: --set attribute, changes in ConfigMaps, rollout
Another way to do some changes without file editing is using --set flag. As far as we already have a parameter for nginx response we can update its value like this:
root@helm-training# microk8s helm3 upgrade mychart ./mychart --set nginx.message="Bar!" --description "Change nginx message to Bar!"
Unfortunately, nginx can not reload its configuration automatically, so if you check you don't see a new message right now despite the fact that manifest was successfully updated.
To check the current state of the manifest use:
root@helm-training# microk8s helm3 get manifest mychart
There are several ways how to reload an application and make it work with a new config:
- This article described good practices on how to set up auto-reloading using external signals or Reloader tool. Consider these for real cases.
- If you work in a sandbox and don't care about downtime you can just delete a pod with nginx, ReplicaSet will restore it and nginx will read a new config.
- Use kubectl for rollout.
I will stick to the last approach and redeploy the pod using the power of Kubernetes, do the same and after a new pod runs you will see "Bar!" message in your browser:
root@helm-training# microk8s kubectl rollout restart deployment/helm-hw

But!
You may wonder if there is any Helm-based approach to restarting pods after an upgrade.
And the answer is yes!
In Helm 2 was a flag --recreate-pods but it was kind of imperative, it worked as deleting all the pods and led to downtime, so it was marked deprecated in Helm 3.
Helm 3 came up with a solution based on checksums and it is recommended way to support auto-reloading. But it is not a topic of this guide, so I will use classical rollout.
Rollback changes: history, rollback, how to work with revisions
To show chart's history use:
root@helm-training# microk8s helm3 hist mychart

REVISION UPDATED                 STATUS    CHART        APP VERSION DESCRIPTION
1       Wed Dec 01 00:00:59 2022 superseded mychart-0.1.0 1.0        Install complete
2       Wed Dec 01 00:12:28 2022 superseded mychart-0.1.0 1.0        Make nginx say Foo
3       Wed Dec 01 00:20:24 2022 deployed  mychart-0.1.0 1.0        Change nginx message to Bar!
The command history (or hist alias) displays a list of revisions for a specific chart, so you can see both of our updates here. You can find descriptions which were added in upgrade command usages are pretty useful, so don't hesitate to add a description when doing changes.
If you use hist command with -h flag you will see in the annotation that the default maximum of revisions that will be included in history is 256, but does it mean that Helm keeps 256 revisions archived? The answer is No!
Let's check it with the next command:
root@helm-training# microk8s helm3 env | grep HELM_MAX_HISTORY
HELM_MAX_HISTORY="10"
Helm has some properties configured in environment variables including max history property. If it is not set it would be 10 – the value is hardcoded, if you set it to 0 Helm would keep an unlimited amount of revisions.
Except for the description, you may be interested in other instruments to check particular revision, to make sure that it contains what you want, before doing a rollback. For that purpose Helm provides us the ability to check the chart's manifests for specific revision:
root@helm-training# microk8s helm3 get manifest mychart --revision 2

...
# Source: mychart/templates/configmap.yaml
apiVersion: v1
kind: ConfigMap
metadata:
  name: nginx-config
data:
  nginx.conf: '
events {
}
http {
   server {
       listen 80;
       location / {
         return 200 Foo!;
       }
   }
}
'
...
Here we can see that in 2nd revision nginx responded with "Foo" message.
Another useful tip: use NOTES.txt file to add release notes. Helm has a command to show notes for specific revision and the syntax is almost the same:
root@helm-training# microk8s helm3 get notes mychart --revision 2
It does not show anything interesting right now because we didn't add notes, but feel free to use it for your purposes.
And finally, when we are sure that we want to rollback to revision 2 we should execute a command:
root@helm-training# microk8s helm3 rollback mychart 2

Rollback was a success! Happy Helming!
The rollback command will restore a previous version of a chart from the specific secret and redeploy it to the cluster. Pay attention that rollback command has --recreate-pods optional flag to restart a pod imperatively in opposed to upgrade command.
Rollback also creates a new line in history with an automatically generated description:
root@helm-training# microk8s helm3 hist mychart

REVISION UPDATED                 STATUS    CHART        APP VERSION DESCRIPTION
1       Wed Dec 01 00:00:59 2022 superseded mychart-0.1.0 1.0        Install complete
2       Wed Dec 01 00:12:28 2022 superseded mychart-0.1.0 1.0        Make nginx say Foo
3       Wed Dec 01 00:20:24 2022 superseded mychart-0.1.0 1.0        Change nginx message to Bar!
4       Wed Dec 01 00:22:31 2022 deployed  mychart-0.1.0 1.0        Rollback to 2
Then if you roll back to revision 4 it will be the same as if you roll back to revision 2.
Prepare to distribution: package command
Helm has a special command to package your chart in a tar archive. If you want to distribute your charts to consumers or work with third-party charts, this is the most popular format for a chart.
root@helm-training# microk8s helm3 package ./mychart
Successfully packaged chart and saved it to: /home/helm-training/mychart-0.1.0.tgz
Helm uses Chart.yaml file to build a package's name, so your path must contain it. By default, it will look like name-version.tgz.
To install chart from archive use:
microk8s helm3 install mychart mychart-0.1.0.tgz
Repositories: local, external, registries
If we talk about installing and downloading packages, we mean that there is some repository with charts. The most popular hub of repositories and charts for now is ArtifactHub (previously HelmHub).
It is good practice to work with charts like code: store them locally (or in a local repository) and update them carefully through a testing procedure. Operating with a remote repository only can lead to errors related to unwanted changes in new versions.
If you're wondering how to create your local repository, in some obsolete guidelines you may find a keyword for serve. It was a local chart repository installed on your machine for development purposes. But it was marked deprecated, and this is what the official documentation says:
It didn't receive much uptake as a development tool and had numerous issues with its design. In the end, we decided to remove it and split it out as a plugin.
For a similar experience to helmserve, have a look at the local filesystem storage option in ChartMuseum and the servecm plugin.
Helm documentation also provides guides on how to host your own repository based on existing solutions like JFrog, Google Cloud Storage, Cloudsmith, etc.
If you don't want to use plugins for local repository you can run a http-server locally.
A quick example based on dockerized nginx in four steps:
Step 1. Create a new folder, let's call it /charts, and put packaged charts there.
Step 2. Init it as repo using. It will create /charts/index.yaml - a file containing data about charts in the current directory.
microk8s helm3 repo init
Step 3. Run docker in a new terminal with nginx image with mounting /charts to /nginx/html.
docker run -it -p 80:80 -v ~/helm-training/charts/:/usr/share/nginx/html nginx
Step 4. Add localhost as external repo and work with it while the container is running.
microk8s helm3 repo add local http://localhost
It is also good to mention that Amazon, Azure, Google and IBM supports OCI-based registry solutions to manage charts. A Helm repository is a way to house and distribute packaged Helm charts. An OCI-based registry can contain zero or more Helm repositories and each of those repositories can contain zero or more packaged Helm charts. Click here to read more.
Install chart from an external repository
Like an example of a 3rd party chart, let’s choose a kube-ops-view tool. It is a simple monitoring tool for your Kubernetes cluster, it has a primitive UI that allows you to see pods installed, resource consumption for each node, etc.
Let's search on ArtifactHub for kube-ops-view tool, choose the repository and add it to our repo list.
Or alternatively, we can use Helm's tool for a console search:
root@helm-training# microk8s helm3 search hub kube-ops-view

URL                                               CHART VERSION APP VERSION DESCRIPTION
https://artifacthub.io/packages/helm/geek-cookb... 1.2.2        20.4.0     A read-only system dashboard for multiple K8s c...
https://artifacthub.io/packages/helm/christiank... 1.1.9        20.4.0     A Helm chart for bootstrapping kube-ops-view.
https://artifacthub.io/packages/helm/fluent-ope... 0.1.2        20.4       A Helm chart kubeops, a read only kubernetes da...
Add the repo to our config:
root@helm-training# microk8s helm3 repo add kube-ops-repo https://christianknell.github.io/helm-charts

"kube-ops-repo" has been added to your repositories
Ask Helm to show a list of added repositories:
root@helm-training# microk8s helm3 repo list

NAME         URL
kube-ops-repo https://christianknell.github.io/helm-charts
Update the repo to get recent updates:
root@helm-training# microk8s helm3 repo update

Hang tight while we grab the latest from your chart repositories...
...Successfully got an update from the "kube-ops-repo" chart repository

Update Complete. ⎈Happy Helming!⎈
Repo added, let's install kube-ops-view chart:
root@helm-training# microk8s helm3 install kube-ops-view kube-ops-repo/kube-ops-view

NAME: kube-ops-view
LAST DEPLOYED: Wed Dec 01 00:45:06 2022
NAMESPACE: default
STATUS: deployed
REVISION: 1
TEST SUITE: None
When the chart is installed it creates a service called kube-ops-view inside your cluster. I will use port-forward command to access the service through a browser:
root@helm-training# microk8s kubectl port-forward service/kube-ops-view 8801:80

Forwarding from 127.0.0.1:8801 -> 8080
Forwarding from [::1]:8801 -> 8080
Handling connection for 8801
Let's go to a browser to see the result:

EXTRA: What was not covered?
Here I want to mention several good-to-know things that were not described in the article, but all of them are quite utilitarian and may be extremely helpful in real-life cases.
You can develop your own starter
Remember the create command? It generates some chart's structure. What if you need some specific structure with predefined templates, values, etc?
Right! Helm supports custom starters for this purpose.
In a few words, you create a custom structure and use it with --starter flag in addition to create command.
You can configure dependencies between charts and create Library Charts
There are two chart types: application and library. Application is the default type and it is the standard chart which can be operated on fully. The library chart provides utilities, functions, or another common configs for keeping charts DRY. Library charts can't be installed as application.
We can add library or application charts one to another as a dependency.
Dependencies can be configured in Chart.yaml like a list of chart in yaml notation:
# Chart.yaml dependencies:
- name: nginx
  version: "1.2.3"
  repository: "https://example.com/charts"
- name: memcached
  version: "3.2.1"
  repository: "https://another.example.com/charts"
Helm supports a batch of commands to work with dependencies:
-
helm dependency build helm dependency listhelm dependency update
You can use hooks to run one pods before another
Hooks allow us to order starting manifests in a Kubernetes cluster.
If you need to run one abstraction before another, do some pre-install, pre-delete, post-upgrade, and other steps, you can use hooks.
Think about it when you need to install a test DB before running a service, or clear a cache after an update.
Hooks are represented by classic Kubernetes abstractions like job or pod.
You are free to configure more than one hook to the same stage (for example, post-install), in that case, hooks will be sorted by hook-weight (from lower to higher).
Hooks can also be configured for deletion after successful or failed execution according to hook-deletion-policies.
Sources
Helm docs
Helm GitHub
Slurm.io: kubernetes for developers
Blogs and articles:
link, link, link, link, link
and other mentioned in the text.