

 800+ IT
News
als RSS Feed abonnieren
800+ IT
News
als RSS Feed abonnieren📚 Using Python to Interact With Excel (PLAXIS Input)
💡 Newskategorie: AI Nachrichten
🔗 Quelle: towardsdatascience.com
PLAXIS AUTOMATION SERIES
Step-by-step guide toward automation

We all love user-friendly interfaces. PLAXIS Input app is certainly a good example of such an interface. With little training, beginners can easily create a pad footing model.
Though, it is very common to use mouse to perform actions in PLAXIS Input which can be a tedious process if we are working on a complex model. There are three limitations in the current input interface:
- Bulk geometry input is time-consuming. Although array option is available, it is limited to elements with the same geometry.
- When conducting parametric study on the design, we often need to redraw the geometry which is inefficient.
- Naming of each element needs to be done manually. Naming could be really useful for staging if we have complex models.
This tutorial aims to extend the lesson learnt from the 1st tutorial. We will use Excel as an interface to input geometry and material properties and create plate elements in PLAXIS.
- Read values from Excel using Pandas
- Input geometry with Excel and create plate element
- Input material properties with Excel and assign material
As before, this tutorial requires the readers have VS Code and PLAXIS environment installed. Follow the instructions from the article below if you’re new to this page.
Start Using Python to Automate PLAXIS
Also, we will also need pandas installed to the PLAXIS environment. Follow the instructions below to install external modules if you haven’t done so.
PLAXIS Output Visualisation Using Python
Excel Input Interface
The ultimate goal of this tutorial is to extract values from an Excel input template and use them to create structural elements in PLAXIS. Therefore, it is important to define the input interface.
We will create an empty excel spreadsheet, call it “Input_param”. The interface contains three worksheets:
- Geometry
- Plates
- PlateMatName

when you create the worksheets, ensure they follow the same names as shown above as the naming is case-sensitive.
Geometry
The purpose of the “Geometry” worksheet is to define the coordinates of the structural elements. The values will be used in the “Plates” worksheet in the next section. It includes four columns as shown below:
- Dist: define the name of x coordinate for specific structural element. For example, “LDWall” defines the x coordinate of left diaphragm wall .
- X value: assign the actual x coordinates to the corresponding “Dist”. For example, we assigned -5 m to “LDWall” which means the left diaphragm wall will start at x = -5 m.
- RL: define the name of y coordinate for a specific structural element. Similar to “LDWall”, “DWallTop” defines the y coordinate of the top of diaphragm wall.
Y value: assign the actual y coordinates to the corresponding “RL”. Similar concept as “X value”.
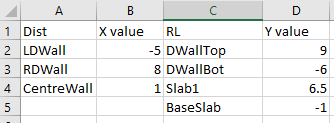
These coordinate definitions will then be used in the “Plates” worksheet.
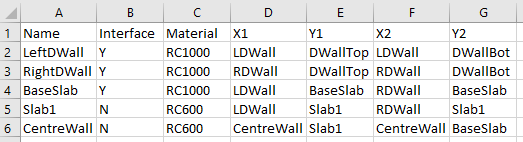
Plates
The purpose of this worksheet is to design the properties of multiple plate elements, including:
- Names: as appear in PLAXIS (any name without space, replace space with underline)
- Interface: decide if positive and negative interfaces should be created for the element or not (Y/N)
- Material: decide what material should be assigned to the specific plate (any name without space, replace space with underline)
X1, Y1, X2 & Y2: Since plate in PLAXIS 2D is a line, it requires coordinates of two points. Last four columns are to specify the coordinates using the definitions from the previous sections.
Once this worksheet is created, we can move to the last worksheet “PlateMatName”.
PlateMatName
This worksheet aims to define the material properties we specify in the previous section. It should be noted that the name entered here needs to be exactly the same as the names given in the “Plates” worksheet.
There are five inputs for the plate properties:
- EA (kN/m)
- EI (kNm²/m)
- Unit weight, w (kN/m/m)
- Poisson ratio, v (nu) (-)
- Prevent punching (Y/N)

These are typical material properties for PLAXIS 2D, just to ensure all input properties are in the correct unit.
The values used in this example aim to create an excavation model. Make sure you have created the excel spreadsheet with the worksheets and values as outlined above.
Once the input file is created, we are ready to move to the next step.
Step 1: Read Values from Excel Using Pandas
The main goal of Step 1 is to extract the coordinates definition from the “Geometry” worksheet and store values as dictionary for later stage.
First, we create an empty python file and call it “excel_geometry.py”.
Import Modules and Start Server
Similar to previous tutorial, we will start off by importing relevant modules and start server.
from plxscripting.easy import *
import subprocess, time
import pandas as pd
import openpyxl

###############################################
PLAXIS_PATH = r'C:\Program Files\Bentley\Geotechnical\PLAXIS 2D CONNECT Edition V22\\Plaxis2DXInput.exe'  # Specify PLAXIS path on server.
PORT_i = 10000  # Define a port number.
PORT_o = 10001
PASSWORD = 'SxDBR<TYKRAX834~'  # Define a password.
subprocess.Popen([PLAXIS_PATH, f'--AppServerPassword={PASSWORD}', f'--AppServerPort={PORT_i}'], shell=False)  # Start the PLAXIS remote scripting service.
time.sleep(5)  # Wait for PLAXIS to boot before sending commands to the scripting service.

# Start the scripting server.
s_i, g_i = new_server('localhost', PORT_i, password=PASSWORD)
s_o, g_o = new_server('localhost', PORT_o, password=PASSWORD)

s_i.new()

g_i.gotostructures()
Read Excel File
File location: C:\Users\phtsang\Desktop\PLAXIS_V22\Python_automation
File name: spreadsheet we created earlier which is “Input_param.xlsx”
Since we want to extract values from “Geometry”, we will use “pd.read_excel()” and specify the worksheet we want to read using “sheet_name”.
source=r"C:\Users\phtsang\Desktop\PLAXIS_V22\Python_automation"
file="Input_param"+".xlsx"
geomsheet="Geometry"
df_geom = pd.read_excel(file, sheet_name = geomsheet,engine="openpyxl")
Detailed explanation of dictionary and dataframe can be found in this article:
Goodbye Boring PLAXIS Output with Python
Read Coordinate Definition
Here, I will demonstrate the first approach to read values from dataframe (think of it as an excel table). Below is the table of the “Geometry “ worksheet.
Let’s say we would like to extract columns A and B and stores as dictionary with “X value” as heading. It can be done with the following steps:
- First, we need to locate the columns we want using command ‘df_geom.columns[]’. For example, ‘df_geom.columns[0]’ gives the first column name “Dist”. Do the same for column “X value”.
- Next step is to extract all rows under the specified column names. This is done using a double squared bracket command in pandas: ‘df_geom[[df_geom.columns[0], df_geom.columns[0]]]’
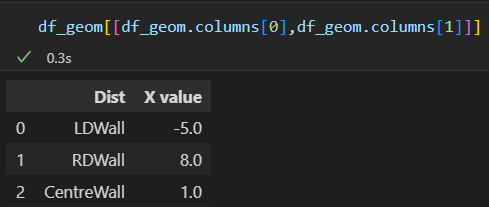
- Since we only want to include “X value” in the dictionary, we will set “Dist” as index.
set_index(df_geom.columns[0])
- Finally, we use the pandas command ‘to_dict()’ to convert the dataframe to dictionary.
After combining the code, it should look like:
geom=[]
for i in range(2):
    geom1=df_geom[[df_geom.columns[i*2],df_geom.columns[i*2+1]]].set_index(df_geom.columns[i*2]).to_dict()
    geom.append(geom1)
The output of geom list looks like:
[{'X value': {'LDWall': -5.0, 'RDWall': 8.0, 'CentreWall': 1.0}}, {'Y value': {'DWallTop': 9.0, 'DWallBot': -6.0, 'Slab1': 6.5, 'BaseSlab': -1.0}}]By creating a dictionary, it allows us to assign values by names easily. For example, I can assign -5 to a point with the following code. This is specifically useful when conducting parametric study as we can intuitively know which coordinates to change.
geom[0]['X value']['LDWall']
Now that we have stored the coordinates, we can then use these values to create structural elements.
Step 2: Input Geometry with Excel and Create Plate Element
In Step 2, we will extract the values from the “Plates” worksheet and create plate elements accordingly.
Generally, the steps are similar to 1st tutorial except this time we need to create elements based on the information provided in the input table. It involves the following actions:
- Find unique material names and create empty material
- Loop through the number of elements from the table
- Create plate using the user-input name and coordinate definition
- Check interface requirement (Y/N) and create positive and negative interfaces if required. Give them an appropriate name.
- Assign material according to the “Material” column from the table
The information involved in the input table is shown below. We will need this to reference our code.
- First, we need to extract values from “Plates” worksheet and stores as “df_plate”.
#Plates:
platesheet="Plates"
df_plate = pd.read_excel(file, sheet_name = platesheet,engine="openpyxl")
- Then, we need to read the values from “Material” column and find the unique material (i.e. RC1000 and RC600). To read values from specific cells, we can use pandas command ‘df_plate.iloc[row, column]’. It follows the same rule list data type in which indexes should be used.
- For example, if we want to get “RightDWall” and “BaseSlab” from the table. We can use ‘df_plate.iloc[1,0]’ and ‘df_plate.iloc[2,0]’. It should be noted that the first row (heading) is skipped when using iloc. If we want to get all rows, we can write ‘df_plate.iloc[:,0]’.
- After that, ‘dict.fromkeys()’ can be used to find the unique values. Combine the code we have.
material=list(dict.fromkeys(df_plate.iloc[:,2].to_list()))
- We can then create empty material with the material name given above. After that, we store the material as objects to ‘platematerials’.
for i in range(len(material)):
    g_i.platemat('Identification',material[i])

platematerials = [mat for mat in g_i.Materials[:] if mat.TypeName.value == 'PlateMat']
- Next step is to loop through all the input elements from the table.
for i in range(df_plate.count()[0])
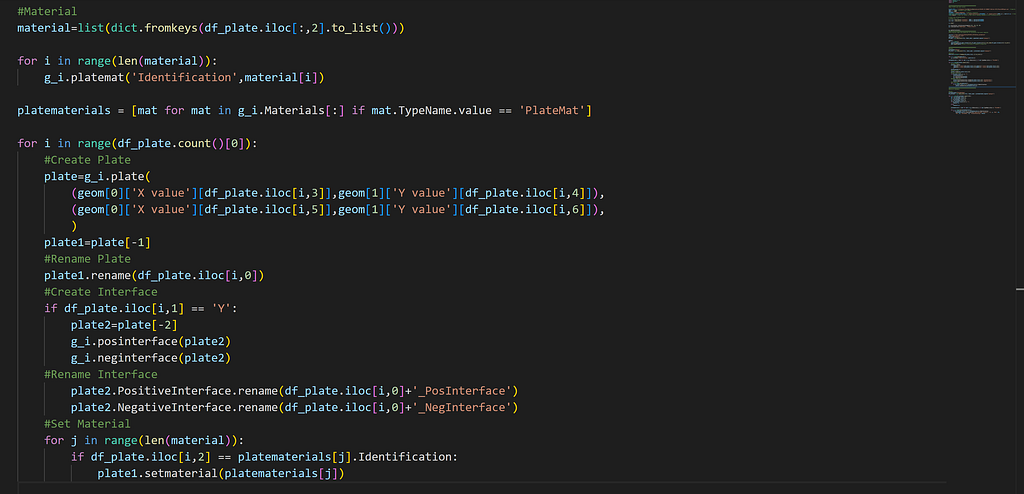
- We need to create plate using the user-input values with ‘g_i.plate((X1,Y1),(X2,Y2))’. See below two examples of using iloc to extract specific cell values.
geom[0][‘X value’][df_plate.iloc[0,3]] locates D2 from the table and hence gives -5 (our definition of LDWall)
geom[1][‘X value’][df_plate.iloc[0,4]] locates E2 from the table and hence gives 9 (our definition of DWallTop)
Using this logic, we can create the two points of the plate element.
#Create Plate
plate=g_i.plate(
    (geom[0]['X value'][df_plate.iloc[i,3]],geom[1]['Y value'][df_plate.iloc[i,4]]),
    (geom[0]['X value'][df_plate.iloc[i,5]],geom[1]['Y value'][df_plate.iloc[i,6]]),
    )
- We then change the name of the plate according to the “Name” column.
plate1=plate[-1]
plate1.rename(df_plate.iloc[i,0])
- Use if statement to check if interface is required. If ‘Y’, use ‘g_i.posinterface(plate)’ and ‘g_i.neginterface(plate)’ to create interfaces.
if df_plate.iloc[i,1] == 'Y':
    plate2=plate[-2]
    g_i.posinterface(plate2)
    g_i.neginterface(plate2)
- Then, I use the PLAXIS command ‘rename()’ to name the interfaces such that I have “LeftDWall_PosInterface”. Having a specific name for each element is particularly useful for staging.
plate2.PositiveInterface.rename(df_plate.iloc[i,0]+'_PosInterface')
        plate2.NegativeInterface.rename(df_plate.iloc[i,0]+'_NegInterface')
- Last step is to set material to the plates according to the “Material” column. Remember we have stored the empty material “RC1000” and “RC600” as objects in ‘platematerials’. We will need to use if to check the material name provided in the table. If the name of the material matches the existing material object, assign that material to the plate using ‘plate.setmaterial()’.
for j in range(len(material)):
     if df_plate.iloc[i,2] == platematerials[j].Identification:
            plate1.setmaterial(platematerials[j])
The final script should be as follow:
#Plates:
platesheet="Plates"
df_plate = pd.read_excel(file, sheet_name = platesheet,engine="openpyxl")

#Material
material=list(dict.fromkeys(df_plate.iloc[:,2].to_list()))

for i in range(len(material)):
    g_i.platemat('Identification',material[i])

platematerials = [mat for mat in g_i.Materials[:] if mat.TypeName.value == 'PlateMat']

for i in range(df_plate.count()[0]):
    #Create Plate
    plate=g_i.plate(
        (geom[0]['X value'][df_plate.iloc[i,3]],geom[1]['Y value'][df_plate.iloc[i,4]]),
        (geom[0]['X value'][df_plate.iloc[i,5]],geom[1]['Y value'][df_plate.iloc[i,6]]),
        )
    plate1=plate[-1]
    #Rename Plate
    plate1.rename(df_plate.iloc[i,0])
    #Create Interface
    if df_plate.iloc[i,1] == 'Y':
        plate2=plate[-2]
        g_i.posinterface(plate2)
        g_i.neginterface(plate2)
    #Rename Interface
        plate2.PositiveInterface.rename(df_plate.iloc[i,0]+'_PosInterface')
        plate2.NegativeInterface.rename(df_plate.iloc[i,0]+'_NegInterface')
    #Set Material
    for j in range(len(material)):
        if df_plate.iloc[i,2] == platematerials[j].Identification:
            plate1.setmaterial(platematerials[j])
Once the plate elements are created, we can then define our material properties.
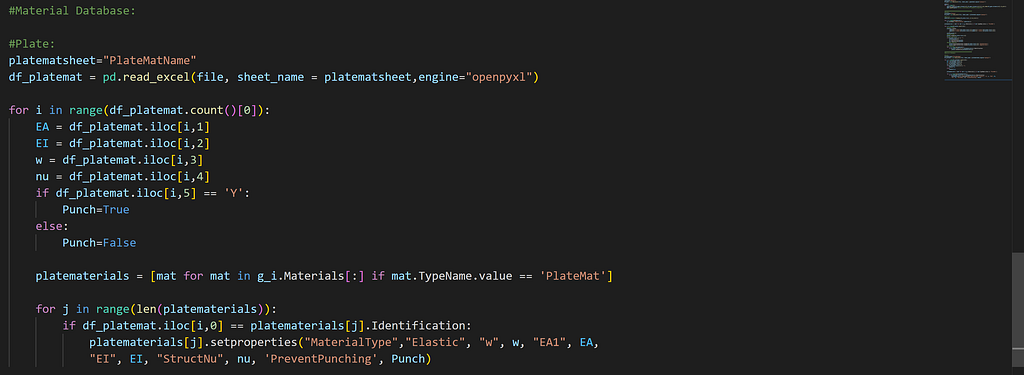
Step 3: Input Material Properties with Excel and Assign Material
In Step 3, we aim to extract the material properties from “PlateMatName” worksheet and assign these properties to the material object (i.e. “RC1000” and “RC600”) we created in the previous section.
The information involved in the input table is shown below.
- Similar to the previous step, we first read the values from “PlateMatName” and store them as dataframe.
platematsheet="PlateMatName"
df_platemat = pd.read_excel(file, sheet_name = platematsheet,engine="openpyxl")
- As mentioned under “Excel Input Interface”, there are five inputs for plate properties: EA (kN/m), EI (kNm²/m), Unit weight, w (kN/m/m), Poisson ratio, v (nu) (-) and Prevent punching (Y/N).
- We will loop through the rows in the table and use iloc to find each value and assign them to corresponding variables.
for i in range(df_platemat.count()[0]):
   EA = df_platemat.iloc[i,1]
   EI = df_platemat.iloc[i,2]
   w = df_platemat.iloc[i,3]
   nu = df_platemat.iloc[i,4]
   if df_platemat.iloc[i,5] == 'Y':
       Punch=True
   else:
       Punch=False
- We then check the “Name” column. If it matches the name of the material object in PLAXIS, we assign the properties to that object.
platematerials = [mat for mat in g_i.Materials[:] if mat.TypeName.value == 'PlateMat']

for j in range(len(platematerials)):
    if df_platemat.iloc[i,0] == platematerials[j].Identification:
        platematerials[j].setproperties("MaterialType","Elastic", "w", w, "EA1", EA,
        "EI", EI, "StructNu", nu, 'PreventPunching', Punch)
- Finally, use PLAXIS command ‘setproperties()’ to set material properties.
platematerials[j].setproperties("MaterialType","Elastic", "w", w, "EA1", EA, "EI", EI, "StructNu", nu, 'PreventPunching', Punch)The final script is shown below:
platematsheet="PlateMatName"
df_platemat = pd.read_excel(file, sheet_name = platematsheet,engine="openpyxl")

for i in range(df_platemat.count()[0]):
    EA = df_platemat.iloc[i,1]
    EI = df_platemat.iloc[i,2]
    w = df_platemat.iloc[i,3]
    nu = df_platemat.iloc[i,4]
    if df_platemat.iloc[i,5] == 'Y':
        Punch=True
    else:
        Punch=False

    platematerials = [mat for mat in g_i.Materials[:] if mat.TypeName.value == 'PlateMat']

    for j in range(len(platematerials)):
        if df_platemat.iloc[i,0] == platematerials[j].Identification:
            platematerials[j].setproperties("MaterialType","Elastic", "w", w, "EA1", EA,
            "EI", EI, "StructNu", nu, 'PreventPunching', Punch)
Run the script with the following.
(PLAXIS) C:\Users\phtsang\Desktop\PLAXIS_V22\Python_automation>python excel_geometry.py
You should see the following is created in PLAXIS 2D. As you see in the Model explorer, all plates we created have the names we specify in the input table.
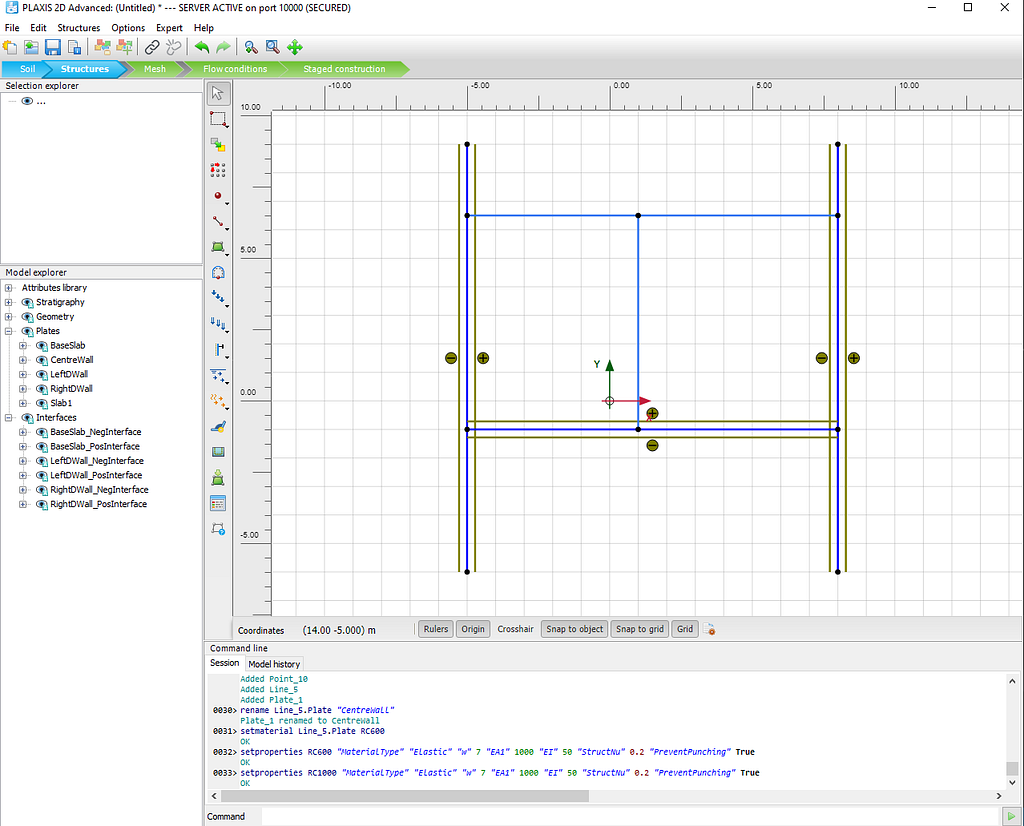
In terms of material, RC1000 and RC600 have been created with the properties we specified in the table.
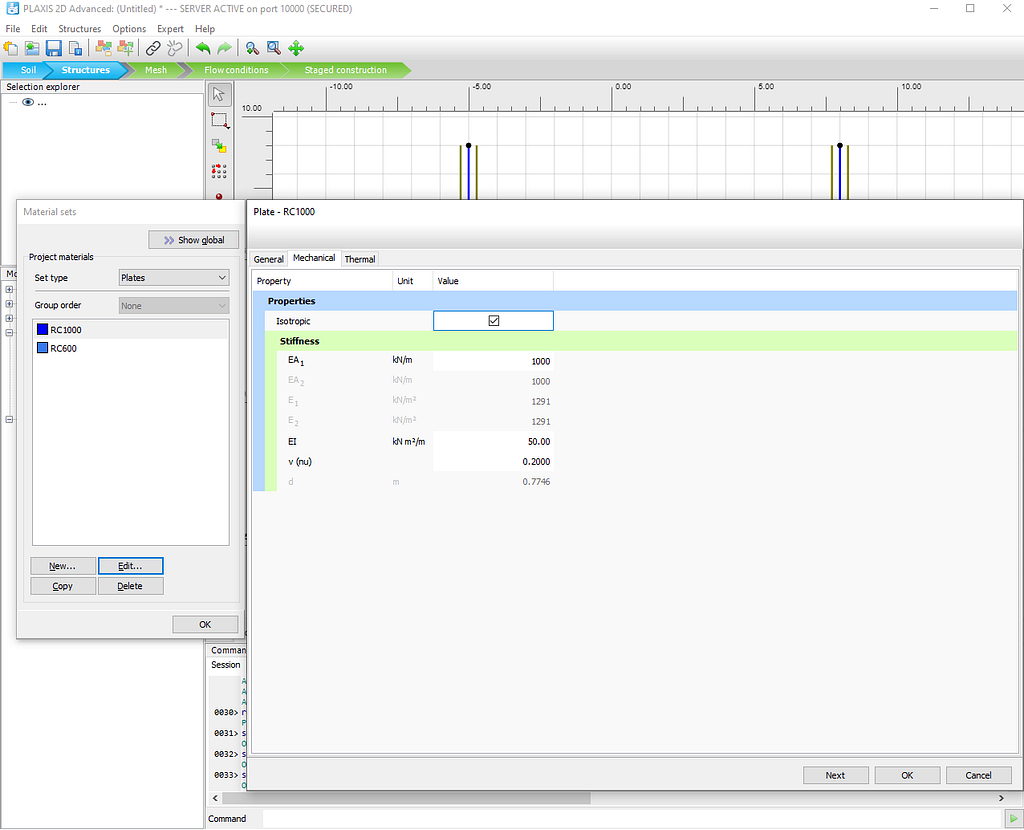
Wonderful! We have just created a user interface for PLAXIS 2D.
Conclusion
That’s all for the fourth tutorial on interacting with Excel using Python. After this tutorial, you should be able to obtain inputs from excel and create multiple structural elements, as well as assign material properties in PLAXIS.
If you enjoy reading this type of content, feel free to follow my page. I will keep posting this series of tutorials on automating PLAXIS with Python. Apart from that, I’m also keen to share knowledge on how to use Python to automate workflow in engineering.
Using Python to Interact With Excel (PLAXIS Input) was originally published in Towards Data Science on Medium, where people are continuing the conversation by highlighting and responding to this story.
...