

 800+ IT
News
als RSS Feed abonnieren
800+ IT
News
als RSS Feed abonnieren📚 Integrate Stripe Payments with Django By Building a Digital Products Selling App
💡 Newskategorie: Programmierung
🔗 Quelle: dev.to
One of the great features of online selling is being able to process payments online. With the ever-growing online businesses, having a good payment processing system is necessary. Online selling has a lot of advantages among which are; low start-up and operating costs, high flexibility, a wide selection of available products, and improved customer experience.
In this tutorial, you will learn how to integrate Stripe to accept one-time payments for your digital products through a Django app. A digital product can be a book, for example, to which the buyer will be given access after completing the payment.
Stripe is a suite of APIs powering online payment processing and commerce solutions for internet businesses of all sizes. It is one of the most widely used tools for handling payments due to its ease of integration, convenience of use, and nice documentation.
There are two ways to accept one-time payments using Stripe. These are:
- Stripe Checkout: This is a low-code payment integration that you can use to quickly integrate payments solution into your application.
- Payment Intent: This provides a more custom experience to end users by storing necessary information about the payment and linking to a Stripe customer. It handles complex payment flows as well.
This tutorial is going to focus on Stripe Checkout. We are going to build an application where you as an admin can upload your products, and your customers (end users) will be able to purchase them.
Note:- If you encounter any issues throughout the tutorial, you can check out the code in the GitHub repository.
Table of Contents
- Prerequisite
- Project Configuration
- Building the Model
- Setting Up the Views
- Stripe Configuration
- Stripe Checkout
- Payment Confirmation Using WebHook
- Give the Customer Access to the Product
- Create Payment History
- Conclusion
Prerequisite
This guide assumes that you are familiar with Django.
Project Configuration
First, create a virtual environment and activate it:
python3 -m venv .venv
source .venv/bin/activate
Next, install Django and create a new Django project:
pip install django==4.1.4
django-admin startproject config .
Run migrations:
python manage.py migrate
Create a superuser:
python manage.py createsuperuser
Run the server to ensure the installation worked correctly:
python manage.py runserver
Great, now let’s create a new app called products. This app will contain the model of the product we are selling, the views, and URL configurations that are related to it.
py manage.py startapp products
Add it to the installed apps list in the settings:
# config/settings.py

INSTALLED_APPS = [
    'django.contrib.admin',
    'django.contrib.auth',
    'django.contrib.contenttypes',
    'django.contrib.sessions',
    'django.contrib.messages',
    'django.contrib.staticfiles',

    # Local apps
    'products',
]
Building the Model
To keep it simple for the main scope of this tutorial, we are going to build a simple product model. A product can have tags. In addition, we also want to create a price model so that we can track the changing prices of a product over time. Go to the models.py file of the products app and add the following code:
# products/models.py

from django.conf import settings
from django.db import models
from django.template.defaultfilters import slugify
from django.utils.translation import gettext_lazy as _

User = settings.AUTH_USER_MODEL

def get_image_filename(instance, filename):
    name = instance.name
    slug = slugify(name)
    return f"products/{slug}-{filename}"

class ProductTag(models.Model):
    name = models.CharField(
        max_length=100, help_text=_("Designates the name of the tag.")
    )
    created_at = models.DateTimeField(auto_now_add=True)
    updated_at = models.DateTimeField(auto_now=True)

    def __str__(self) -> str:
        return self.name

class Product(models.Model):
    name = models.CharField(max_length=200)
    tags = models.ManyToManyField(ProductTag, blank=True)
    desc = models.TextField(_("Description"), blank=True)
    thumbnail = models.ImageField(upload_to=get_image_filename, blank=True)
    url = models.URLField()
    quantity = models.IntegerField(default=1)

    created_at = models.DateTimeField(auto_now_add=True)
    updated_at = models.DateTimeField(auto_now=True)

    class Meta:
        ordering = ("-created_at",)

    def __str__(self):
        return self.name

class Price(models.Model):
    product = models.ForeignKey(Product, on_delete=models.CASCADE)
    price = models.DecimalField(decimal_places=2, max_digits=10)

    created_at = models.DateTimeField(auto_now_add=True)
    updated_at = models.DateTimeField(auto_now=True)

    def __str__(self) -> str:
        return f"{self.product.name} {self.price}"
- Note that the product has a
urlfield that is going to be used to send the customer a link to the digital product you are selling (book). - The
Productmodel also contains an image field for the thumbnail so let’s go ahead and install Pillow.
pip install pillow==9.3.0
Then, let’s register the models as follows:
# products/admin.py

from django.contrib import admin

from .models import Price, Product, ProductTag

class PriceAdmin(admin.StackedInline):
    model = Price

@admin.register(Product)
class ProductAdmin(admin.ModelAdmin):
    inlines = (PriceAdmin,)

    class Meta:
        model = Product

admin.site.register(ProductTag)
admin.site.register(Price)
- The
Pricemodel is registered inline with theProductmodel so that we can add the prices of a product while creating the product inside the admin panel.
Since we are working with user-uploaded images, we need to set MEDIA_URL and MEDIA_ROOT in the settings:
# config/settings.py

MEDIA_ROOT = os.path.join(BASE_DIR, 'media')
MEDIA_URL = '/media/'
Next, configure the project's urls.py to serve user-uploaded media files during development.
# config/urls.py

from django.conf import settings
from django.conf.urls.static import static

# Media Assets
urlpatterns += static(settings.MEDIA_URL, document_root=settings.MEDIA_ROOT)
Great, let’s now test the functionality we have so far:
py mangage.py makemigrations
py manage.py migrate
py mangage.py runserver
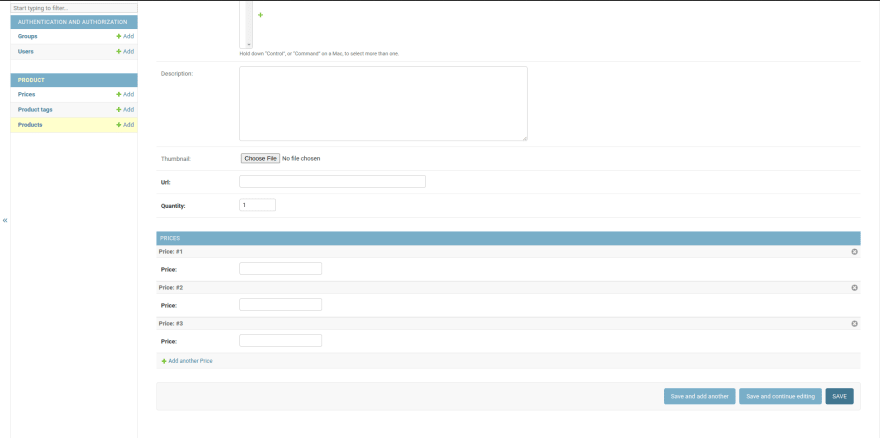
Go to the admin panel and you can now create products
Setting Up the Views
Let’s now create views and templates to list our available products and view them in detail.
# products/views.py

from django.views import View
from django.views.generic import DetailView, ListView

from .models import Price, Product

class ProductListView(ListView):
    model = Product
    context_object_name = "products"
    template_name = "products/product_list.html"

class ProductDetailView(DetailView):
    model = Product
    context_object_name = "product"
    template_name = "products/product_detail.html"

    def get_context_data(self, **kwargs):
        context = super(ProductDetailView, self).get_context_data()
        context["prices"] = Price.objects.filter(product=self.get_object())
        return context
Then, update the project’s urls.py file to include the URL configuration for products app:
# config/urls.py

from django.urls import include, path

urlpatterns = [
    #...
    path("", include("products.urls", namespace="products")),
]
Create a urls.py file inside the products app and add the URL configuration for the product list and detail views:
# products/urls.py

from django.urls import path

from .views import (
    ProductDetailView,
    ProductListView,
)

app_name = "products"

urlpatterns = [
    path("", ProductListView.as_view(), name="product-list"),
    path("<int:pk>/", ProductDetailView.as_view(), name="product-detail"),
]
Then, create a templates folder at the root of your project:
mkdir templates
Add it to the settings:
# config/settings.py

TEMPLATES = [
    {
        "DIRS": [BASE_DIR / "templates"],
        ...
    },
]
Inside the templates directory, create a file named base.html that will be used as a base template for all the other templates we are going to create. Note that we are using Bootstrap for styling.
<!DOCTYPE html>
<html lang="en">
<head>
<!-- Required meta tags -->
<meta charset="utf-8" />
<meta
name="viewport"
content="width=device-width, initial-scale=1, shrink-to-fit=no"
/>
<!-- Bootstrap CSS -->
<link
rel="stylesheet"
href="https://maxcdn.bootstrapcdn.com/bootstrap/4.0.0/css/bootstrap.min.css"
integrity="sha384-Gn5384xqQ1aoWXA+058RXPxPg6fy4IWvTNh0E263XmFcJlSAwiGgFAW/dAiS6JXm"
crossorigin="anonymous"
/>
<!--Font awesome icons -->
<link
rel="stylesheet"
href="https://use.fontawesome.com/releases/v5.8.2/css/all.css"
integrity="sha384-oS3vJWv+0UjzBfQzYUhtDYW+Pj2yciDJxpsK1OYPAYjqT085Qq/1cq5FLXAZQ7Ay"
crossorigin="anonymous"
/>
{% block script %}{% endblock %}
<title>{% block title %} {% endblock %}</title>
</head>
<body>
<div class="container p-3 my-3">
<div class="row">
<div class="col-md-12">
<!--Any flash messages pop up in any page because this is the base template-->
{% if messages %}
<div class="alert alert-dismissible" role="alert">
{% for message in messages %}
<div class="alert alert-{{ message.tags }}">{{ message }}</div>
{% endfor %}
<button
type="button"
class="close"
data-dismiss="alert"
aria-label="Close"
>
<span aria-hidden="true">×</span>
</button>
</div>
{% endif %} {% block content %}{% endblock %}
</div>
</div>
</div>
<!-- jQuery first, then Popper.js, then Bootstrap JS -->
<script
src="https://code.jquery.com/jquery-3.2.1.slim.min.js"
integrity="sha384-KJ3o2DKtIkvYIK3UENzmM7KCkRr/rE9/Qpg6aAZGJwFDMVNA/GpGFF93hXpG5KkN"
crossorigin="anonymous"
></script>
<script
src="https://cdnjs.cloudflare.com/ajax/libs/popper.js/1.12.9/umd/popper.min.js"
integrity="sha384-ApNbgh9B+Y1QKtv3Rn7W3mgPxhU9K/ScQsAP7hUibX39j7fakFPskvXusvfa0b4Q"
crossorigin="anonymous"
></script>
<script
src="https://maxcdn.bootstrapcdn.com/bootstrap/4.0.0/js/bootstrap.min.js"
integrity="sha384-JZR6Spejh4U02d8jOt6vLEHfe/JQGiRRSQQxSfFWpi1MquVdAyjUar5+76PVCmYl"
crossorigin="anonymous"
></script>
</body>
</html>
Next, create a folder named products inside the templates folder, and inside it, create 2 files named product_list.html and product_detail.html
{% comment %} templates/products/product_list.html {% endcomment %}

{% extends "base.html" %} {% block title %} Products {% endblock title%} {% block content %} {% for product in products %}
<div class="card" style="width: 18rem">
  <img
    class="card-img-top"
    src="{{product.thumbnail.url}}"
    alt="Card image cap"
  />
  <div class="card-body">
    <h5 class="card-title">{{product.name}}</h5>
    <p class="card-text">{{product.desc}}</p>
    <a
      href="{% url 'products:product-detail' product.id %}"
      class="btn btn-primary"
      >View Detail</a
    >
  </div>
</div>
{% endfor %} {% endblock content %}
{% comment %} templates/products/product_detail.html {% endcomment %}

{% extends "base.html" %}
{% block title %} Buy Product {% endblock title%}
{% block content %}
<div class="card-deck">
  {% for price in prices %}
  <div class="card">
    <img
      class="card-img-top"
      src="{{product.thumbnail.url}}"
      alt="Card image cap"
    />
    <div class="card-body">
      <h5 class="card-title">{{product.name}}</h5>
      <p class="card-text">{{product.desc}}</p>
      <div class="card-text">
        <h5 class="card-text">${{ price.price }}</h5>
        <form
          action=""
          method="POST"
        >
          {% csrf_token %}
          <button type="submit" class="btn btn-primary">Checkout</button>
        </form>
      </div>
    </div>
  </div>
  {% endfor %}
</div>
{% endblock content %}
- On the product detail page, we are looping through and displaying the different prices of the product with a checkout button attached.
- In this tutorial, the only variation for a product is its price. However, you can configure the models to include and update the structure as it seems fit to your requirements.
Go to http://localhost:8000/admin/ and create a sample product. Then go to the index page http://localhost:8000 to see the product and its detail.
Stripe Configuration
First, install the Stripe package which provides convenient access to the Stripe API from Python applications:
pip install stripe==5.0.0
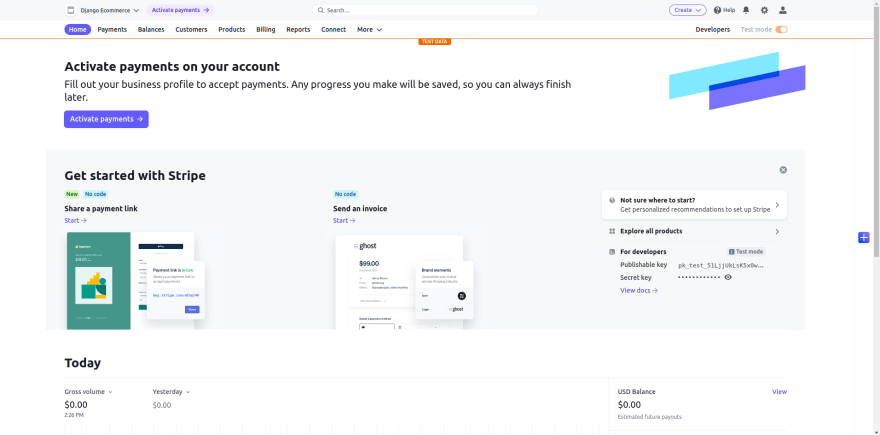
Next, log in to your Stripe account or create a new one and head over to the dashboard
Click on “Developers” then on the left sidebar click on “API keys”:
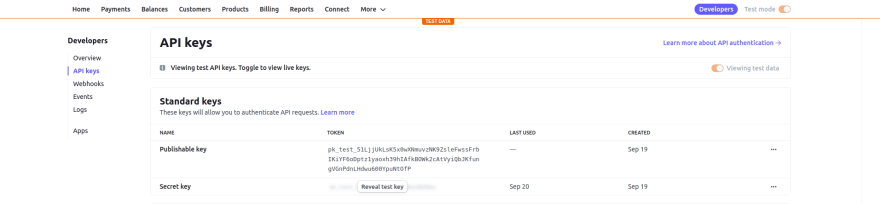
Grab the public and secret keys for use in your project. Note that you will get a different pair in production (when test mode is disabled).
Then, create a .env file at the root of your project:
touch .env
and store the keys in your environment file:
# Stripe
STRIPE_PUBLISHABLE_KEY=
STRIPE_SECRET_KEY=
In order to access these keys in the project, we need to install Python Decouple:
pip install python-decouple==3.6
Then, update the settings to include the public and secret keys you grabbed from the Stripe dashboard:
# config/settings.py

from decouple import config

# Stripe
STRIPE_PUBLISHABLE_KEY = config('STRIPE_PUBLISHABLE_KEY')
STRIPE_SECRET_KEY = config('STRIPE_SECRET_KEY')
Finally, make sure that you have set up an account name on the Stripe Dashboard https://dashboard.stripe.com/settings/account
Stripe Checkout
In this section, we are going to create a Stripe checkout session. Normally, you would want to put payment-related logic into its own app, however, for the scope of this tutorial, we will use the products app we created earlier to create the views for a Stripe checkout.
Before proceeding, let’s first understand what the flow is going to look like:
- We will create a Checkout session when the “Checkout” button is pressed.
- The Checkout Session is unique with different properties among which is a URL that redirects customers to a Stripe-hosted payment page. This is done by using Stripe’s JavaScript module.
- Customers will fill in their payment details like card number and complete the transaction.
- Customers will be redirected to a success page for successful payments and to a cancellation page for canceled payments.
- After the transaction is completed, payment is confirmed using webhook.
Head over to products/views.py and create the Stripe checkout session view as follows:
# products/views.py

import stripe
from django.conf import settings
from django.shortcuts import redirect
from django.views import View

from .models import Price

stripe.api_key = settings.STRIPE_SECRET_KEY

class CreateStripeCheckoutSessionView(View):
    """
    Create a checkout session and redirect the user to Stripe's checkout page
    """

    def post(self, request, *args, **kwargs):
        price = Price.objects.get(id=self.kwargs["pk"])

        checkout_session = stripe.checkout.Session.create(
            payment_method_types=["card"],
            line_items=[
                {
                    "price_data": {
                        "currency": "usd",
                        "unit_amount": int(price.price) * 100,
                        "product_data": {
                            "name": price.product.name,
                            "description": price.product.desc,
                            "images": [
                                f"{settings.BACKEND_DOMAIN}/{price.product.thumbnail}"
                            ],
                        },
                    },
                    "quantity": price.product.quantity,
                }
            ],
            metadata={"product_id": price.product.id},
            mode="payment",
            success_url=settings.PAYMENT_SUCCESS_URL,
            cancel_url=settings.PAYMENT_CANCEL_URL,
        )
        return redirect(checkout_session.url)
Here are a couple of things to note from the above code:
- The view will be called with a price id URL parameter.
- The view creates a new Checkout Session by calling the
stripe.checkout.Session.createmethod with the appropriate parameters. - One of the parameters is
line_items. It provides a list of items the customer is purchasing. - Stripe allows you to create product and price objects in the dashboard. However, in our case, we are managing the product and prices ourselves so we need to create the Stripe Price object inline. To do so, we used the
price_dataparameter ofline_itemsby passing in the currency, unit amount, product name, description, and image. For a list of fields and parameters, you can use, check out the doc. - The
metadataparameter defines a set of key-value pairs that you can attach to an object. You can store additional information about the object using it. We will use the metadata value later when we create a webhook handler. - We are implementing a one-time payment so we used
modewithpaymentvalue. - The success and cancel URLs define the URLs the customer will be redirected to when the transaction is completed, or canceled respectively.
Now, update the .env file to include the following environment variables:
BACKEND_DOMAIN=http://127.0.0.1:8000
PAYMENT_SUCCESS_URL=http://127.0.0.1:8000/success/
PAYMENT_CANCEL_URL=http://127.0.0.1:8000/cancel/
Then, update the settings:
# config/settings.py

BACKEND_DOMAIN = config("BACKEND_DOMAIN")
PAYMENT_SUCCESS_URL = config("PAYMENT_SUCCESS_URL")
PAYMENT_CANCEL_URL = config("PAYMENT_CANCEL_URL")
Add the URL configuration for the CreateStripeCheckoutSessionView
# products/urls.py

from django.urls import path

from .views import CreateStripeCheckoutSessionView

app_name = "products"

urlpatterns = [
    path(
        "create-checkout-session/<int:pk>/",
        CreateStripeCheckoutSessionView.as_view(),
        name="create-checkout-session",
    ),
]
Great, we now need to update the product_detail template so that the Checkout form is functional:
{% comment %} templates/products/product_detail.html {% endcomment %}

{% extends "base.html" %}
{% block title %} Buy Product {% endblock title%}
{% block script %} <script src="https://js.stripe.com/v3/"></script> {% endblock script%}
{% block content %}
<div class="card-deck">
  {% for price in prices %}
  <div class="card">
    <img
      class="card-img-top"
      src="{{product.thumbnail.url}}"
      alt="Card image cap"
    />
    <div class="card-body">
      <h5 class="card-title">{{product.name}}</h5>
      <p class="card-text">{{product.desc}}</p>
      <div class="card-text">
        <h5 class="card-text">${{ price.price }}</h5>
        <form
          action="{% url 'products:create-checkout-session' price.id %}"
          method="POST"
        >
          {% csrf_token %}
          <button type="submit" class="btn btn-primary">Checkout</button>
        </form>
      </div>
    </div>
  </div>
  {% endfor %}
</div>
{% endblock content %}
In the above code:
- We added the Stripe.js library at the top.
- We updated the form
actionattribute to send form data to theCreateStripeCheckoutSessionView
Let’s also add payment success and cancel views:
# products/views.py

from django.views.generic import TemplateView

class SuccessView(TemplateView):
    template_name = "products/success.html"

class CancelView(TemplateView):
    template_name = "products/cancel.html"
Create the templates (success.html and cancel.html) for the above 2 views inside templates/products directory.
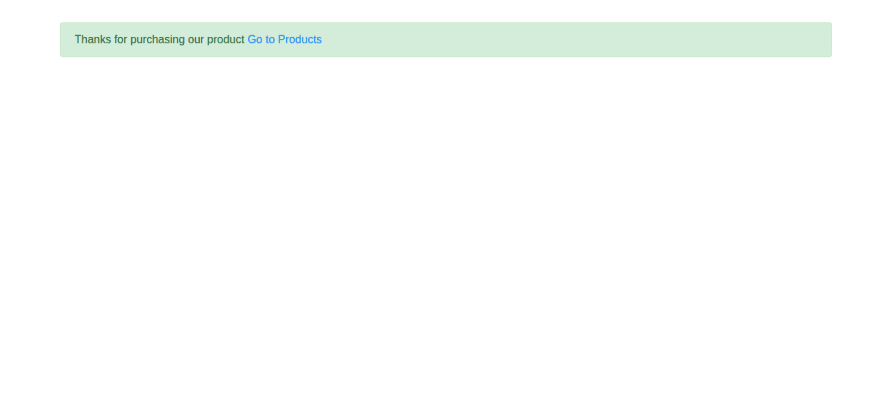
Success.html
{% comment %} templates/products/success.html {% endcomment %}

{% extends "base.html" %}
{% block title %} Success {% endblock title%}
{% block content %}
<div class="alert alert-success" role="alert">
  Thanks for purchasing our product
  <a
      href="{% url 'products:product-list' %}"
      >Go to Products</a
    >
</div>
{% endblock content %}
Cancel.html
{% comment %} templates/products/cancel.html {% endcomment %}

{% extends "base.html" %}
{% block title %} Cancel {% endblock title%}
{% block content %}
<div class="alert alert-info" role="alert">
  Forgot to add something to your cart?
  <a
      href="{% url 'products:product-list' %}"
      >Go to Products</a
    >
</div>
{% endblock content %}
Finally, configure the routes for success and cancel views:
# products/urls.py

from django.urls import path

from .views import CancelView SuccessView

app_name = "products"

urlpatterns = [
    path("success/", SuccessView.as_view(), name="success"),
    path("cancel/", CancelView.as_view(), name="cancel"),
]
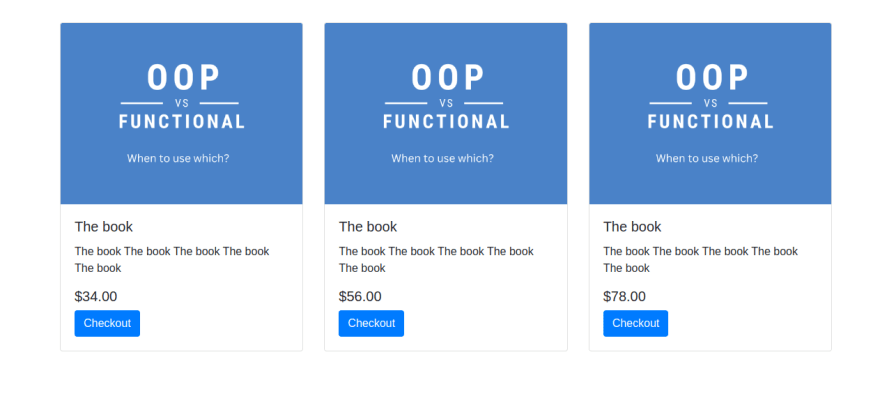
Time to test the functionality, head over to the product detail page (here I have one product with three different prices):
Then click the Checkout button on one of the products and you will get redirected to the Stripe checkout page:
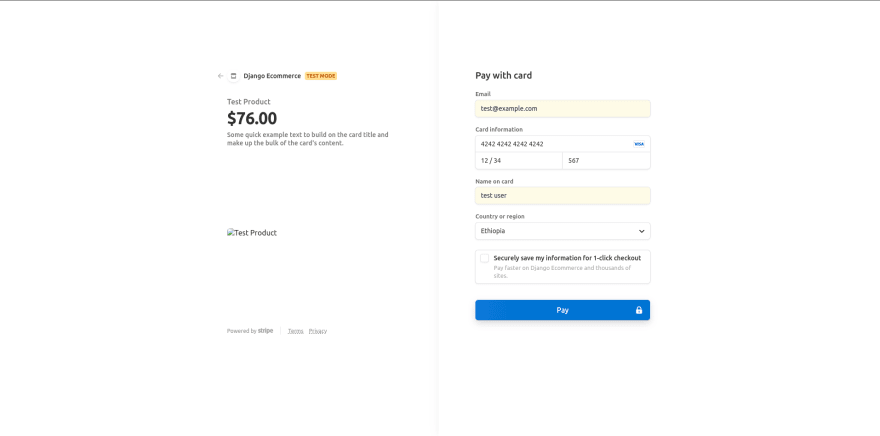
As mentioned in the docs too, use the following form fields for testing:
- For card number use
4242 4242 4242 4242 - For Date use a valid future date, such as 12/34
- Use any three-digit CVC
You can use any value you like for the other fields.
Great, after you click the Pay button, you will be redirected to the success page:
To make sure everything worked correctly, head over to https://dashboard.stripe.com/test/payments and you will see your recent payment listed:

Everything seems to be working fine now, However, even if the payment failed, the user will be redirected to the success page i.e. being redirected to the success page doesn’t guarantee a successful payment. Therefore, we need a way to ensure the process went smoothly. This is where WebHooks come into play.
Payment Confirmation Using WebHook
Stripe uses webhooks to notify your application when an event happens. Although there are a couple of events that you can handle, the event we are interested in right now is the checkout.session.completed event that occurs when a Checkout Session has been successfully completed.
First and foremost install the Stripe CLI tool for your OS.
Then, run the following command to send all Stripe events in test mode to a local webhook endpoint called /webhooks/stripe/
stripe listen --forward-to localhost:8000/webhooks/stripe/
Copy the webhook secret key generated by running the above command and paste it into the .env file found at the root of your project:
STRIPE_WEBHOOK_SECRET=
Update the settings as well:
STRIPE_WEBHOOK_SECRET = config("STRIPE_WEBHOOK_SECRET")
Great, now head over to products/views.py and create the webhook handler as an HTTP endpoint:
# products/views.py

import stripe
from django.conf import settings
from django.http import HttpResponse
from django.utils.decorators import method_decorator
from django.views import View
from django.views.decorators.csrf import csrf_exempt
from .models import Price, Product

stripe.api_key = settings.STRIPE_SECRET_KEY

@method_decorator(csrf_exempt, name="dispatch")
class StripeWebhookView(View):
    """
    Stripe webhook view to handle checkout session completed event.
    """

    def post(self, request, format=None):
        payload = request.body
        endpoint_secret = settings.STRIPE_WEBHOOK_SECRET
        sig_header = request.META["HTTP_STRIPE_SIGNATURE"]
        event = None

        try:
            event = stripe.Webhook.construct_event(payload, sig_header, endpoint_secret)
        except ValueError as e:
            # Invalid payload
            return HttpResponse(status=400)
        except stripe.error.SignatureVerificationError as e:
            # Invalid signature
            return HttpResponse(status=400)

        if event["type"] == "checkout.session.completed":
            print("Payment successful")

        # Can handle other events here.

        return HttpResponse(status=200)
- Note that we have used the
csrf_exemptdecorator to make the view exempt from the CSRF protection ensured by Django’s middleware This allows us to receive data from another domain (Stripe) even if it has no CSRF token. - Stripe can optionally sign the webhook events it sends to your endpoints by including a signature in each event’s
Stripe-Signatureheader. By adding this, we are verifying that the events were indeed sent by Stripe and not by a third party.
Add the URL configuration:
# products/urls.py

from django.urls import path

from .views import StripeWebhookView

app_name = "products"

urlpatterns = [
    path("webhooks/stripe/", StripeWebhookView.as_view(), name="stripe-webhook"),
]
- Since we have configured Stripe earlier in this section to send all events to a local endpoint named
webhooks/stripe/, make sure the name of the URL is also/webhooks/stripe/
Let's test it. Now when you make a payment, you will see the payment successful output on the console:

Give the Customer Access to the Product
We now need to give the customer access to the product he/she purchased upon successful payment. Since we are selling a digital product (book), we can do so by sending the user an email containing a link to the product.
Go to products/views.py and update the webhook as follows:
# products/views.py

import stripe
from django.conf import settings
from django.core.mail import send_mail # Add this
from django.http import HttpResponse
from django.utils.decorators import method_decorator
from django.views import View
from django.views.decorators.csrf import csrf_exempt
from .models import Price, Product

stripe.api_key = settings.STRIPE_SECRET_KEY

@method_decorator(csrf_exempt, name="dispatch")
class StripeWebhookView(View):
    """
    Stripe webhook view to handle checkout session completed event.
    """

    def post(self, request, format=None):
        payload = request.body
        endpoint_secret = settings.STRIPE_WEBHOOK_SECRET
        sig_header = request.META["HTTP_STRIPE_SIGNATURE"]
        event = None

        try:
            event = stripe.Webhook.construct_event(payload, sig_header, endpoint_secret)
        except ValueError as e:
            # Invalid payload
            return HttpResponse(status=400)
        except stripe.error.SignatureVerificationError as e:
            # Invalid signature
            return HttpResponse(status=400)

        if event["type"] == "checkout.session.completed":
            print("Payment successful")

            # Add this
            session = event["data"]["object"]
            customer_email = session["customer_details"]["email"]
            product_id = session["metadata"]["product_id"]
            product = get_object_or_404(Product, id=product_id)

            send_mail(
                subject="Here is your product",
                message=f"Thanks for your purchase. The URL is: {product.url}",
                recipient_list=[customer_email],
                from_email="your@email.com",
            )

        # Can handle other events here.

        return HttpResponse(status=200)
- Remember the
product_idwe passed asmetadatain theCreateStripeCheckoutSessionView? we are using that to get the product URL and send it to the user through his/her email.
For testing purposes, we can use the console email backend so update the settings as follows:
# config/settings.py

EMAIL_BACKEND = "django.core.mail.backends.console.EmailBackend"
Now, test the payment process again and you will get an email on your console with a link to the product.
Create Payment History
Aside from making sure the payment went smoothly, you may also want to keep a user’s payment history in your database. To do so, let’s first create a PaymentHistory model with the following fields:
# products/models.py

class PaymentHistory(models.Model):
    PENDING = "P"
    COMPLETED = "C"
    FAILED = "F"

    STATUS_CHOICES = (
        (PENDING, _("pending")),
        (COMPLETED, _("completed")),
        (FAILED, _("failed")),
    )

    email = models.EmailField(unique=True)
    product = models.ForeignKey(Product, on_delete=models.CASCADE)
    payment_status = models.CharField(
        max_length=1, choices=STATUS_CHOICES, default=PENDING
    )
    created_at = models.DateTimeField(auto_now_add=True)
    updated_at = models.DateTimeField(auto_now=True)

    def __str__(self):
        return self.product.name
Then, in the webhook view, create a payment history object upon a successful payment:
# products/views.py

from .models import PaymentHistory # Add this

@method_decorator(csrf_exempt, name="dispatch")
class StripeWebhookView(View):
    """
    Stripe webhook view to handle checkout session completed event.
    """

    def post(self, request, format=None):
        payload = request.body
        endpoint_secret = settings.STRIPE_WEBHOOK_SECRET
        sig_header = request.META["HTTP_STRIPE_SIGNATURE"]
        event = None

        try:
            event = stripe.Webhook.construct_event(payload, sig_header, endpoint_secret)
        except ValueError as e:
            # Invalid payload
            return HttpResponse(status=400)
        except stripe.error.SignatureVerificationError as e:
            # Invalid signature
            return HttpResponse(status=400)

        if event["type"] == "checkout.session.completed":
            print("Payment successful")
            session = event["data"]["object"]
            customer_email = session["customer_details"]["email"]
            product_id = session["metadata"]["product_id"]
            product = get_object_or_404(Product, id=product_id)

            send_mail(
                subject="Here is your product",
                message=f"Thanks for your purchase. The URL is: {product.url}",
                recipient_list=[customer_email],
                from_email="test@gmail.com",
            )

            PaymentHistory.objects.create(
                email=customer_email, product=product, payment_status="completed"
            ) # Add this

        # Can handle other events here.

        return HttpResponse(status=200)
Conclusion
In this tutorial, we have created a minimal product listing and checkout functionality using Stripe. Your next steps can be integrating Celery for sending emails upon successful payment, registration/login system for your customers, updating the user interface, expanding the model structure, and so on.
If you got lost somewhere throughout the guide, check out the project on GitHub
Happy coding! 🖤
...