

 800+ IT
News
als RSS Feed abonnieren
800+ IT
News
als RSS Feed abonnieren📚 Fancy 3D Image Reveal Effects with Three.js 🤩 — Great for your next portfolio
💡 Newskategorie: Programmierung
🔗 Quelle: dev.to
Note: This code was inspired by a tutorial created by Daniel Velasquez on Codrops. The tutorial, titled "Creating Grid-to-Fullscreen Animations with Three.js", explores the process of building a grid layout with interactive animations using Three.js.
If you prefer video, watch this 👇️
📔 Table of Contents
- ✨ Introduction
- 🛠️ Setting up the basic project skeleton
- 🛠️ Adding dependencies to the Codepen Project
- 📦️ Setting up the Three.js scene
- Setting up the view size
- Setting up the Plane Mesh and Materials
- 👂️ Adding event listeners to the element
- 📏 Calculating the Mesh's View Units
- Calculating the Center of the Plane Mesh
- Setting up the Shader Uniforms
- 🌈 Customizing the Reveal Effect's Color
- ↔️ Scaling and positioning the mesh
- Implementing the Fullscreen Transition
- Adding Progress Animation with Shader Uniforms and GSAP
- Vertex Shader for Left-to-Right Reveal Effect
- 🚪 Closing the Reveal Effect
- 🥳 Conclusion
✨ Introduction
Modern web design is all about creating engaging and interactive experiences for users. One popular way to achieve this is through the use of animations and special effects. In this article, we'll take a closer look at a code example that demonstrates how to create an impressive reveal effect using JavaScript, Three.js, and the GreenSock Animation Platform (GSAP).
The code example we'll be examining creates a reveal effect that is triggered when the user clicks on an image. When clicked, the image will transition into a fullscreen mode where it is enlarged and an animated transition occurs to reveal additional information about the image. This effect is achieved using a combination of Three.js, a powerful JavaScript library for creating 3D graphics in the browser, and GSAP, a popular animation library that makes it easy to create smooth, performant animations in JavaScript.
Throughout the article, we'll break down the code step-by-step and explain how it works. We'll start by looking at how the initial setup is done and how the scene, camera, and meshes are created. Next, we'll explore how the reveal effect is triggered and how the mesh is animated to reveal additional content. We'll also cover how the colors and styles of the image are modified using shader uniforms, and how the animation is smoothly transitioned back to the original state. By the end of this article, you'll have a better understanding of how to create complex, interactive animations using modern web technologies.
If you want to see the full code, you can refer to the CodePen implementation of this project. It includes all of the code, including the necessary HTML, CSS, and JavaScript, and it is readily available to view and edit. You can use this CodePen as a starting point for your own projects, or simply to learn more about how the Reveal Effect works.
🛠️ Setting up the basic project skeleton
Building the HTML and CSS scene
Before we dive into the Three.js code, we need to set up the HTML and CSS scene for our reveal effect. We'll be creating a simple layout with a container and an item, and applying CSS styles to achieve the reveal effect. In this section, we'll walk through the process of creating the HTML and CSS scene, and explain how the reveal effect is achieved through these styles.
To follow along with this tutorial, make sure you have a text editor and a web browser. Open up a new pen on CodePen, or create an HTML file on your local machine. Let's get started!
<div class="item"></div>
body {
  display: grid;
  width: 100%;
  overflow: hidden;
  margin: 0;
  padding: 0;
  height: 100vh;
  place-items: center;
}

.item {
  position: relative;
  width: 250px;
  height: 250px;
  background-color: coral;
}
The CSS code above creates a square element and centers it on the page by utilizing the CSS Grid and positioning properties.
Firstly, the CSS code sets the body to use CSS Grid with the display: grid property. Then, it sets the width of the body to 100% of the viewport width with width: 100%;. The overflow: hidden; property ensures that no content overflows beyond the body element. The margin: 0; padding: 0; properties remove any default margin and padding that may be added to the body.
Next, the height: 100vh; property sets the height of the body to 100% of the viewport height. This ensures that the square element will be centered vertically on the page.
Finally, the place-items: center; property centers the item horizontally and vertically within the body. This property is a shorthand for align-items: center; and justify-content: center;.
The CSS code also defines the .item class with a width and height of 250px, creating a square element with the specified dimensions. The position: relative; property ensures that any absolute positioning inside the .item element is relative to its own dimensions.
The background-color: coral; property sets the background color of the .item element to coral, creating a visible square element on the page.
Writing the basic JavaScript code
After that, open-up the JavaScript code tab and write a simple class. Classes are used in this code to create an object that encapsulates the logic and state of a "reveal effect" animation. The class keyword defines a blueprint for the object that contains its properties and methods.
By using classes, the code is structured in an organized and modular way, making it easier to maintain and extend in the future. The RevealEffect class contains all the relevant properties and methods for the "reveal effect" animation, keeping the code clean and easy to read. It also allows for multiple instances of the animation to be created, each with their own state and behavior.
class RevealEffect {
  constructor (container, item) {
    this.container = container
    this.item = item

    this.animating = false
    this.state = 'closed'
  }
}
This code defines a class called "RevealEffect" that is used to create an effect that reveals an item in a container. The constructor takes two parameters, container and item, and assigns them to properties of the same names on the class instance.
The class also initializes two other properties, animating and state, both set to a boolean value or string, respectively. The animating property is used to track whether the effect is currently animating, and the state property is used to track the current state of the effect, which is initially set to "closed".
It's worth noting that this code only initializes the properties of the class, and does not contain any methods or functionality for the effect itself. These would need to be added to the class definition in order for the effect to actually do something.
🛠️ Adding dependencies to the Codepen Project
In order to create our interactive 3D effect, we will be using Two.js, Three.js, and GSAP.
First, we need to add the Three.js library to our CodePen project. To do this, click on the "Settings" button at the top of the page and select "JavaScript" from the dropdown menu. In the "Add External JavaScript" section, search for "Three.js" and click the "Add Pen Dependency" button next to it.
Next, we need to add GSAP as a dependency. In the same "Add External JavaScript" section, search for "GSAP" and click the "Add Pen Dependency" button next to it.
With these libraries added, we can now begin setting up our scene and creating our interactive effect.
📦️ Setting up the Three.js scene
In order to create a 3D scene using Three.js, there are several things that need to be set up, including a renderer, a camera, and a scene. These elements are essential for rendering and displaying 3D objects in the browser. In this section, we'll go over how to set up these components and configure them to create a basic 3D scene.
class RevealEffect {
  constructor (container, item) {
    // ...

    // Setup the three.js scene
    this.scene = null
    this.camera = null
    this.renderer = null
  }

  init() {
    this.renderer = new THREE.WebGLRenderer({alpha: true, antialias: true})
    this.renderer.setPixelRatio(window.devicePixelRatio)
    this.renderer.setSize(window.innerWidth, window.innerHeight)
    this.container.appendChild(this.renderer.domElement)

    this.scene = new THREE.Scene()

    this.camera = new THREE.PerspectiveCamera(
      45,
      window.innerWidth / window.innerHeight,
      0.1,
      10000
    )

    this.camera.position.z = 50
    this.camera.lookAt = this.scene.position
  }
}

const effect = new RevealEffect(document.querySelector('#app'))
effect.init()
<div id="app"></div>
<div class="item"></div>
/* ... */

#app {
  position: absolute;
  top: 0;
  left: 0;
  z-index: -1;
}
This code defines a class called "RevealEffect" that is used to create a three.js scene and renderer, which is appended to a specified container element. The constructor takes two parameters, container and item, and assigns them to properties of the same names on the class instance.
The class also initializes three additional properties, scene, camera, and renderer, all initially set to null. These will be used to hold references to the three.js scene, camera, and renderer objects once they are created.
The class defines a method called init() which creates a new WebGL renderer with alpha and antialias options, sets the pixel ratio and size of the renderer to the dimensions of the window, and appends the renderer's DOM element to the specified container element.
The alpha option is a boolean value that determines whether or not the canvas created for the WebGL context will have an alpha channel. If set to true, the canvas will have an alpha channel which allows for transparency in the WebGL scene. If set to false, the canvas will not have an alpha channel and the background color will be opaque.
The antialias option is a boolean value that determines whether or not to enable antialiasing in the WebGL context. Antialiasing is a technique used to smooth jagged lines and reduce aliasing artifacts, which can appear as visual disturbances such as jagged edges, flickering, or moiré patterns. If set to true, antialiasing will be enabled and the WebGL scene will appear smoother. If set to false, antialiasing will be disabled and the WebGL scene will appear more jagged.
The method then creates a new three.js scene and a new perspective camera, sets the camera's position and target, and assigns the camera's lookAt property to the position of the scene. This sets up the basic structure of the 3D scene.
In a 3D scene, the camera defines the perspective through which the user will view the scene. In this code, the camera's position is set to a vector that represents its position in the scene, which in this case is (0, 0, 5). This places the camera at the origin of the 3D coordinate system, which is where the X, Y, and Z axes intersect, and moves it back along the Z-axis by a distance of 5 units.
The camera's lookAt() method is then called with a vector representing the point in the scene that the camera is pointed at. In this code, the target is set to the origin of the scene, which means that the camera is pointed directly at the center of the scene.
Using lookAt() to set the camera's target causes it to automatically adjust its orientation so that it is always pointed towards the target. The result is that the camera will always be pointing directly at the center of the scene, which can be helpful in maintaining a consistent perspective as the scene is animated or modified.
Finally, the code instantiates the "RevealEffect" class with a container element specified by the ID "app", and calls its init() method, which sets up the three.js scene, camera, and renderer.
Overall, this code sets up the basic framework for a three.js 3D scene, which can then be used to create and animate 3D objects and effects.
Setting up the view size
In a web application, it's important to provide a consistent experience for users across different devices and screen sizes. One aspect of achieving this is setting up the view size of the content to fit the device screen. In this section, we will see how to set up the view size using Three.js.
We will learn how to set up the view size in both pixels and view units, and how to position the content on the screen.
class RevealEffect {
  constructor (container, item) {
    // ...

    // Setup the shader uniforms
    this.uniforms = {
      uViewSize: new THREE.Uniform(new THREE.Vector2(1, 1))
    }
  }

  init() {
    // ...

    const viewSize = this.getViewSize()
    this.uniforms.uViewSize.value.x = viewSize.width
    this.uniforms.uViewSize.value.y = viewSize.height
  }

  getViewSize() {
    const fovInRadians = (this.camera.fov * Math.PI) / 180.0
    const height = Math.abs(this.camera.position.z * Math.tan(fovInRadians / 2)) * 2

    return {width: height * this.camera.aspect, height}
  }
}
The constructor now initializes a new property called uniforms, which is an object that holds a single uniform variable for the shader, uViewSize, which is set to a new THREE.Uniform object with a Vector2 argument representing a 2D vector with x and y values both set to 1.
The class also defines a new method called getViewSize() which calculates the size of the viewport based on the camera's field of view and position. The method first converts the camera's field of view to radians, then calculates the height of the viewport based on the camera's position and the tangent of half the field of view. The method then returns an object with width and height properties calculated from the height and the camera's aspect ratio.
The method calculates the height of the viewport using the camera's field of view and position. The field of view is specified in degrees, so it first converts this value to radians by multiplying it by π/180.0. This gives us the variable fovInRadians, which represents the camera's field of view in radians.
Next, the method calculates the height of the viewport using the formula:
height = 2 * distance * tan(fov/2)
where distance is the distance from the camera to the center of the viewport, and fov is the field of view in radians. We can simplify this formula by letting h = 2 * distance * tan(fov/2). Then we can solve for distance to get:
distance = h / (2 * tan(fov/2))
Since we want the height of the viewport to be the distance from the camera to the center of the viewport times 2, we can multiply this distance by 2 to get the final value for height.
To calculate the width of the viewport, we can use the aspect ratio of the camera, which is the width of the viewport divided by the height. We can use the formula width = height * aspect to calculate the width, where height is the value we just calculated and aspect is the camera's aspect ratio.
Putting it all together, the getViewSize() method first calculates the camera's field of view in radians using the fovInRadians variable. It then calculates the height of the viewport using the formula described above, and uses this value to calculate the width of the viewport based on the camera's aspect ratio. Finally, it returns an object with the calculated width and height values.
We use the tangent function in the getViewSize() method to calculate the height of the viewport based on the camera's field of view.
The field of view is the angle, in degrees, that the camera can "see" in front of it. A higher field of view means the camera can see more of the scene in front of it, while a lower field of view means the camera can only see a smaller part of the scene. The field of view is typically specified by the user or the programmer as a parameter when the camera is created.
In order to calculate the height of the viewport, we need to use the field of view angle to determine the vertical distance between the camera and the center of the viewport. This is where the tangent function comes in.
The tangent function is a trigonometric function that relates the opposite and adjacent sides of a right triangle. In the case of the getViewSize() method, we can think of the field of view angle as the angle opposite to the height of the viewport in a right triangle, and the distance from the camera to the center of the viewport as the adjacent side. By applying the tangent function to the field of view angle, we can calculate the height of the viewport as twice the distance from the camera to the center of the viewport multiplied by the tangent of half the field of view angle.
So in short, we use the tangent function to calculate the height of the viewport based on the camera's field of view angle because it allows us to relate the angle to the distance from the camera, and thus calculate the height of the viewport.
The init() method is updated to set the uViewSize uniform value to the calculated viewport size. It retrieves the viewport size using the getViewSize() method and sets the "x" and "y" values of the uViewSize uniform to the "width" and "height" properties of the viewport size, respectively.
This code is preparing the uniforms and setting up the viewport size to be used in the shader code for this effect. This information can be used to control various aspects of the effect, such as size and position, based on the size of the viewport, allowing for dynamic adjustments to the effect depending on the size of the display.
Reminder: If you prefer video, watch this 👇️
Setting up the Plane Mesh and Materials
In a Three.js scene, a mesh is the 3D shape or model that is added to the scene, and a material determines how the mesh is colored or textured. In this section, we will set up the plane mesh and the necessary materials for our reveal effect.
const vertexShader = `
uniform vec2 uViewSize;

void main() {
  vec3 pos = position.xyz;

  gl_Position = projectionMatrix * modelViewMatrix * vec4(pos, 1.);
}`
const fragmentShader = `
void main() {
  gl_FragColor = vec4(1., 1., 1., 1.);
}`

class RevealEffect {
// ...
  init() {
    // ...

    const material = new THREE.ShaderMaterial({
      uniforms: this.uniforms,
      vertexShader,
      fragmentShader,
      side: THREE.DoubleSide
    })

    const segments = 128
    const geometry = new THREE.PlaneGeometry(1, 1, segments, segments)
    this.mesh = new THREE.Mesh(geometry, material)
    this.scene.add(this.mesh)
  }
}
This code is defining and using custom shaders to render a THREE.Mesh object in a THREE.Scene.
The vertex shader, defined in the variable vertexShader, is a program that is run on the graphics card for each vertex of the mesh. In this case, the vertex shader takes in a uniform variable uViewSize, which is a vec2 representing the size of the viewport in pixels. The position of the vertex is then transformed using the modelViewMatrix and projectionMatrix provided by Three.js, and the result is assigned to the gl_Position variable, which is a built-in variable that represents the final position of the vertex on the screen.
The fragment shader, defined in the variable fragmentShader, is a program that is run on the graphics card for each pixel of the mesh. In this case, the fragment shader simply sets the color of the pixel to white, with full opacity.
In the init() method of the RevealEffect class, a THREE.ShaderMaterial object is created with the vertex and fragment shaders, and assigned to a THREE.Mesh object. The THREE.PlaneGeometry object is also created to define the shape of the mesh. Finally, the mesh is added to the scene for rendering.
By creating custom shaders, the RevealEffect class can modify the behavior of the rendering pipeline, and create a wide range of visual effects. In this case, the shaders are used to simply render the mesh with a white color.
The current shaders, as defined in the code, are very basic because they simply render the mesh with a solid white color. However, the power of custom shaders is that they can be modified and extended to create a wide range of visual effects.
👂️ Adding event listeners to the element
In this section, we will discuss how to add event listeners to the HTML element. In the previous sections, we created a scene with a plane mesh that we will use to reveal the content of the element.
Now, we will detect when the user clicks on the element and trigger the animation that will reveal the content. We will use JavaScript to listen to the click event on the element and trigger the animation function.
class RevealEffect {
  // ...
  init() {
    // ...

    this.item.addEventListener('mousedown', () => this.onClick())
  }

  onClick() {
    this.updateMesh()
  }

  updateMesh() {

  }
}

const effect = new RevealEffect(document.querySelector('#app'), document.querySelector('.item'))
// ...
In this code, a mousedown event listener is added to the item element passed to the RevealEffect class. When the user clicks the element, the onClick method of the RevealEffect instance is called.
The onClick method, in turn, calls the updateMesh method of the RevealEffect instance. The purpose of the updateMesh method is to modify the position attribute of the vertices in the mesh to gradually reveal the content underneath, creating the 3D reveal effect.
By adding the mousedown event listener, the developer is creating an interaction that triggers the reveal effect. This interaction can be customized to suit the specific needs of the project, such as adding hover or touch events to trigger the reveal effect on different devices or with different inputs.
Finally, the RevealEffect instance is created and passed a reference to the container and item elements of the HTML document. The init method of the RevealEffect instance is then called, which sets up the WebGL renderer, camera, and scene, and adds the mesh to the scene. Once the mesh is added, it is ready to be animated with the reveal effect triggered by the mousedown event listener.
📏 Calculating the Mesh's View Units
In this section, we will look at the code responsible for calculating the dimensions and position of the Mesh in view units. This is necessary for the Mesh to scale and translate properly in relation to the camera's position and target.
updateMesh() {
    const rect = this.item.getBoundingClientRect();
    const viewSize = this.getViewSize();

    // Transform pixel units to camera's view units
    const widthViewUnit = (rect.width * viewSize.width) / window.innerWidth;
    const heightViewUnit = (rect.height * viewSize.height) / window.innerHeight;
    let xViewUnit = (rect.left * viewSize.width) / window.innerWidth;
    let yViewUnit = (rect.top * viewSize.height) / window.innerHeight;
  }
The purpose of this method is to calculate the size and position of the item in relation to the camera's view, so that we can apply a reveal effect to it.
To do this, the method first gets the size of the item element in pixels, as well as the size of the current view (i.e. the camera's view) in pixels, using the getBoundingClientRect method and the getViewSize method, respectively.
Next, the method converts the width and height of the item element from pixels to view units, which are units relative to the camera's view. This is done by multiplying the pixel width and height of the item by the ratio of the view size to the window size.
Finally, the method calculates the x and y positions of the item in view units, by multiplying the left and top positions of the item in pixels by the ratio of the view size to the window size.
After these calculations, we have the size and position of the item in view units, which we can use to apply a reveal effect to it.
Calculating the Center of the Plane Mesh
After calculating the position of the plane mesh, we now need to adjust it so that its position is relative to the center of the view, rather than the top left corner. This is important because we want the animation to start from the center of the element, rather than from the top left corner.
In this section, we'll take a closer look at the updateMesh() method and see how it adjusts the position of the mesh to make its origin the center, and not the top left corner.
updateMesh() {
    // ...

    // Make units relative to center instead of top left
    xViewUnit -= viewSize.width / 2;
    yViewUnit -= viewSize.height / 2;

    // Make the origin of the plane's position to be the center instead of the top left
    const x = xViewUnit + widthViewUnit / 2;
    const y = -yViewUnit - heightViewUnit / 2;
  }
In this part of the updateMesh method, we're adjusting the position of the plane in the three.js scene so that its origin is at the center of the element being clicked, rather than at the top left corner.
First, we subtract half of the viewSize.width and viewSize.height from the xViewUnit and yViewUnit variables respectively. This centers the position relative to the center of the screen.
Then, we calculate the new x and y values for the plane's position, where the x coordinate is shifted by half the width of the plane and the y coordinate is shifted by half the height of the plane. This centers the plane's origin at the center of the element being clicked.
By centering the plane's origin at the center of the clicked element, we can achieve a more visually pleasing reveal effect that expands from the center of the element rather than from its top left corner.
Setting up the Shader Uniforms
In this section, we will be setting up the shader uniforms, which will allow us to pass values from JavaScript to the vertex and fragment shaders. The shader uniforms are used to animate and manipulate the appearance of the mesh.
We will be creating a new instance of the THREE.Uniform object and using it to set the initial values of the mesh's position and scale. Then, we will update these values every time the mesh is resized or repositioned using the updateMesh() method.
Finally, we will pass these values to the vertex and fragment shaders using the uniforms property of the shader material.
const vertexShader = `
uniform vec2 uMeshScale;
uniform vec2 uMeshPosition;
// ...
`

class RevealEffect {
  constructor (container, item) {
    // ...

    // Setup the shader uniforms
    this.uniforms = {
      // ...
      uMeshScale: new THREE.Uniform(new THREE.Vector2(1, 1)),
      uMeshPosition: new THREE.Uniform(new THREE.Vector2(0, 0)),
    }
  }
  updateMesh() {
    // ...

    this.uniforms.uMeshPosition.value.x = x / widthViewUnit;
    this.uniforms.uMeshPosition.value.y = y / heightViewUnit;

    this.uniforms.uMeshScale.value.x = widthViewUnit;
    this.uniforms.uMeshScale.value.y = heightViewUnit;
  }
}
This code sets up two new uniform variables in the vertex shader: uMeshScale and uMeshPosition.
In the constructor of the RevealEffect class, two THREE.Uniform instances are created for each of these variables, and they are added to the uniforms object.
The updateMesh function is responsible for updating the values of the uMeshScale and uMeshPosition uniforms. The uMeshPosition value is set to the x and y coordinates of the center of the clicked element, divided by the widthViewUnit and heightViewUnit respectively. This value represents the position of the plane mesh in the x and y direction, relative to the clicked element.
The uMeshScale value is set to the widthViewUnit and heightViewUnit values, which represent the dimensions of the clicked element in the camera's view units. This value determines the size of the plane mesh.
These uniform values are used in the vertex shader to position and scale the plane mesh.
🌈 Customizing the Reveal Effect's Color
In this section, we will customize the color of the reveal effect by using a fragment shader. We will create a new uniform for the color, update it in the updateMesh() method, and pass it to the shader.
We will extract the background-color of the element being revealed and convert it to RGB values to use as the uniform color. The fragment shader takes in the color uniform and outputs it as the fragment's color, which we will use to create the reveal effect's visual.
const fragmentShader = `
uniform vec3 uColor;

void main() {
  vec3 color = uColor;
  gl_FragColor = vec4(color/255., 1.);
}`

class RevealEffect {
  constructor (container, item) {
    // ...

    // Setup the shader uniforms
    this.uniforms = {
      // ...
      uColor: new THREE.Uniform(new THREE.Vector3(20, 20, 20)),
    }
  }

  updateMesh() {
    // ...

    const styles = window.getComputedStyle(this.item);
    let color = styles.getPropertyValue('background-color');
    color = color.substring(color.indexOf('(') + 1, color.indexOf(')'));

    const rgbColors = color.split(',', 3).map((c) => parseInt(c));
    this.uniforms.uColor.value.x = rgbColors[0];
    this.uniforms.uColor.value.y = rgbColors[1];
    this.uniforms.uColor.value.z = rgbColors[2];
  }
}
This code defines the fragment shader used in the RevealEffect class. The shader program takes a uniform variable uColor, which is a three-component vector specifying the color of the plane. In the main function, the color is set to the uColor value, and the resulting color is passed to the output gl_FragColor.
In the RevealEffect class constructor, a uniform variable uColor is created with an initial value of (20, 20, 20), which represents a dark gray color. In the updateMesh method, the background color of the target element is extracted and converted to a three-component RGB vector. This RGB vector is then used to update the uColor uniform variable of the shader, so that the plane color matches the background color of the element.
The getPropertyValue method of the window.getComputedStyle object is used to get the background color value of the target element. This value is in the format rgb(r, g, b) where r, g and b are integers between 0 and 255 representing the red, green and blue components of the color. The substring and split methods are used to extract the three integer components of the color and convert them to an RGB vector.
↔️ Scaling and positioning the mesh
After computing the size and position of the plane mesh in the updateMesh() function, the RevealEffect class scales and positions the mesh by updating its width, height, x and y properties.
These properties are used to position the mesh in the scene and to render the texture on the plane correctly. This section explores how the mesh is scaled and positioned to create the reveal effect.
Now update the mesh size and position with the new values:
  updateMesh() {
    // ...

    // Scale and position the mesh
    const mesh = this.mesh;
    mesh.scale.x = widthViewUnit;
    mesh.scale.y = heightViewUnit;
    mesh.position.x = x;
    mesh.position.y = y;
  }
This code is part of the updateMesh function in the RevealEffect class and is responsible for scaling and positioning the mesh.
After calculating the x and y positions of the mesh relative to the center of the screen, the width and height of the mesh are set using the widthViewUnit and heightViewUnit values that were calculated earlier.
The mesh variable references the THREE.Mesh instance that was created in the init method and its scale and position properties are updated to match the calculated values.
Setting the scale property scales the mesh's size, while setting the position property sets the mesh's center position in the 3D space.
Implementing the Fullscreen Transition
In this section, we will implement the full-screen transition when the user clicks on the item. We will define the toFullscreen() method that is responsible for starting the animation and displaying the item in full-screen mode. The onClick() method will trigger the toFullscreen() method when the user clicks on the item.
Finally, we will add the necessary properties to control the state of the animation, preventing multiple animations from running simultaneously.
class RevealEffect {
  // ...

  onClick() {
    // ...
    this.toFullscreen();
  }

  toFullscreen() {
    if (this.state === 'fullscreen' || this.isAnimating) return;
    this.animating = true;
    this.container.style.zIndex = '2';
  }
}
This code is a part of the RevealEffect class, which is responsible for creating an effect where a hidden object is gradually revealed and expands to fill the screen on click.
The toFullscreen method is called when the user clicks on the hidden object, which starts the animation of the reveal effect. The method first checks if the state is already set to 'fullscreen' or if an animation is already in progress, and if either of these conditions is true, the method simply returns without doing anything.
If the state is not set to 'fullscreen' and no animation is in progress, the animating property is set to true, which is used to prevent multiple animations from happening simultaneously.
The z-index of the container element is set to '2', which brings it to the top of the stacking order, allowing the revealed mesh to cover other elements on the page. This is a necessary step for the reveal effect to work properly.
Adding Progress Animation with Shader Uniforms and GSAP
In this section, we add a progress animation to the reveal effect by using shader uniforms. We first declare a uniform uProgress in the vertex shader that we will use to control the reveal progress in the fragment shader.
Then, we set the uProgress uniform value using GSAP animation in the toFullscreen() method. We also bind the render() method to the onUpdate callback of the animation, which will be called on every animation frame to update the shader uniforms and render the scene.
By the end of the animation, the reveal effect will be complete, and the state property will be set to 'fullscreen.'
const vertexShader = `
uniform float uProgress;
// ...
`

class RevealEffect {
  constructor (container, item) {
    // ...

    // Setup the shader uniforms
    this.uniforms = {
      // ...
      uProgress: new THREE.Uniform(0)
    }
  }

  render() {
    this.renderer.render(this.scene, this.camera);
  }

  toFullscreen() {
    // ...
    this.tween = gsap.to(this.uniforms.uProgress, 1, {
      value: 1,
      onUpdate: this.render.bind(this),
      onComplete: () => {
        this.isAnimating = false;
        this.state = 'fullscreen';
      },
    });
  }
}
The code defines a uniform called uProgress in the vertex shader, which is used to control the reveal effect's progress. The RevealEffect class constructor sets up the uniform by creating a THREE.Uniform object with an initial value of 0.
The toFullscreen() method uses the GreenSock Animation Platform (gsap) to animate the uProgress uniform from its initial value of 0 to 1 over a duration of 1 second. During the animation, the onUpdate function is called on every frame, which triggers the render method to re-render the scene. Once the animation is complete, the onComplete function sets the isAnimating flag to false and updates the state property to 'fullscreen'.
Vertex Shader for Left-to-Right Reveal Effect
This code shows a vertex shader used to create a left-to-right reveal effect for a 3D mesh. The effect is achieved by manipulating the mesh's vertices based on a progress value that determines how much of the effect has been revealed.
The code also scales the mesh to fit the size of the page view, moves the mesh towards the center of the page, and flips it horizontally as the effect progresses. This implementation uses Three.js and WebGL.
const vertexShader = `
// ...

void main() {
  vec3 pos = position.xyz;

  // Activation for left-to-right
  float activation = uv.x;

  float latestStart = 0.5;
  float startAt = activation * latestStart;
  float vertexProgress = smoothstep(startAt, 1., uProgress);

  // Transformation
  float flippedX = -pos.x;
  pos.x = mix(pos.x, flippedX, vertexProgress);
  pos.z += vertexProgress;

  // Scale to page view size/page size
  vec2 scaleToViewSize = uViewSize / uMeshScale - 1.;
  vec2 scale = vec2(
    1. + scaleToViewSize * vertexProgress
  );
  pos.xy *= scale;

  // Move towards center
  pos.x += -uMeshPosition.x * vertexProgress;
  pos.y += -uMeshPosition.y * vertexProgress;

  gl_Position = projectionMatrix * modelViewMatrix * vec4(pos, 1.);
}`;
The purpose of this shader is to animate a paper-like reveal and scale effect for a 3D model. The effect is achieved by gradually flipping the model horizontally, scaling it up, and moving it towards the center of the screen, while also revealing it as if it was hidden behind a paper. Let's go through each line of the code with this new information:
void main() { vec3 pos = position.xyz;
This line initializes a variable called pos with the current vertex position.
float activation = uv.x;
This line calculates the activation value based on the x-coordinate of the texture coordinate passed to the shader. In this case, it is used to determine the start point of the animation.
The uv variable in this shader code is a vec2 representing the texture coordinate of the current vertex. Specifically, uv.x is used to determine the horizontal position of the vertex in the texture map.
When the texture is applied to the 3D model, the uv.x value maps the texture from left to right across the model's surface. By using the uv.x value to calculate the activation value, the shader code creates a gradient-like effect from left to right.
The activation value is calculated as uv.x, so when uv.x is 0.0, the activation value is also 0.0, and when uv.x is 1.0, the activation value is also 1.0. This means that the leftmost vertices of the 3D model are fully hidden when activation is 0.0, and the rightmost vertices are fully visible when activation is 1.0.
The startAt value is then calculated based on the activation value, and vertexProgress is smoothly interpolated based on the uProgress uniform value. This interpolation ensures that the vertexProgress value gradually increases as the animation progresses from left to right, creating the illusion of a smooth gradient-like effect. By using the vertexProgress value to transform the vertices of the 3D model, the shader code creates an animation that gradually reveals the model from left to right, resulting in a visually pleasing effect.
float latestStart = 0.5; float startAt = activation * latestStart;
These lines calculate the startAt value, which is the point at which the animation starts.
float vertexProgress = smoothstep(startAt, 1., uProgress);
This line calculates the vertexProgress value, which is the progress of the animation based on the startAt value and a uniform uProgress value that controls the animation progress.
float flippedX = -pos.x; pos.x = mix(pos.x, flippedX, vertexProgress); pos.z += vertexProgress;
These lines gradually flip the x coordinate of the vertex, so that it appears as if the model is being flipped horizontally. The z coordinate is also modified based on the vertexProgress.
vec2 scaleToViewSize = uViewSize / uMeshScale - 1.; vec2 scale = vec2( 1. + scaleToViewSize * vertexProgress ); pos.xy *= scale;
These lines scale up the vertex gradually towards the center of the screen. The scale factor is calculated based on the uniform values uViewSize and uMeshScale, and interpolated towards 1.0 based on the vertexProgress.
pos.x += -uMeshPosition.x * vertexProgress; pos.y += -uMeshPosition.y * vertexProgress;
These lines move the vertex towards the center of the screen based on the uniform value uMeshPosition and the vertexProgress.
gl_Position = projectionMatrix * modelViewMatrix * vec4(pos, 1.);
Finally, this line sets the transformed vertex position as the output gl_Position, after applying the projection matrix and model-view matrix to it.
Overall, this shader code gradually reveals and scales up the 3D model as if it were behind a paper, and also flips it horizontally to achieve a paper-like reveal and scale effect. The result is an animation that looks as if the model is emerging from behind a folded paper, and gradually moving towards the center of the screen.
🚪 Closing the Reveal Effect
The RevealEffect class allows for a reveal effect to be applied to an HTML element, where it expands and fills the screen when clicked. The toFullscreen() method initiates this expansion effect, and when it's complete, the toClosed() method is called to close it.
This section covers the code for toClosed(), which uses GreenSock Animation Platform (GSAP) to animate the uProgress uniform value and render the animation until it's complete. When the animation is complete, the element is closed, and the state of the RevealEffect class is set to "closed."
class RevealEffect {
  toFullscreen() {
      // ...
      onComplete: () => {
        // ...
        this.toClosed()
      },
  }

  toClosed() {
    if (this.state === 'closed' || this.isAnimating) return;
    this.animating = true;
    this.tween = gsap.to(this.uniforms.uProgress, 1, {
      value: 0,
      onUpdate: this.render.bind(this),
      onComplete: () => {
        this.isAnimating = false;
        this.state = 'closed';
        this.container.style.zIndex = '0';
      },
    });
  }
}
This code is part of the RevealEffect class and contains two methods: toFullscreen() and toClosed().
toFullscreen() method is called when the user clicks on an item and it makes the element take up the entire viewport. It does this by animating the uProgress uniform from 0 to 1 using the GSAP library. Once the animation is complete, it calls the onComplete() function which sets the state property of the class to "fullscreen" and then calls the toClosed() method.
toClosed() method animates the uProgress uniform from 1 to 0 using GSAP. Once the animation is complete, it sets the state property of the class to "closed" and sets the zIndex of the container element to 0, indicating that the element is no longer in fullscreen mode.
In summary, these two methods are responsible for transitioning the element between fullscreen mode and closed mode.
🥳 Conclusion
In conclusion, the Reveal Effect code demonstrates how to create an interactive image reveal effect using Three.js and GSAP.
The code accomplishes this by creating a 3D plane and a custom fragment shader that reveals the image as the plane moves. The position and scale of the plane are updated based on the mouse position, and the shader uniforms are updated to animate the reveal effect.
Through the implementation of the toFullscreen() and toClosed() methods, the code also allows for toggling the image from fullscreen to closed and vice versa. This functionality is achieved by manipulating the progress of the reveal effect animation, which controls the opacity of the image.
By understanding the Reveal Effect code, developers can gain valuable insights into creating interactive and engaging visual effects for their web projects. With the help of Three.js and GSAP, it is possible to create complex animations and effects that enhance the user experience and bring a website to life.
Video version of this tutorial 👇️
Let's Connect 🤝
Youtube: https://www.youtube.com/@eludadev
Linkedin: https://www.linkedin.com/in/eludadev/
Twitter: https://twitter.com/eludadev
Reddit: https://www.reddit.com/user/eludadev
CSS Tricks: https://css-tricks.com/author/eluda/
Twilio: https://www.twilio.com/blog/author/elaaroussi

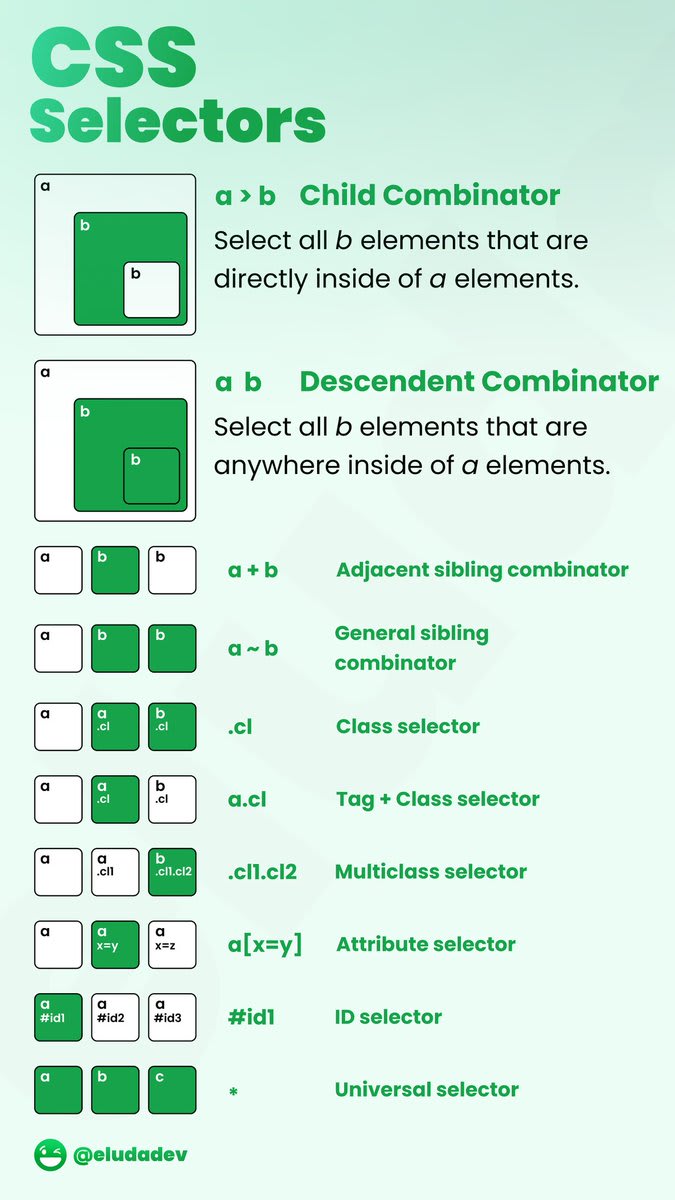
Aloha, web developers! 👋
If you struggle with memorizing the whopping amount of selectors out there, know that you'r not alone.
I have a cure for this problem. It's literally free. Print it. Make it your desktop background. Or even print it on a t-shirt. It's yours forever.18:14 PM - 18 May 2022


Like freebies? 🤑
I made a pack of 100 free hover animations. Get it now, share it, and do whatever you want with it. It's yours forever! ❤️
