

 800+ IT
News
als RSS Feed abonnieren
800+ IT
News
als RSS Feed abonnieren📚 Java CRUD Rest API using Spring Boot, Hibernate, Postgres, Docker and Docker Compose
💡 Newskategorie: Programmierung
🔗 Quelle: dev.to
Let's create a CRUD Rest API in Java, using:
- Spring Boot (Framework to build web servers in Java)
- Hibernate (Java ORM)
- Postgres (relational database)
- Docker (for containerization)
- Docker Compose
If you prefer a video version:
All the code is available in the GitHub repository (link in the video description): https://youtube.com/live/Nefd6qdpdSI
🏁 Intro
Here is a schema of the architecture of the application we are going to create:
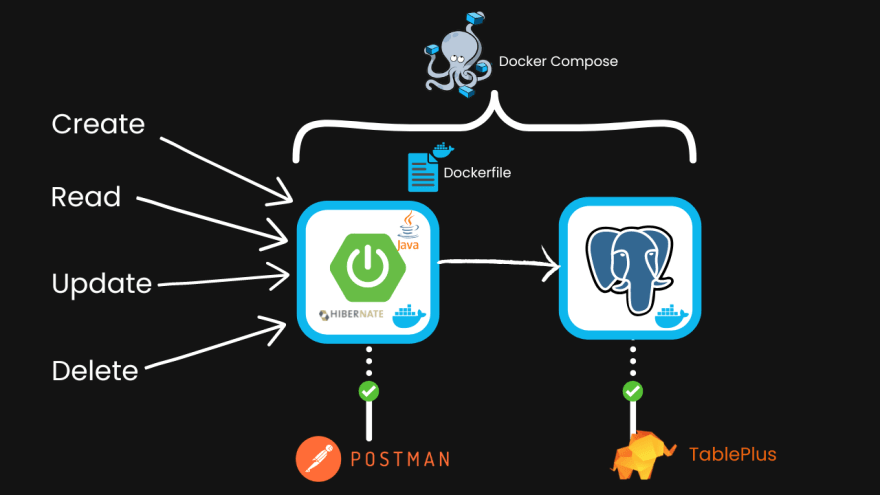
We will create 5 endpoints for basic CRUD operations:
- Create
- Read all
- Read one
- Update
- Delete
Here are the steps we are going through:
- Create a Java application using Spring Boot, Spring Web, Spring Data, and Hibernate.
- Run the Postgres database in a container using Docker Compose, and test it with TablePlus.
- Dockerize the Java application writing a Dockerfile and a docker-compose.yml file to run the application and the database.
- Build the Java App, build the Docker image and run the container using Docker Compose, then test it with Postman.
We will go with a step-by-step guide, so you can follow along.
Requirements:
- Java Installed
- Maven (or any other build tool for Java)
- Any Java IDE
- Docker installed and running
- (Optional): Postman and Tableplus to follow along, but any testing tool will work
☕ Create a new Java Spring Boot application
You can do this in multiple way.
If you use VSCode, I'd recommend to install these 2 extensions:
- Extension Pack for Java
- Spring Initializr Java Support
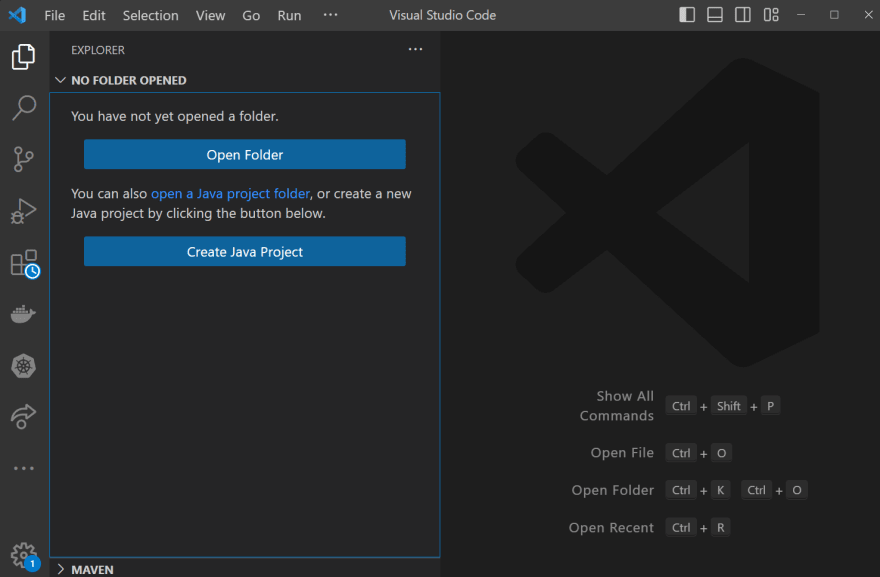
If you have these extensions, you should see a similar prompt when you open VS Code.
Click on "Create Java Project"
Then you should select how to build your Java project.
You can do this in different ways. We will create this application by selecting, in order:
- Spring Boot
- Maven project (you can choose Gradle if you want)
- Spring Boot version 3.0.4 (any 3.0.0 + should work)
- Java version 17 (any 11+ should work)
- choose a package. In my case: com.francescociulla.javadocker
- Artifact Id: live (you can replace it with what you want and change the upcoming part accordingly)
- packaging type: Jar (you can choose war if you want)
- Java version: 17
- Spring Web (To handle HTTP requests)
- Spring Data JPA (To handle the database)
- PostgreSQL Driver
And finally Selected 3 dependencies, press to continue:

Now you should decide a folder to generate this project into.
In my case, the path is c:/workspace but feel free to choose any path.

After generating it, you should see this popup at the bottom right (or you can simply open the folder with any IDE).

Click "Open", and you should have something like this:

Now an important part. If we simply run the application (if you have the extensions installed you should have a play button at the top-right when you have the JavaApplication.java file open) like this, it FAILS

This is not wrong, because we want to connect this app to a Postgres DB, but we don't have the DB Running.
In this case we will run the DB not by installing it but by using a Docker container
🐘 Run the Postgres Container
To do that, create a file called "docker-compose.yml" at the root level, and populate it like that:
version: '3.9'

services:
  java_db:
    container_name: java_db
    image: postgres:12
    ports:
      - 5432:5432
    environment:
      POSTGRES_PASSWORD: postgres
      POSTGRES_USER: postgres
      POSTGRES_DB: postgres
    volumes:
      - pgdata:/var/lib/postgresql/data
volumes:
  pgdata: {}
Explanation:
- We are using version 3.9 of the docker-compose file
- We are creating a service called "java_db", with the same container_name
- We are using the image "postgres:12" (you can use any version you want)
- We are exposing the port 5432 of the container to the port 5432 of the host
- We are setting the password, user and database name
- We are creating a volume to persist the data.
Now, open a terminal and type:
docker compose up -d java_db
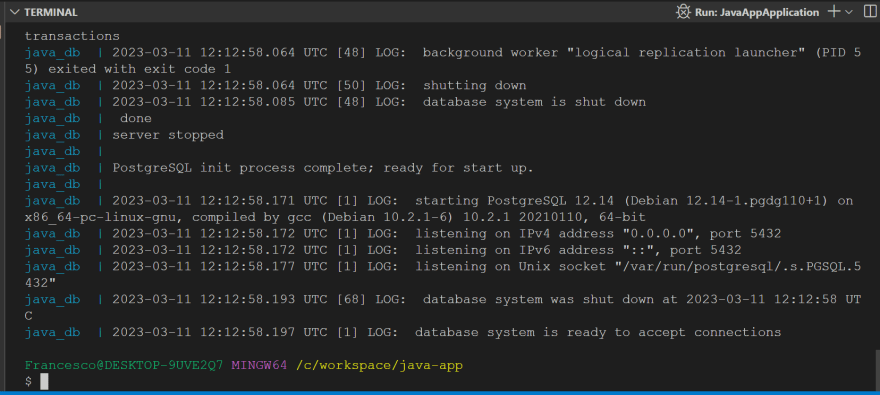
Wait some seconds, then type:
docker compose logs
If you have something like that, with the "database system is ready to accept connections" you are good to go.
But to be sure, let's make a test using Tableplus
Open Tableplus and click on the + close to "search for connection..." and choose "PostgreSQL"

Populate the fields with the following:
- Host: localhost
- Port: 5432
- User: postgres
- Password: postgres (don't use this in production!)
- Database: postgres

Now click the "Test" button at the bottom-right. If you get a "connection is ok" message as the following, you are good to go.

you can also click "connect" and you will have an empty db
🧑💻 Code the Java Spring Boot application
Time to create our Spring Boot application.
In the main folder, create a folder called user
Inside this folder, create 3 files:
- User.java
- UserRepository.java
- UserController.java
Your structure should look similar to this one:

📝 Populate User.java file:
package com.example.live.user;

import jakarta.persistence.*;

@Entity
@Table(name = "users")
public class User {

  @Id
  @GeneratedValue(strategy = GenerationType.AUTO)
  private Long id;

  @Column(name = "name")
  private String name;

  @Column(name = "email")
  private String email;

  //getters and setters

  public Long getId() {
    return id;
  }

  public void setId(Long id) {
    this.id = id;
  }

  public String getName() {
    return name;
  }

  public void setName(String name) {
    this.name = name;
  }

  public String getEmail() {
    return email;
  }

  public void setEmail(String email) {
    this.email = email;
  }
}
Explanation:
This is a Java class that represents a User entity and is used in conjunction with a database using Jakarta Persistence (previously known as Java Persistence API or JPA) for object-relational mapping (ORM).
Here are the key features of this code:
The @Entity annotation is used to mark this class as a JPA entity, which means it can be persisted to a database table.
The @Table annotation is used to specify the name of the database table to which this entity is mapped. In this case, it is mapped to a table named "users".
The @ Id annotation is used to specify that the id field is the primary key of the entity.
The @GeneratedValue annotation is used to specify that the value of the primary key should be generated automatically by the database system. In this case, the GenerationType.AUTO strategy is used, which means the database will choose the appropriate strategy based on the database being used.
The @Column annotation is used to specify the name of the column in the database table that corresponds to the name and email fields. If no name is specified, the default is to use the name of the field.
The class has a constructor with no arguments and getters and setters for each of the fields.
Overall, this class defines the schema of a database table called "users", which has columns for the user's ID, name, and email.
The @Entity, @Table, @ Id, and @Column annotations are used to specify how the class should be mapped to the database table, while the getters and setters provide access to the data in the object.
📝 Populate the UserRepository.java file:
package com.example.live.user;

import org.springframework.data.jpa.repository.JpaRepository;
import org.springframework.stereotype.Repository;

@Repository
public interface UserRepository extends JpaRepository<User, Long> {

}
Explanation of the code in UserRepository.java:
This is a Java interface that defines a repository for the User entity using Spring Data JPA.
Here are the key features of this code:
The import statements at the top of the file bring in the necessary classes from the Spring Data JPA library.
The @Repository annotation is used to mark this interface as a Spring bean that handles data access for the User entity.
The JpaRepository interface is extended by this interface. This provides a set of methods for working with User entities, such as saving, deleting, and finding users. It also allows for pagination and sorting of results.
The UserRepository interface uses generics to specify the entity type and the type of its primary key. In this case, it works with User entities and Long primary keys.
Overall, this interface provides a high-level abstraction for working with User entities in a Spring Data JPA application.
By extending the JpaRepository interface and defining the User entity and primary key type, Spring Data JPA will automatically generate the necessary implementation for the methods defined in the JpaRepository interface.
This allows developers to focus on defining the business logic for their application, rather than writing boilerplate code for data access.
📝 Populate the UserController.java as following:
package com.example.live.user;

import java.util.List;

import org.springframework.beans.factory.annotation.Autowired;
import org.springframework.web.bind.annotation.RequestMapping;
import org.springframework.web.bind.annotation.RestController;
import org.springframework.web.bind.annotation.DeleteMapping;
import org.springframework.web.bind.annotation.GetMapping;
import org.springframework.web.bind.annotation.PathVariable;
import org.springframework.web.bind.annotation.PostMapping;
import org.springframework.web.bind.annotation.RequestBody;
import org.springframework.web.bind.annotation.PutMapping;

@RestController
@RequestMapping("/api/users")
public class UserController {

  @Autowired
  private UserRepository userRepository;

  @GetMapping
  public List<User> getAllUsers() {
    return userRepository.findAll();
  }

  @GetMapping("/{id}")
  public User getUserById(@PathVariable Long id) {
    return userRepository.findById(id).get();
  }

  @PostMapping
  public User createUser(@RequestBody User user) {
    return userRepository.save(user);
  }

  @PutMapping("/{id}")
  public User updateUser(@PathVariable Long id, @RequestBody User user) {
    User existingUser = userRepository.findById(id).get();
    existingUser.setName(user.getName());
    existingUser.setEmail(user.getEmail());
    return userRepository.save(existingUser);
  }

  @DeleteMapping("/{id}")
  public String deleteUser(@PathVariable Long id) {
    try {
      userRepository.findById(id).get();
      userRepository.deleteById(id);
      return "User deleted successfully";
    } catch (Exception e) {
      return "User not found";
    }
  }
}
Explanation for the Usercontroller.java code:
This is a Java class that defines a RESTful API for performing CRUD (Create, Read, Update, Delete) operations on the User entity using Spring Boot and Spring Data JPA.
Here are the key features of this code:
The import statements at the top of the file bring in the necessary classes and annotations from the Spring Boot and Spring Data JPA libraries.
The @RestController annotation is used to mark this class as a RESTful controller that handles HTTP requests and responses.
The @RequestMapping annotation is used to specify the base URL for all API endpoints. In this case, it is set to "/api/users".
The @Autowired annotation is used to inject an instance of the UserRepository interface into this class.
There are several endpoint methods defined in this class, each mapped to a specific HTTP method (GET, POST, PUT, DELETE) and URL path.
getAllUsers() is a GET method that returns a list of all users in the database by calling the findAll() method on the UserRepository.
getUserById(Long id) is a GET method that takes an ID parameter in the URL path and returns a single user with that ID by calling the findById(Long id) method on the UserRepository.
createUser(User user) is a POST method that takes a JSON representation of a new user in the request body and saves it to the database by calling the save(User user) method on the UserRepository.
updateUser(Long id, User user) is a PUT method that takes an ID parameter in the URL path and a JSON representation of an updated user in the request body. It updates the user with the given ID by first retrieving it from the database using findById(Long id) and then setting its properties to those of the updated user before saving it using save(User user) on the UserRepository.
deleteUser(Long id) is a DELETE method that takes an ID parameter in the URL path and deletes the user with that ID from the database by calling the deleteById(Long id) method on the UserRepository.
Overall, this class provides a complete set of RESTful API endpoints for managing User entities in a Spring Boot and Spring Data JPA application.
Now it's time to finish the configuration part then we are done
This application.properties file is a configuration file used by a Spring Boot application. It defines properties that configure the application's data source and Hibernate, the ORM (Object Relational Mapping) framework used for database persistence.
📝 application.properties file
This file is located in the resources folder.
Populate the application.properties file:
spring.datasource.url=${DATABASE_URL}
spring.datasource.username=${DATABASE_USERNAME}
spring.datasource.password=${DATABASE_PASSWORD}
spring.jpa.hibernate.ddl-auto=update
spring.jpa.properties.hibernate.dialect=org.hibernate.dialect.PostgreSQLDialect
Explanation:
spring.datasource.url This property sets the URL of the database to which the application will connect. The value is set using the ${DATABASE_URL} placeholder, which will be set in the docker-compose.yml file.
spring.datasource.username This property sets the username to use when connecting to the database. The value is set using the ${DATABASE_USERNAME} placeholder, which will be set in the docker-compose.yml file.
spring.datasource.password This property sets the password to use when connecting to the database. The value is set using the ${DATABASE_PASSWORD} placeholder, which will be set in the docker-compose.yml file.
spring.jpa.hibernate.ddl-auto This property sets the strategy used by Hibernate to generate and update the database schema. In this case, the value is set to update, which means that Hibernate will automatically create tables and update the schema as needed based on the entity classes in the application.
spring.jpa.properties.hibernate.dialect This property sets the Hibernate dialect to use for communicating with the database. In this case, the value is set to org.hibernate.dialect.PostgreSQLDialect, which is the dialect for PostgreSQL databases.
Overall, this application.properties file is used to configure the data source and ORM framework for a Spring Boot application that connects to a PostgreSQL database.
🐳 Dockerization
Now, to connect the db to the Spring App, we need to Dockerize the app first, then run it using Docker Compose
This Dockerfile is used to create a Docker image for a Java application that is packaged as a JAR file.
At the application root-level, create a file called Dockerfile (capital "D") and populate it like this:
FROM openjdk:17-jdk-alpine

COPY target/live-0.0.1-SNAPSHOT.jar app-1.0.0.jar

ENTRYPOINT [ "java", "-jar", "app-1.0.0.jar" ]
Explanation for the code inside the Dockerfile
FROM openjdk:17-jdk-alpine This line specifies the base image to use for building the Docker image. In this case, it uses the openjdk:17-jdk-alpine image, which is a lightweight version of the OpenJDK 17 image that is optimized for running Java applications in a containerized environment.
COPY target/live-0.0.1-SNAPSHOT.jar app-1.0.0.jar This line copies the JAR file of the Java application from the target directory in the local file system to the root directory of the Docker image and renames it to app-1.0.0.jar. This assumes that the JAR file has already been built and packaged in the target directory of the local file system. If you used a different artifactId for your project, you will need to change the name of the JAR file accordingly.
ENTRYPOINT [ "java", "-jar", "app-1.0.0.jar" ] This line sets the command to run when a container is started from the Docker image. In this case, it specifies that the java command should be executed with the -jar option and the JAR file to run is app-1.0.0.jar.
🐙Docker Compose
Let's add the java_app service in the docker-compose.yml file we previously created.
version: '3.9'

services:
  #new service (java_app)
  java_app:
    container_name: java_app
    image: francescoxx/java_app:1.0.0
    build: .
    ports:
      - 8080:8080
    environment:
      - DATABASE_URL=jdbc:postgresql://java_db:5432/postgres
      - DATABASE_USERNAME=postgres
      - DATABASE_PASSWORD=postgres
    depends_on:
      - java_db

  #old service (postgres)
  java_db:
    container_name: java_db
    image: postgres:12
    ports:
      - 5432:5432
    environment:
      POSTGRES_USER: postgres
      POSTGRES_PASSWORD: postgres
      POSTGRES_DB: postgres
    volumes:
      - pgdata:/var/lib/postgresql/data

volumes:
  pgdata: {}
Explanation for the java_app service:
container_name is the custom name of the container. This is optional, but I recommend using it, because it makes it easier to find the container in the list of running containers.
image is the image tag (name) we want to assign. I recommend using your dockerhub account username instead of "francescoxx" (that's mine).
build is the build path of the Dockerfile. In this case, the Dockerfile and the docker-compose.file are in the same directory, so we can just use the dot, . that means "here, in this folder".
ports is the list of ports we want to expose. In this case, we are exposing the port 8080 of the java app container. The format is "host_port:container_port"
environment is a list of environment variables wee want to use. In this case we have 3 of them, for the connection to the db, with the username and the password (of course use more secure password in production!). Also note that the connection is to "java_db". Containers find each other, if they are on the same network, by the container name. This is why is so important to define a container name, at least for the database container.
depends_on is to run this container after running the Postgres one. But please note that by doing this the container ios just waiting for the container to start, not the database application insisde it, so it might fail at the first try (we should need something called healthcheck to do it properly)
🧱 Create the Jar file
We need to create the jar file of the Java application, so we can copy it into the Docker image.
To create the jar file, type:
mvn clean package -DskipTests
Note: we are skipping the tests here because otherwise the build process is gonna FAIL!
The reason is that the tests are trying to connect to the database, but the environment variables we defined are outside the application logic.
Now build the Docker image, by using this command:
docker compose build
If you get an error because the target file doesn't exist, check the name of your Java file in the target folder
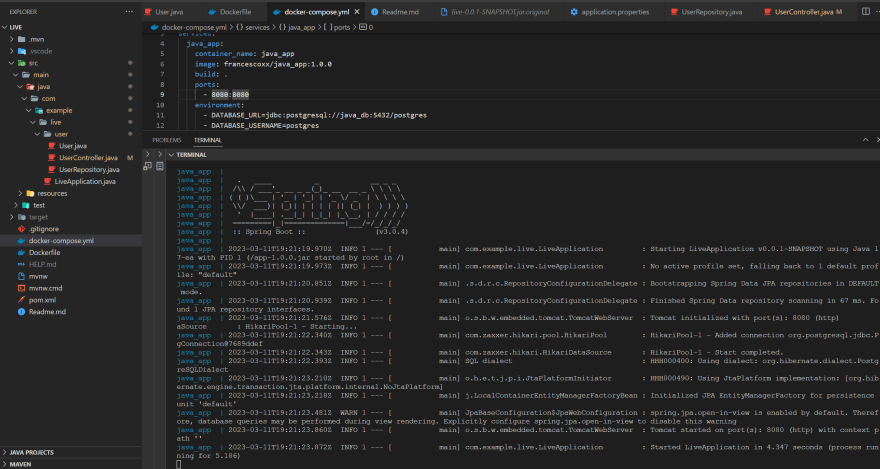
👟 Run the Java App
To run the Java application simply type:
docker compose up java_app
If your output looks like the one below, you are good to go:
just to be sure, on another terminal type
docker ps -a
You should see something like this:

Now it's time to test our application.
🔍 Test our application
Before we test our application, let's go back to Tableplus and refresh using the 🔁 button at the top-right corner of the application (or close and reopen the connection).
Now there is a table in the database. This is because we Annotated the User Class with the @Entity annotation, and we synced the models with the database (we also defined a line in the application.properties to do this, see the 4th line of the application.properties file)

Now let's test this CRUD API application with Postman
📝 Test the application
Since we don't have a test endpoint, we can just make a GET request to localhost:8080/api/users.
The response should be an empty array

📝 Create a user
Now let's create a user, making a POST request to localhost:8080/api/users with the body below as a request body:

Let's make one more:

And a third one:

📝 Get all the users
Now that we created 3 users, let's get all of them, making a GET request to localhost:8080/api/users

📝 Get one user
To get a single user, you can just make a GET request, appending the user number we want at the end of the url
For example, to get the user #3, you can make a GET request to localhost:8080/api/user/3

📝 Update one user
To update an existing user, you need to provide the new body and the user you want to modify.
For example, to update the user #2, you can make a PUT request to localhost:8080/api/users/2 by providing a new body:

📝 Delete one user
To Delete one user, make a DELETE request appending the id of the user you want to delete.
For example, to delete the user #1, make a DELETE request o localhost:8080/api/users/1

Note that if we try to delete a user that doesn't exist, we handle the error, for example:

As final test, let check again with TablePlus

🏁 Conclusion
We made it! We have built a CRUD rest API in Java, using:
- Spring Boot (Dependencies: Spring Web, Spring Data JPA, PostgreSQL connector)
- Hibernate
- Postgres
- Docker
- Docker compose.
This is just an example, but you can use this as a starting point to build your own application.
If you prefer a video version:
All the code is available in the GitHub repository (link in the video description): https://youtube.com/live/Nefd6qdpdSI
That's all.
If you have any question, drop a comment below.
...