

 800+ IT
News
als RSS Feed abonnieren
800+ IT
News
als RSS Feed abonnieren📚 Structuring Your Machine Learning Project with MLOps in Mind
💡 Newskategorie: AI Nachrichten
🔗 Quelle: towardsdatascience.com
MLOps in Action: Project Structuring

If you’re looking to take your machine learning projects to the next level, MLOps is an essential part of the process. In this article, we’ll provide you with a practical tutorial on how to structure your projects for MLOps, using the classic handwritten digit classification problem as an example. We’ll take you step-by-step through the process of creating a basic project template that you can use to organize your own projects. By the end of this tutorial, you’ll have a solid understanding of MLOps principles and how to apply them to your own projects. However, if you’re new to MLOps, we recommend starting with my beginner-friendly tutorial to get up to speed. So let’s dive in and take your ML projects to the next level!
Table of contents:
· 1. Introduction
· 2. MLOps
∘ 2.1. Business problem
∘ 2.2. Data engineering
∘ 2.3. Machine learning model engineering
∘ 2.4. Code engineering
· 3. Project structure
∘ 3.1. Cookiecutter Data Science
· 4. MLOps project structure
∘ 4.1. Starting a new MLOps project
∘ 4.2. Using MLOps project template for handwritten digits classification
∘ 4.3. How to run your project?
· 5. Conclusion
My MLOps tutorials:
- Tutorial 1: A Beginner-Friendly Introduction to MLOps
- Tutorial 2: Structuring Your Machine Learning Project with MLOps in Mind
[I will be updating this list as I publish articles on the subject]
1. Introduction
In the previous tutorial, we defined MLOps as a way to design, build, and deploy machine learning models in an efficient, optimized, and organized manner. This is achieved by combining a set of techniques, practices, and tools that are often discussed within the context of the MLOps lifecycle.
In the MLOps lifecycle, the first step after understanding the problem is to structure your project. This is typically done by using a template, whether it’s a company template, a public template, or your own template, as we will see later in this tutorial.
In this tutorial, we will use handwritten digit classification as an example. In a previous tutorial, I created a Github repository for MNIST classification, and the project structure looks like:
MNIST_classification
├── dataset_scripts
│   ├── construct_dataset_csv.py
│   ├── construct_dataset_folders.py
│   ├── describe_dataset_csv.py
│   ├── explore_dataset_idx.py
│   └── README.md
├── main_classification_convnet.py
├── main_classification_onehot.py
├── main_classification_single_output.py
├── .gitignore
└── README.md
The project folder includes the ‘dataset_scripts’ folder, which contains scripts for manipulating the dataset in its original IDX format (you can check my previous tutorial, “How to Effortlessly Explore Your IDX Dataset” for more information), Python scripts to train three different types of models, a .gitignore file, and a README file. The project structure is simple as it’s designed for tutorial purposes. In this tutorial, I will introduce my project structure for MLOps projects. Note that if you want programming details about the models and training, you can always refer to my tutorial, “A Brief Introduction to Neural Networks: A Classification Problem.”
2. MLOps
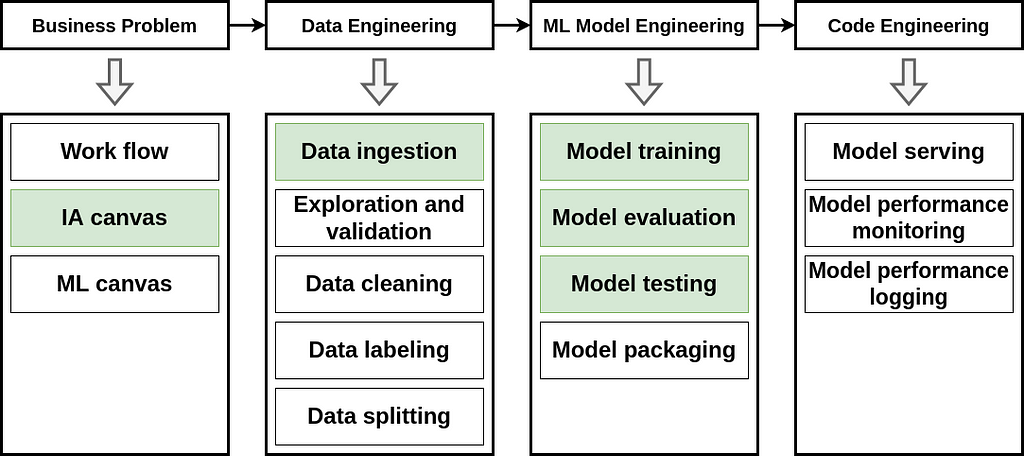
The different steps in the machine learning process are outlined in the MLOps workflow, which includes the business problem, data engineering, machine learning model engineering, and code engineering. In this section, we will explore how to implement each step. However, some steps will not be discussed in-depth since the problem we are addressing (handwritten digit classification) does not require them. We will focus on steps that are highlighted in green (see the Figure below). The remaining steps will be covered in future tutorials. If you want to learn more about the MLOps workflow, you can check out my beginner-friendly tutorial.
2.1. Business problem
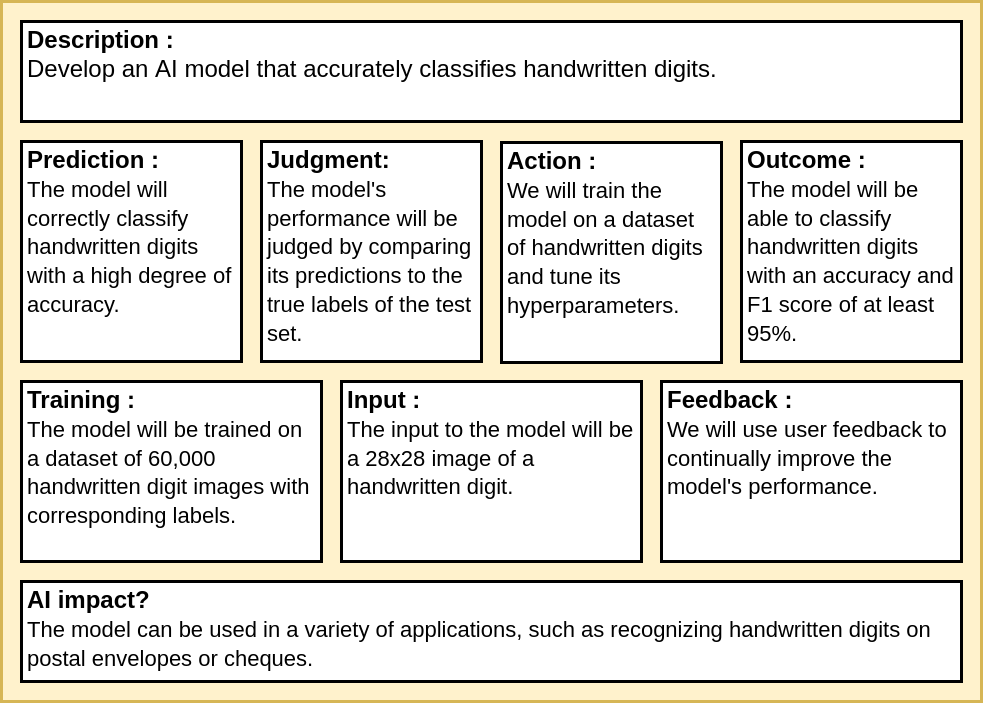
The problem addressed in this tutorial is the classification of handwritten digits, which is a multi-class classification task. Specifically, given an input image of a handwritten digit ranging from 0 to 9, the model is required to identify the digit and output its corresponding label.
The AI canvas comprises the following components: task description, prediction (model output), judgement, action, outcome, training, input, feedback, and model impact on the problem. For the current problem of handwritten digits classification, our AI canvas would be structured and filled as follows:
2.2. Data engineering
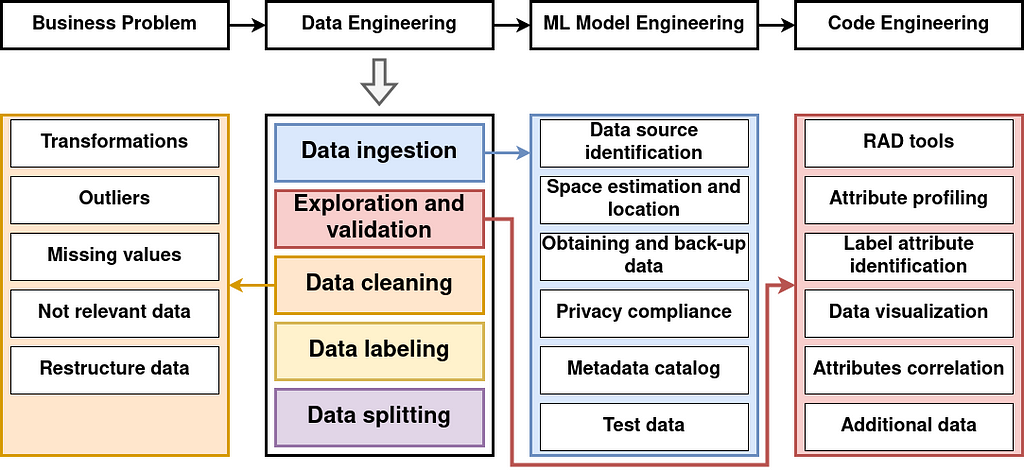
Data engineering encompasses various tasks, such as data ingestion, exploration and validation, cleaning, labeling, and splitting. In this project, we performed the following data engineering tasks:
- Data ingestion: We downloaded the MNIST dataset in its original format from its official website and converted it to a CSV file.
- Data exploration and validation: We visualized some images from the dataset and displayed some insights.
- Data cleaning: The dataset was already clean and did not require any further cleaning.
- Data labeling: The dataset was already labeled, so no additional labeling was necessary.
- Data splitting: The dataset was already split into training and test sets. We will extract the validation set from the training set later.
It’s worth noting that this project involves a relatively simple data engineering process, as the dataset was already prepared and processed. However, we will explore more complex examples in future articles.
2.3. Machine learning model engineering
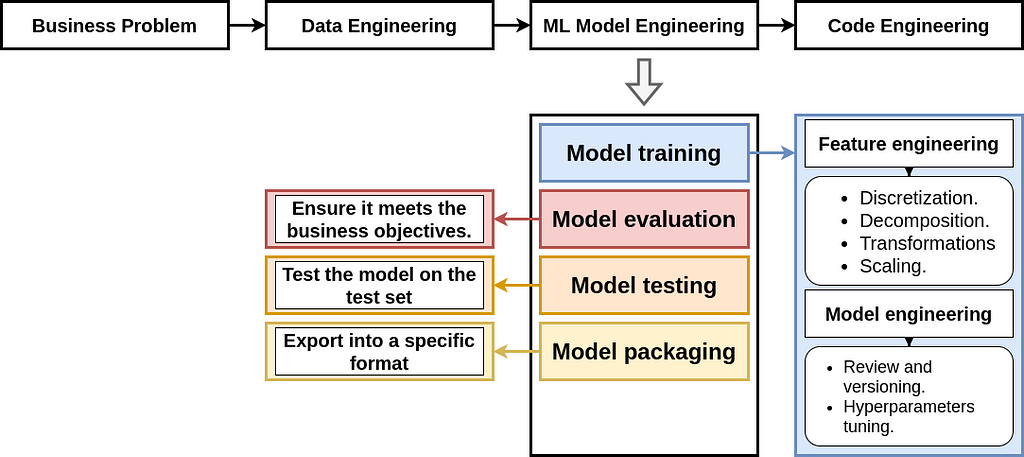
Machine learning model engineering is the third step in MLOps workflow. It involves various tasks, such as model training, evaluation, testing, and packaging. In this project, we performed the following ML model engineering tasks:
- Model training: For feature engineering, we used data scaling (to scale the pixels to the range of [0,1]), data reshaping (to represent the image as a 1D vector or 2D matrix), and data encoding (one-hot encoding). For model engineering, we implemented two different types of models and applied hyperparameter tuning.
- Model evaluation: In addition to accuracy, we used other evaluation metrics such as recall, precision, and F1 score to ensure that the model meets the business objectives (outcomes) described in the AI canvas.
- Model testing: After evaluating the model, we tested it on two different types of data: the first type is the test set of the MNIST dataset, and the second type is some handwritten digit images generated from the application.
- Model packaging and versioning will be discussed in the next tutorial, where we will cover the machine learning pipeline in more detail.
If you want more programming details, you can always check out my previous tutorial.
2.4. Code engineering
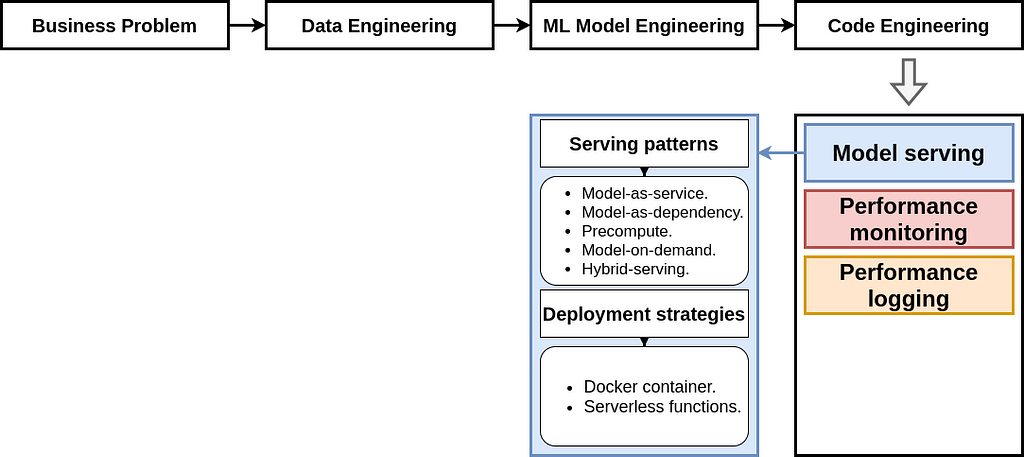
In the code engineering step, the selected model is deployed to the application and its performance needs to be monitored and logged. Before deploying the model, the serving pattern and deployment strategy need to be thoughtfully selected. After deployment, its behavior needs to be managed and maintained to ensure it is functioning properly. Although this part is not elaborated in this tutorial, I plan to dedicate an entire article to it in the near future.
3. Project structure
Now that we have highlighted the different MLOps steps that we applied in the handwritten digits classification, let’s move on to structuring the project to meet the project need while keeping these steps in mind. To do this, I will first present a well-known project structures, then I will present my project structure template for MLOps. This template will be updated later as we add more components.
But why is it important to properly structure your machine learning projects? Well, there are several benefits:
- Good transparency: An organized project is easier to understand, not only for you but also for others.
- Simple maintenance: A well-structured project is easier to maintain and update, saving you time and effort.
- Improved efficiency: A clear plan reduces time wasted and minimizes the risk of getting sidetracked or losing track of important information.
- Good reproducibility and reusability: A good project structure ensures that project results can be easily reproduced and its components can be reusable.
- Easy collaboration: When a project is organized in a clear and logical way, it becomes easier for others to understand and contribute.
In summary, properly structuring your machine learning project can lead to greater transparency, efficiency, maintainability, and collaboration.
3.1. Cookiecutter Data Science
As mentioned earlier in this article, before writing any lines of code, the first thing we need to do is define the project structure. This can be accomplished by using a project structure template. Templates can be the company template established to respond to company/project needs, a publicly available template that a group of people or an individual has created and published for others to use, or your own custom template that you feel comfortable using.
One of the most famous project structure in the field is the Cookiecutter Data Science which is:
a logical, reasonably standardized, but flexible project structure for doing and sharing data science work.
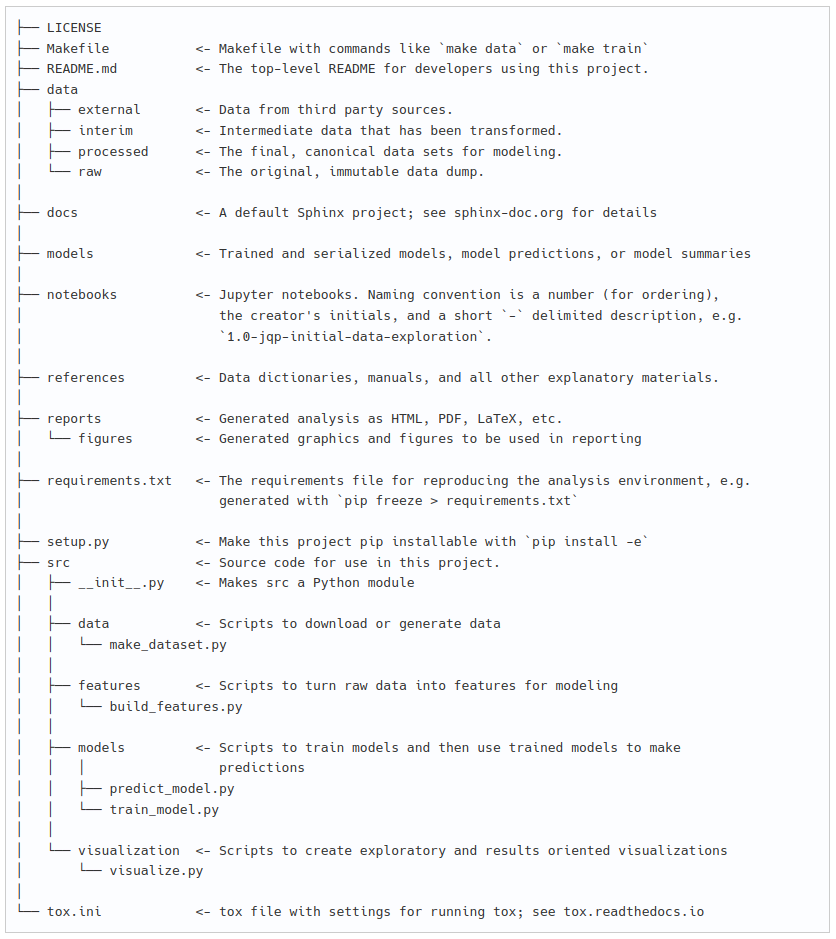
You can find the project structure of this template below, as well as a description of each file:
4. MLOps project structure
Now that we have explained how the different steps of MLOps workflow are executed, let’s define a project structure template that aligns with the MLOps workflow. The Cookiecutter MLOps template is based on the Cookiecutter Data Science template we presented earlier. Like Cookiecutter Data Science, my Cookiecutter MLOps template includes the LICENSE, README, Makefile and requirements files; and docs, models, notebooks, references, reports, visualization and source folders. However, an additional folder (configs) has been added and the source and the visualization folders have been enhanced.
The MLOps project structure template has the following structure:
{{ cookiecutter.repo_name }}/
├── LICENSE
├── README.md
├── Makefile        # Makefile with commands like `make data` or `make train`
├── configs         # Config files (models and training hyperparameters)
│   └── model1.yaml
│
├── data
│   ├── external    # Data from third party sources.
│   ├── interim     # Intermediate data that has been transformed.
│   ├── processed   # The final, canonical data sets for modeling.
│   └── raw         # The original, immutable data dump.
│
├── docs            # Project documentation.
│
├── models          # Trained and serialized models.
│
├── notebooks       # Jupyter notebooks.
│
├── references      # Data dictionaries, manuals, and all other explanatory
│                   # materials.
│
├── reports         # Generated analysis as HTML, PDF, LaTeX, etc.
│   └── figures     # Generated graphics and figures to be used in reporting.
│
├── requirements.txt # The requirements file for reproducing the environment.
└── src              # Source code for use in this project.
    ├── __init__.py  # Makes src a Python module.
    │
    ├── data         # Data engineering scripts.
    │   ├── build_features.py
    │   ├── cleaning.py
    │   ├── ingestion.py
    │   ├── labeling.py
    │   ├── splitting.py
    │   └── validation.py
    │
    ├── models       # ML model engineering (a folder for each model).
    │   └── model1
    │       ├── dataloader.py
    │       ├── hyperparameters_tuning.py
    │       ├── model.py
    │       ├── predict.py
    │       ├── preprocessing.py
    │       └── train.py
    │
    └── visualization # Scripts to create exploratory and results
        │             # oriented visualizations.
        ├── evaluation.py
        └── exploration.py
The configs folder contains all the configuration files, such as model hyperparameters.
The data folder (the sub-folder of src) includes the following files:
- ingestion.py: used to gather the data. If you need to create backups, protect private information, or create a metadata catalog, it’s best to do it here.
- cleaning.py: used to clean the data by reducing outliers/noise, handling missing values, etc.
- labeling.py: used to label the data if necessary.
- splitting.py: used to split the data into test and train sets.
- validation.py: used to validate the data (to ensure it is ready for training).
- build_features.py: this file has been moved to this folder because building features means organizing your dataset into a specific structure.
In the models folder (the sub-folder of src), each model’s scripts are organized in the model’s folder and include:
- model.py: used to define the model architecture.
- dataloader.py: used to load the data to be fed to the model.
- preprocessing.py: used to preprocess the data before feeding it to the model.
- train.py: used to train the model.
- hyperparameters_tuning.py: used to tune the model and/or the training hyperparameters.
- predict.py: used to make predictions on random images (not from the dataset).
The visualization folder includes the following:
- exploration.py: this file includes functions used to visualize the data during the data engineering process.
- evaluation.py: this file includes functions used to visualize the training results.
This was the MLOps template and there are some important notes to consider:
- This is a basic template, so some files and folders can be removed or added based on your project requirements.
- Some preprocessing functions can be used across all models, so it’s possible to create a single preprocessing file and move it to the data folder to avoid duplicating functions. However, it’s recommended to keep the preprocessing file separate to improve the model’s reusability and prevent potential problems in the future.
- In the predict script, it’s assumed that the data is coming from an application rather than the dataset, so additional preprocessing steps may be required.
4.1. Starting a new MLOps project
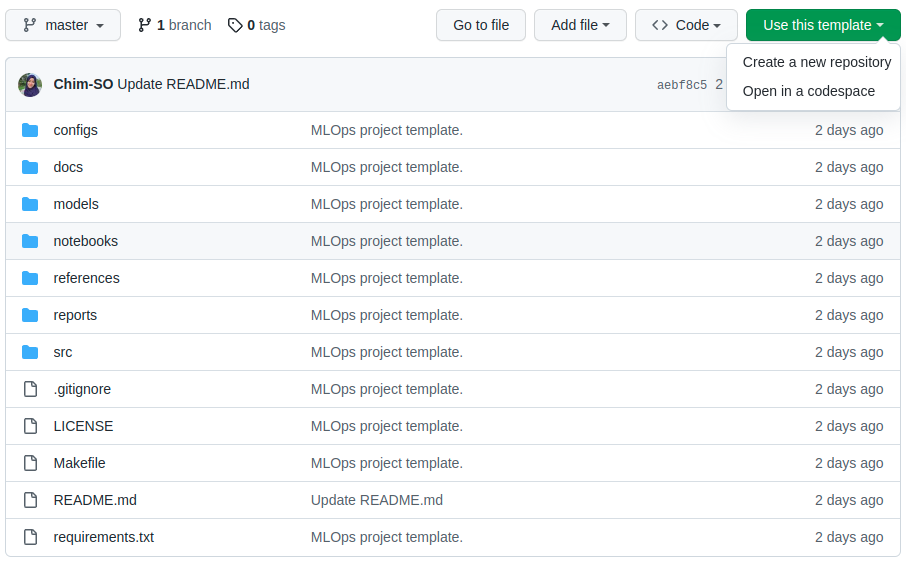
If you want to use this template to start your machine learning project, you can either use the GitHub template or use the Cookiecutter template, as follows:
- To use the GitHub template, first, you need to visit the template page here. Then, click on the green button ‘Use this template’, and you will have to choose whether to ‘Create a new repository’ or to ‘Open in a codespace’:
- To use the Cookiecutter template, you first need to install Cookiecutter using:
pip install cookiecutter
or:
conda config --add channels conda-forge
conda install cookiecutter
Then run this command at the command line:
cookiecutter https://github.com/Chim-SO/cookiecutter-mlops
Here is an example configuration for the handwritten digit classification, which you can customize by filling in the required parameters. Pressing the Enter key will keep the default values for any parameters you do not wish to change:
project_name [project_name]: MLOps_MLflow_mnist_classification

repo_name [mlops_mlflow_mnist_classification]:

author_name [Your name (or your organization/company/team)]: Chim SO

description [A short description of the project.]: MNIST classification

Select open_source_license:
1 - MIT
2 - BSD-3-Clause
3 - No license file
Choose from 1, 2, 3 [1]: 1

s3_bucket [[OPTIONAL] your-bucket-for-syncing-data (do not include 's3://')]:

aws_profile [default]:

Select python_interpreter:
1 - python3
2 - python
Choose from 1, 2 [1]:
4.2. Using MLOps project template for handwritten digits classification
In the second section, we discussed the different steps involved in the MLOps workflow for the handwritten digits classification task. Implementing that pipeline using the MLOps template will result in the following project structure:
MLOps_MLflow_mnist_classification
├── configs
│   ├── cnnbased.yaml
│   └── singleoutput.yaml
├── data
│   ├── external
│   │   └── test
│   │       ├── 0_0.png
│   │       ├── 1_0.png
│   │       ├── 1_1.png
│   │       ├── 3_1.png
│   │       ├── 5_1.png
│   │       ├── 7_0.png
│   │       └── 8_0.png
│   ├── interim
│   ├── processed
│   │   ├── test.csv
│   │   └── train.csv
│   └── raw
│       ├── test_images.gz
│       ├── test_labels.gz
│       ├── train_images.gz
│       └── train_labels.gz
├── LICENSE
├── Makefile
├── MLproject
├── mlruns
├── models
├── README.md
├── requirements.txt
└── src
    ├── data
    │   ├── build_features.py
    │   ├── dataloader.py
    │   └── ingestion.py
    ├── models
    │   ├── cnnbased
    │   │   ├── hyperparameters_tuning.py
    │   │   ├── model.py
    │   │   ├── predict.py
    │   │   ├── preprocessing.py
    │   │   └── train.py
    │   └── singleoutput
    │       ├── hyperparameters_tuning.py
    │       ├── model.py
    │       ├── predict.py
    │       ├── preprocessing.py
    │       └── train.py
    └── visualization
        ├── evaluation.py
        └── exploration.py
Since we have already described the contents of each file and folder, I will now highlight the most important steps that can be a little ambiguous.
- The configs folder contains two configuration files, one for each model. For instance, the singleoutput.yaml file includes model configurations, training parameters, logging parameters (which will be discussed in the next tutorials), and parameters for model tuning.
# Data parameters
data:
  dataset_path : 'data/processed/'

# Model parameters
model:
  name: 'singleoutput'
  num_units: 224
  num_layers: 5
  activation_function : 'sigmoid'

# Training parameters
training:
  batch_size: 128
  num_epochs: 200
  loss_function: 'mae'
  metric: 'mse'

# Logging and output parameters
mlflow:
  mlruns_path: 'file:models/mlruns'
  experiment_name: 'singleOutput'

# Tuning
hyperparameter_tuning:
  num_layers: [3, 5]
  num_units: [16, 64, 224]
  activation_function: ['relu', 'sigmoid']
  batch_size: [128, 256]
  loss_function: ['mae']
  metric: ['mse']
  num_epochs: [200]
- Using the src/data/ingestion.py, the data is first downloaded and stored in data/raw/. Then it is transformed into a record structure using src/data/build_features.py and stored directly to data/processed.
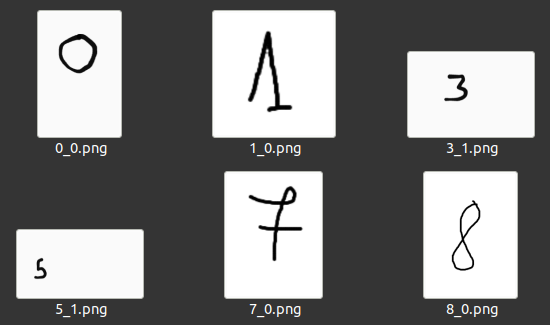
- In the data/external folder, I have added a test sub-folder that includes some random images of handwritten digits. These images will be used by the predict.py script for testing the trained model's predictions on new, unseen data.
- The data/interim folder is empty for this example since there is no intermediate step in the data processing pipeline.
- As the data is a classic dataset, instead of duplicating the data loader for each model, it is moved from the models folder to src/data/.
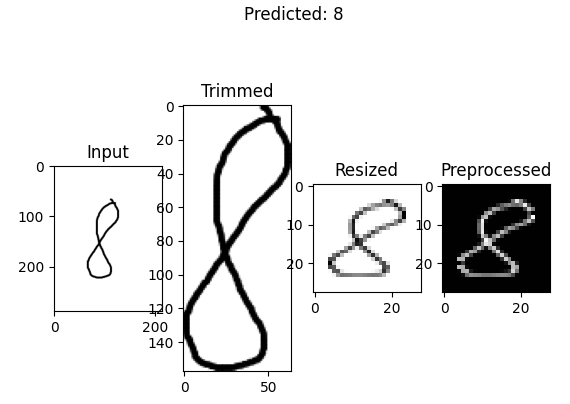
- The src/models/<model>/predict.py script outlines the pipeline to predict the class of a random image. Unlike the preprocessing pipeline used to train the model, which involves resizing and scaling, the prediction pipeline starts by trimming the image, inverting the pixels, and then resizing and scaling it.
- The MLproject file and the mlruns folder are utilized by the MLflow library, which is a platform used to manage the machine learning pipeline. The next article will cover this topic in detail, so if it is new to you, don’t worry.
4.3. How to run your project?
There are several ways to execute a Python project: interactive runs (executing it line by line), batch runs (scheduling a cron job or using a job scheduler), containerized run (using Docker or Kubernetes), automated runs (using MLflow for example), or distributed runs (using a distributed computing framework like Apache Spark). As this is not the main subject of this article, let’s use the easiest way by executing these commands from the project directory:
python src/data/ingestion.py -r data/raw/ # Download data
python src/data/build_features.py -r data/raw/ -p data/processed/ # Create csv files
python -m src.models.cnnbased.train -c configs/cnnbased.yaml # Train CNN model
5. Conclusion
In this article, we have provided an MLOps project structure template and applied it for the handwritten digit classification problem. We demonstrated how the MLOps workflow is applied to solve this problem and drew up a project structure template that you can use as a Cookiecutter project or a Github template. If you find the template helpful, please give it a star on GitHub so that others can discover it. If you are new to MLOps, you can read my beginner-friendly tutorial.
In the next articles, we will continue with this example to cover all the MLOps workflow and principles. I will be writing more tutorials on MLOps and its various technologies with examples, so stay tuned.
Thanks for reading this article. You can find the example project in my GitHub profile. If you have any questions or suggestions, feel free to leave a comment.
Image credits
All images and figures in this article whose source is not mentioned in the caption are by the author.
Structuring Your Machine Learning Project with MLOps in Mind was originally published in Towards Data Science on Medium, where people are continuing the conversation by highlighting and responding to this story.
...