

 800+ IT
News
als RSS Feed abonnieren
800+ IT
News
als RSS Feed abonnieren📚 Laravel for Beginners #3 - The CRUD Operations
💡 Newskategorie: Programmierung
🔗 Quelle: dev.to
Now, we are finally going to start using everything we've learned about Laravel so far, and use it to create a real project.
Let's start with something easier. In this article, we are going to create a mini blog, and it only contains posts, without categories or tags. Each post has a title and a content. This is not a full-featured blog application, but through this example, I'm going to demonstrate exactly how to retrieve data from the database, how to create/update new information, how to save them in the database, as well as how to delete them.
Designing database structure
First, let's deal with the database. We'll create a migration file for the post table. This table should contain the title and the content. Generate a migration file with the following command:
php artisan make:migration create_posts_table
<?php

use Illuminate\Database\Migrations\Migration;
use Illuminate\Database\Schema\Blueprint;
use Illuminate\Support\Facades\Schema;

return new class extends Migration
{
    /**
     * Run the migrations.
     */
    public function up(): void
    {
        Schema::create('posts', function (Blueprint $table) {
            $table->id();
            $table->timestamps();
            $table->string('title');
            $table->text('content');
        });
    }

    /**
     * Reverse the migrations.
     */
    public function down(): void
    {
        Schema::dropIfExists('posts');
    }
};
In this example, we created five columns in the post table:
-
id()creates anidcolumn, which is commonly used for indexing. -
timestamps()creates two columns,created_atanduptated_at. These two columns will be automatically updated when the record is created and updated. -
string('title')creates a columntitlewith typeVARCHAR, whose default length is 255 bytes. -
string('content')creates the content column.
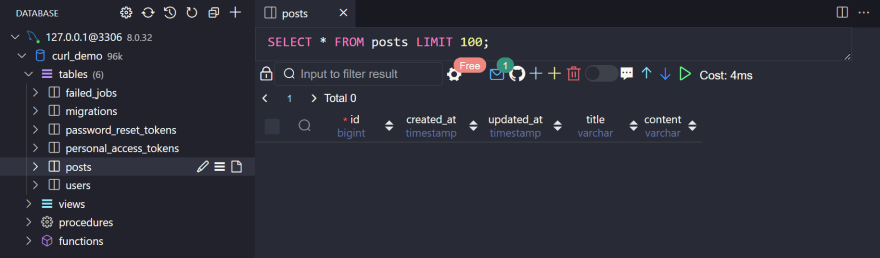
To apply the changes, run the following command:
php artisan migrate
And a new posts table should be generated:
Now, we can create the corresponding model for this table.
php artisan make:model Post
app/Models/Post.php
<?php

namespace App\Models;

use Illuminate\Database\Eloquent\Factories\HasFactory;
use Illuminate\Database\Eloquent\Model;

class Post extends Model
{
    use HasFactory;
}
And generate the corresponding resource controller:
php artisan make:controller PostController --resource
Finally, register this controller in the router:
use App\Http\Controllers\PostController;

Route::resource('posts', PostController::class);
You may check what routes are registered by running the following command:
php artisan route:list
GET|HEAD        posts ................................................................. posts.index › PostController@index
POST            posts ................................................................. posts.store › PostController@store
GET|HEAD        posts/create ........................................................ posts.create › PostController@create
GET|HEAD        posts/{post} ............................................................ posts.show › PostController@show
PUT|PATCH       posts/{post} ........................................................ posts.update › PostController@update
DELETE          posts/{post} ...................................................... posts.destroy › PostController@destroy
GET|HEAD        posts/{post}/edit ....................................................... posts.edit › PostController@edit
The output contains information such as request methods, controller methods, as well as route names. These information are very important, and we are going to need them later in this article.
The CRUD operations
Now it is time for us to dive into the application itself. When building real-life applications, it is unlikely for you to create all the controllers first, and then design the templates, and then move on to the routers. Instead, you need to think from the user's perspective, and think about what actions the use might want to take.
In general, the user should have the ability to perform four operations to each resource, which in our case, is the Post.
- Create: The user should be able to create new resources and save them in the database.
- Read: The user should be able to read resources, both retrieving a list of resources, as well as checking the details of a specific resource.
- Update: The user should be able to update existing resources, and update the corresponding database record.
- Delete: The user should be able to remove a resource from the database.
Together, they are referred to as the CRUD operations.
The create action
Right now, our database is still empty, so the user might want to create new posts. SO let's start with the create (C) action. To complete this create action, you need two things:
- A
create()controller method, which displays a form, allowing the user to fill out the title and content. - A
store()controller method, which saves the newly created post to the database, and redirect the user to the list page.
The create() method matches the URL pattern /posts/create (GET method), and the store() method matches the URL /post (POST method).
Here is a brief review on HTTP methods in case you need a refresher:
- The
GETmethod is the most commonly used HTTP request method. It is used to request data and resources from the server.- The
POSTmethod is used to send data to the server, used for creating/updating a resource.- The
HEADmethod works just like theGETmethod. Except the HTTP response will only contain the head and not the body. This method is usually used by developers for debugging purposes.- The
PUTmethod is similar toPOST, with one small difference. When youPOSTa resource that already exists on the server, this action would not cause any difference. ThePUTmethod, however, will duplicate that resource, every time you make the request.- The
DELETEmethod removes a resource from the server.
Let's start with the create() method:
app/Http/Controllers/PostController.php
<?php

namespace App\Http\Controllers;

use App\Models\Post;
use Illuminate\Contracts\View\View;
. . .

class PostController extends Controller
{
    . . .

    /**
     * Show the form for creating a new resource.
     */
    public function create(): View
    {
        return view('posts.create');
    }

    . . .
}
This method will be executed when you send a GET request to /posts/create, and it points to the view views/posts/create.blade.php. Notice line 16, Response has been changed to View since this methods needs to return a view instead.
Next, we should create the corresponding view. We can start with the layout:
views/layout.blade.php
<!DOCTYPE html>
<html lang="en">

<head>
    <meta charset="UTF-8">
    <meta http-equiv="X-UA-Compatible" content="IE=edge">
    <meta name="viewport" content="width=device-width, initial-scale=1.0">
    <script src="https://cdn.tailwindcss.com"></script>
    @yield('title')
</head>

<body class="container mx-auto font-serif">
    <div class="bg-white text-black font-serif">
        <div id="nav">
            <nav class="flex flex-row justify-between h-16 items-center shadow-md">
                <div class="px-5 text-2xl">
                    <a href="{{ route('posts.index') }}">
                        My Blog
                    </a>
                </div>
                <div class="hidden lg:flex content-between space-x-10 px-10 text-lg">
                    <a href="{{ route('posts.create') }}" class="hover:underline hover:underline-offset-1">New Post</a>
                    <a href="https://github.com/ericnanhu" class="hover:underline hover:underline-offset-1">GitHub</a>
                </div>
            </nav>
        </div>

        @yield('content')

        <footer class="bg-gray-700 text-white">
            <div
                class="flex justify-center items-center sm:justify-between flex-wrap lg:max-w-screen-2xl mx-auto px-4 sm:px-8 py-10">
                <p class="font-serif text-center mb-3 sm:mb-0">Copyright © <a href="https://www.ericsdevblog.com/"
                        class="hover:underline">Eric Hu</a></p>

                <div class="flex justify-center space-x-4">
                    . . .
                </div>
            </div>
        </footer>
    </div>
</body>

</html>
Line 17 and 22, the double curly braces ({{ }}) allows you to execute PHP code inside the template, and in the case, the route('posts.index') method will return the route whose name is posts.index. You may check the route names by referring to the output of the php artisan route:list command.
Next, let's move on to the create view. You need to be organized here. Since this create view is for post related actions, I created a post directory to store this view.
views/posts/create.blade.php
@extends('layout')

@section('title')
<title>Create</title>
@endsection

@section('content')
<div class="w-96 mx-auto my-8">
    <h2 class="text-2xl font-semibold underline mb-4">Create new post</h2>
    <form action="{{ route('posts.store') }}" method="POST">
        {{ csrf_field() }}
        <label for="title">Title:</label><br>
        <input type="text" id="title" name="title"
            class="p-2 w-full bg-gray-50 rounded border border-gray-300 focus:ring-3 focus:ring-blue-300"><br>
        <br>
        <label for="content">Content:</label><br>
        <textarea type="text" id="content" name="content" rows="15"
            class="p-2 w-full bg-gray-50 rounded border border-gray-300 focus:ring-3 focus:ring-blue-300"></textarea><br>
        <br>
        <button type="submit"
            class="font-sans text-white bg-blue-700 hover:bg-blue-800 focus:ring-4 focus:outline-none focus:ring-blue-300 font-medium rounded-md text-sm w-full px-5 py-2.5 text-center">Submit</button>
    </form>
</div>
@endsection
There are a few things we need to notice when using forms to transfer data.
Line 10, the action attribute defines what happens when this form is submitted, and in this case, it instructs the browser to visit the route posts.store, with a POST HTTP method.
Line 11, {{ csrf_field() }}. CSRF is a malicious attack targeting web applications, and this csrf_field() function provides protection against that type of attack. You can read more about CSRF (Cross-site request forgery) here.
Line 13 and 17, pay attention to the name attribute. When the form is submitted, the user input will be tied to a variable, whose name is specified by the name attribute. For instance, when name="title", the user input will be tied to the variable title, and we can access its value using $request->input('title'). We'll see exactly how this works later.
Line 20, the type attribute must be set to submit for this form to work.
Now start the dev server and go to http://127.0.0.1:8000/posts/create.
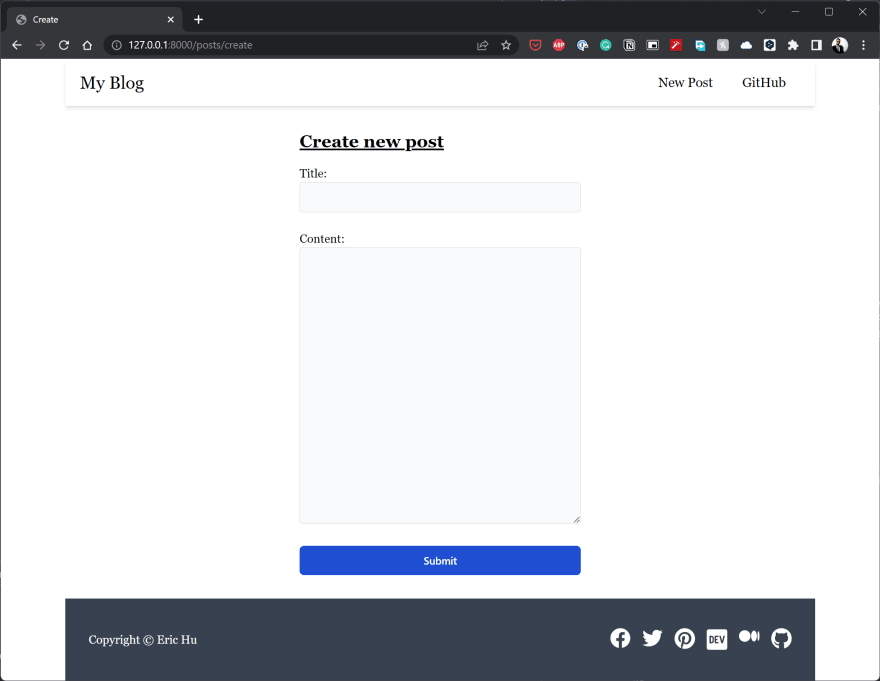
When the submit button is clicked, the browser will send a POST request to the server, and this time, the store() method will be executed. This POST request will contain user input, and they can be accessed like this:
PostController.php
<?php

namespace App\Http\Controllers;

. . .

class PostController extends Controller
{
    . . .

    /**
     * Store a newly created resource in storage.
     */
    public function store(Request $request): RedirectResponse
    {
        // Get the data from the request
        $title = $request->input('title');
        $content = $request->input('content');

        // Create a new Post instance and put the requested data to the corresponding column
        $post = new Post;
        $post->title = $title;
        $post->content = $content;

        // Save the data
        $post->save();

        return redirect()->route('posts.index');
    }

    . . .
}
After the data has been stored, you will be redirected to the posts.index route.
Head back to your browser and type in a new title and content, and then click the submit button. The index view hasn't been created yet, so an error message will be returned. However, if you check the database, a new record should be added.

The list action
Next, let's work on the read operation (R). There are, in fact, two different types of read operations. The first one is the list action, which returns a listing of all posts to the user. This action corresponds to the index() method:
PostController.php
<?php

namespace App\Http\Controllers;

use App\Models\Post;
use Illuminate\Contracts\View\View;
use Illuminate\Http\RedirectResponse;
use Illuminate\Http\Request;
use Illuminate\Http\Response;

class PostController extends Controller
{
    /**
     * Display a listing of the resource.
     */
    public function index(): View
    {
        $posts = Post::all();

        return view('posts.index', [
            'posts' => $posts,
        ]);
    }

    . . .
}
And here is the corresponding index view:
views/post/index.blade.php
@extends('layout')

@section('title')
<title>Page Title</title>
@endsection

@section('content')
<div class="max-w-screen-lg mx-auto my-8">
    @foreach($posts as $post)
    <h2 class="text-2xl font-semibold underline mb-2"><a href="{{ route('posts.show', ['post' => $post->id]) }}">{{ $post->title }}</a></h2>
    <p class="mb-4">{{ Illuminate\Support\Str::words($post->content, 100) }}</p>
    @endforeach
</div>
@endsection
Line 9, foreach iterates over all retrieved $posts, and assign each value to the variable $post.
Line 10, notice how the post id is passed to the posts.show route. The route will then pass this variable to the show() controller method, which you'll see later.
Line 11, the Str::words() method is a PHP helper, and it will only take the first 100 words of the content.
The show action
The second read operation is the show action, which displays the details of a specific resource. This action is achieved with the show() method.
PostController.php
<?php

namespace App\Http\Controllers;

use App\Models\Post;
use Illuminate\Contracts\View\View;
use Illuminate\Http\RedirectResponse;
use Illuminate\Http\Request;
use Illuminate\Http\Response;

class PostController extends Controller
{
    . . .

    /**
     * Display the specified resource.
     */
    public function show(string $id): View
    {
        $post = Post::all()->find($id);

        return view('posts.show', [
            'post' => $post,
        ]);
    }

    . . .
}
views/post/show.blade.php
@extends('layout')

@section('title')
<title>{{ $post->title }}</title>
@endsection

@section('content')
<div class="max-w-screen-lg mx-auto my-8">

    <h2 class="text-2xl font-semibold underline mb-2">{{ $post->title }}</h2>
    <p class="mb-4">{{ $post->content }}</p>

    <div class="grid grid-cols-2 gap-x-2">
        <a href="{{ route('posts.edit', ['post' => $post->id]) }}"
            class="font-sans text-white bg-blue-700 hover:bg-blue-800 focus:ring-4 focus:outline-none focus:ring-blue-300 font-medium rounded-md text-sm w-full px-5 py-2.5 text-center">Update</a>
        <form action="{{ route('posts.destroy', ['post' => $post->id]) }}" method="POST">
            {{ csrf_field() }}
            {{ method_field('DELETE') }}
            <button type="submit"
                class="font-sans text-white bg-red-700 hover:bg-red-800 focus:ring-4 focus:outline-none focus:ring-red-300 font-medium rounded-md text-sm w-full px-5 py-2.5 text-center">Delete</button>
        </form>
    </div>
</div>
@endsection
There are a few things we must note here. First, notice how the Update button is a simple link, but the Delete button is a form. This is because a link would tell the browser to send a GET request to the server, but we need something else for the delete action.
Next, if you look inside the form, you will find that this form has method="POST", but we need a DELETE method for the delete action. This is because by default, HTML only supports GET and POST methods, and if you need something else, you must set method="POST", and use the method_field() method instead.
The update action
Next, for the update operation, we have the edit() method that displays an HTML form, and the update() method that make changes to the database.
PostController.php
<?php

namespace App\Http\Controllers;

use App\Models\Post;
use Illuminate\Contracts\View\View;
use Illuminate\Http\RedirectResponse;
use Illuminate\Http\Request;
use Illuminate\Http\Response;

class PostController extends Controller
{
    . . .

    /**
     * Show the form for editing the specified resource.
     */
    public function edit(string $id): View
    {
        $post = Post::all()->find($id);

        return view('posts.edit', [
            'post' => $post,
        ]);
    }

    /**
     * Update the specified resource in storage.
     */
    public function update(Request $request, string $id): RedirectResponse
    {
        // Get the data from the request
        $title = $request->input('title');
        $content = $request->input('content');

        // Find the requested post and put the requested data to the corresponding column
        $post = Post::all()->find($id);
        $post->title = $title;
        $post->content = $content;

        // Save the data
        $post->save();

        return redirect()->route('posts.show', ['post' => $id]);
    }

    . . .
}
views/post/edit.blade.php
@extends('layout')

@section('title')
<title>Edit</title>
@endsection

@section('content')
<div class="w-96 mx-auto my-8">
    <h2 class="text-2xl font-semibold underline mb-4">Edit post</h2>
    <form action="{{ route('posts.update', ['post' => $post->id]) }}" method="POST">
        {{ csrf_field() }}
        {{ method_field('PUT') }}
        <label for="title">Title:</label><br>
        <input type="text" id="title" name="title" value="{{ $post->title }}"
            class="p-2 w-full bg-gray-50 rounded border border-gray-300 focus:ring-3 focus:ring-blue-300"><br>
        <br>
        <label for="content">Content:</label><br>
        <textarea type="text" id="content" name="content" rows="15"
            class="p-2 w-full bg-gray-50 rounded border border-gray-300 focus:ring-3 focus:ring-blue-300">{{ $post->content }}</textarea><br>
        <br>
        <button type="submit"
                class="font-sans text-white bg-blue-700 hover:bg-blue-800 focus:ring-4 focus:outline-none focus:ring-blue-300 font-medium rounded-md text-sm w-full px-5 py-2.5 text-center">Submit</button>
    </form>
</div>
@endsection
The delete action
And finally, the destroy() method:
PostController.php
<?php

namespace App\Http\Controllers;

use App\Models\Post;
use Illuminate\Contracts\View\View;
use Illuminate\Http\RedirectResponse;
use Illuminate\Http\Request;
use Illuminate\Http\Response;

class PostController extends Controller
{
    . . .

    /**
     * Remove the specified resource from storage.
     */
    public function destroy(string $id): RedirectResponse
    {
        $post = Post::all()->find($id);

        $post->delete();

        return redirect()->route('posts.index');
    }
}
This action does not require a view, since it just redirects you to posts.index after the action is completed.
...If you liked this article, please also check out my other tutorials: