

 800+ IT
News
als RSS Feed abonnieren
800+ IT
News
als RSS Feed abonnieren📚 Integrating Cosmos DB with OData (Part 3)
💡 Newskategorie: Programmierung
🔗 Quelle: devblogs.microsoft.com
Sometimes requiring to build an entire ASP.NET Core application just for the purpose of exposing a RESTFul API endpoint to give your API consumers the ability to query, filter and order the data could be a bit of an overhead, especially if you are not planning on adding in any additional business logic between your data and it’s consumers.
It’s not also a very cost effective solution when it comes to the development effort, maintenance, infrastructure and all the bells and whistles that accompany developing a custom ASP.NET Core API.
If that’s the case for your task, Cosmos DB offers native support for OData out of the box without having to add an additional layer of infrastructure.
In this article, we will discuss how you can leverage Cosmos DB native support for OData while exposing an API and leveraging a secure reliable geo-redundant communications between your clients and your data resources.
Setting Things Up
Let’s start with Azure Dashboard where we need to setup up our infrastructure.
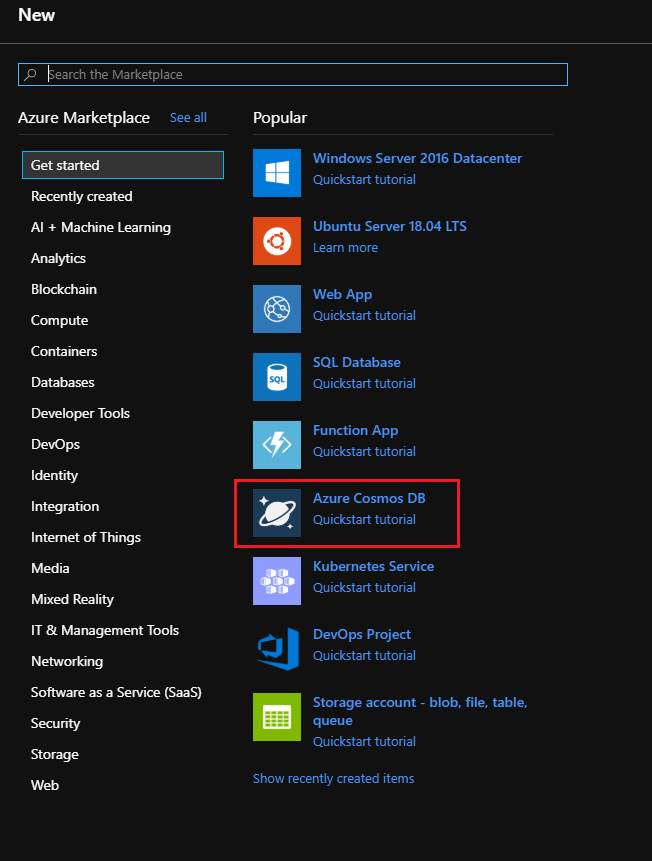
1. At the front page of Azure Dashboard, Click on the plus sign to Create a resource as highlighted in the screenshot below:

2. Select Azure Cosmos DB Option from the list of cloud services presented in the next dialog:
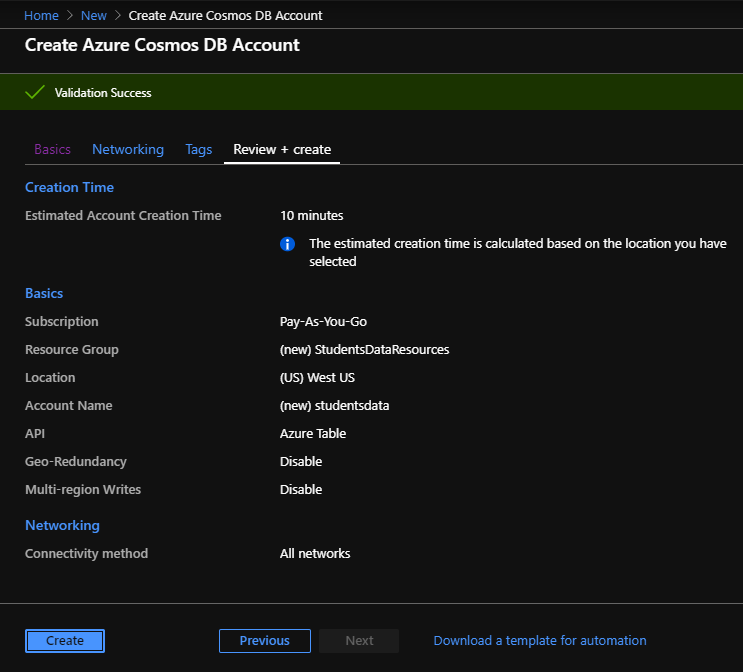
3. In this page we are going to setup all the information needed to create a Cosmos DB instance as shows in the following screenshot:

After selecting the subscription you would like to use for your Cosmos DB, you will need to select the resource group where you need your Cosmos DB instance to reside. If you don’t have an existing resource group, you can click Create new link right below the resource group drop down to create a new resource group for your resources.
You will also notice in the screenshot that we’ve chosen studentsdata as an account name for the purpose of this demo, but the most important part of this setup is to select the right API to ensure you can leverage the native support of OData, in our demo here, you will need to select Azure Table which is the API Cosmos DB offers with OData support as we will discuss further in this article.
You can also enable the Geo-Redundancy option for your instance to enable global distribution on your account across multiple regions, you can also enable that option later as your data needs grow, additionally you can also enable the Multi-region Writes which should allow you to take advantage of the provisioned throughput for your databases and containers across the globe, for the purpose of this demo, we will keep both options disabled.
4.Once you have accomplished the aforementioned steps, click the Review + Create button to review all the information you’ve entered as follows:
The process of creating a Cosmos DB instance takes between 5 – 10 minutes to be fully provisioned and deployed. Once the deployment is done click on Go to resource blue button to start working with your Cosmos DB instance as shows in the following screenshot:

Let’s move on to the next part of this article, which is to create a table with some data so we can examine our OData querying options.
Adding Some Data
To add some data to your new instance, we will need to create a table or container for this data first, in order for you to do that follow the following steps.
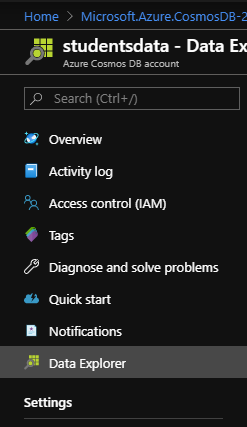
1. Click on the Data Explorer option to navigate to data manipulation and querying page as shows in the following screenshot:
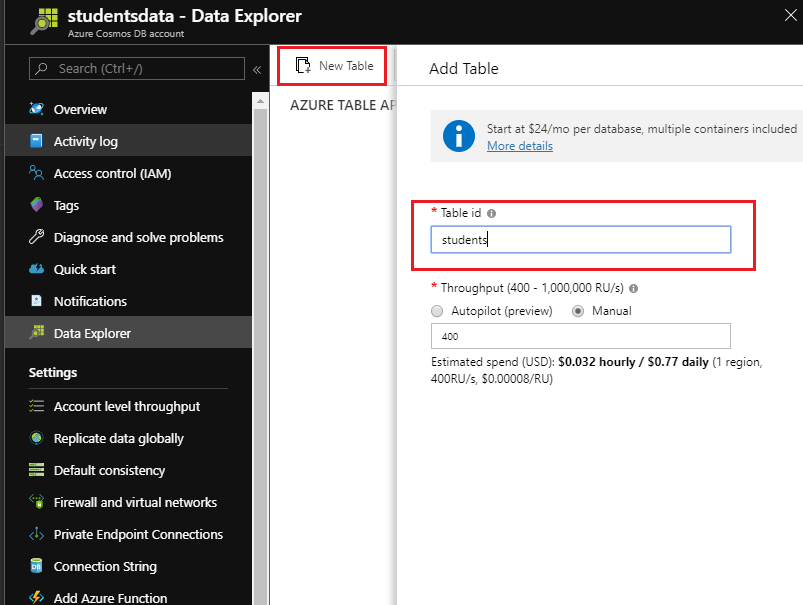
2. Now in the new page, click New Table option at the top left corner to create a table that contains our sample data, once clicked, a dialog will appear from the right side to enable you to give your new data table a name, for the purpose of our demo here, we are going to call our new table students as highlighted in the screenshot below:
3. Now that your table is created, you will need to navigate to your table by expanding TablesDB root item on the left hand in the navigation pane, then at the top click on Add Entity then start defining the properties of the student entity that you would like to store in the table as shows in the following screenshot:
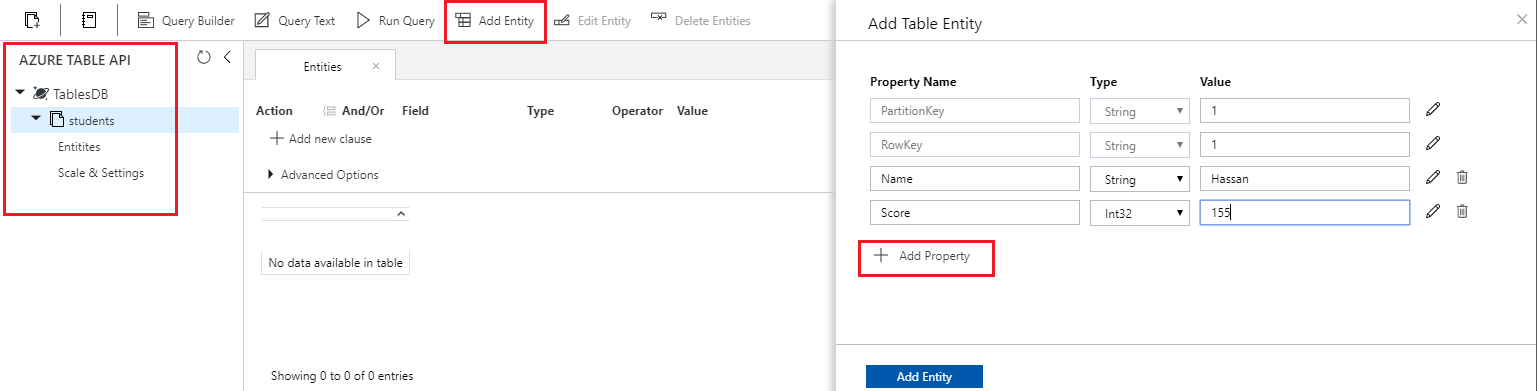
You will notice that the PartitionKey and the RowKey are mandatory keys that you cannot remove or modify their types, they play the role of primary key in an equivalent relational database system, but you can, however add unique values and query the data based on these values.
Since both properties are of string data types, you can choose to add whichever values you want in there, stringified Guids, numbers or any other form of unique identifiers.
But as it shows in the screenshot above, we needed to add more properties to our entity here, we added Name with a data type string, and a Score with data type Int32. now let’s add some entities for our demo as shows in the following screenshot:
Consuming the Data
This is the part where we consume the data that we have created and examine our OData querying against our the students data table that we have created.
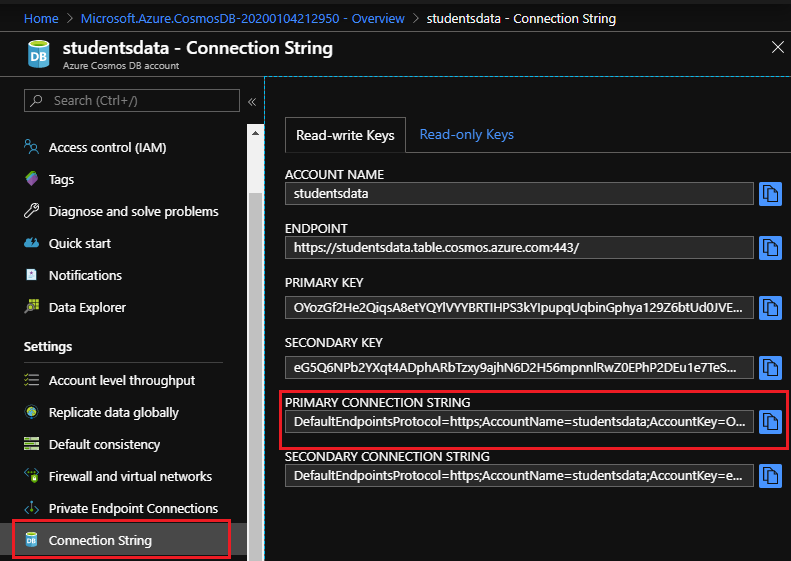
But before we start writing any code, make sure you copy the Connection String of your Cosmos DB instance so you can establish a secure communication between your client and your Cosmos API.
You can find the Connection String of your instance simply by going to the Connection String navigation option on the left hand side of your Azure instance and copying the Primary Connection String as shows in the following screenshot:
1. Now, let’s start by create a simple client as a Console Application in Visual Studio to consume and query our data as follows:
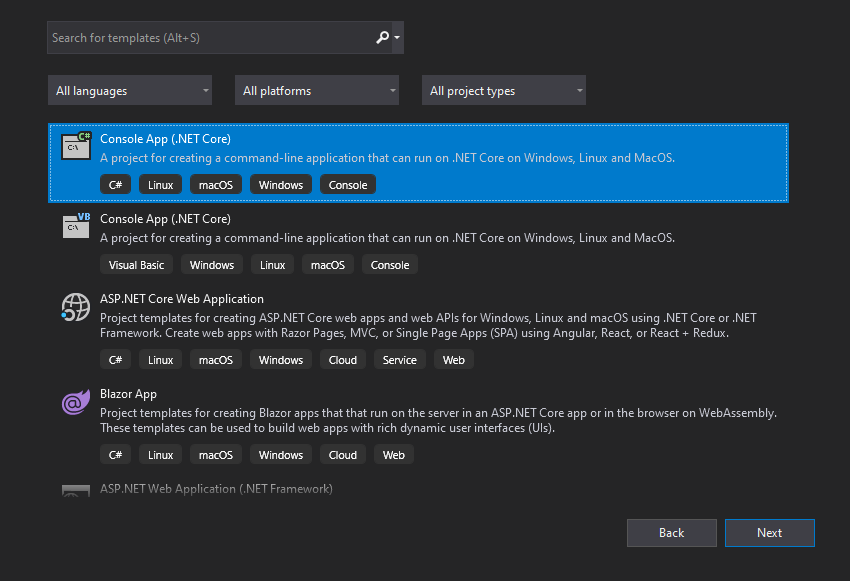
We will be going with a Console App (.NET Core) in this demo, let’s call our App StudentsDataClient.
2. We will need to add a nuget package to enable the authentication and communication, querying and navigation between our simple app and our Cosmos DB students table, the nuget package is Microsoft.Azure.Cosmos.Table specifically version 1.0.6. You can add the package simply by using Manage Nuget Packages option in Visual Studio or by simply typing the following command in the Package Manager Console:
Install-Package Microsoft.Azure.Cosmos.Table -Version 1.0.6
3. Now, that we had our project setup, let’s start by creating a model that reflects the same properties we have created in our students Cosmos DB table, so, in a new file let’s call it Student.cs let’s create the following model:
using Microsoft.Azure.Cosmos.Table;

namespace StudentsDataClient
{
    public class Student : TableEntity
    {
        public string? Name { get; set; }
        public int? Score { get; set; }
    }
}
You will notice that our Student model here inherits from another model called TableEntity, this inheritance is necessary to include all the other properties that a Cosmos DB Table record has, such as the PartitionKey, RowKey, Timestamp in addition to a native implementation of ReadEntity and WriteEntity functions which are needed to map a Cosmos DB record to a strongly typed model for both reading from and writing to your table.
You can also override these methods and properties or simply replace TableEntity with ITableEntity and start implementing all the aforementioned properties and functions.
You will also notice that we defined all our properties here as nullable with a question mark by the type of each, this enables us to ignore properties that are discarded in an OData query, otherwise the return result will be the initial value of the primitive type of the property, for instance, Score would return 0’s.
4. With our model being implemented, let’s instantiate a Cosmos DB client to establish a secure communication while retrieving everything in our table with an empty query as follows:
using System.Threading.Tasks;
using Microsoft.Azure.Cosmos.Table;

namespace StudentsDataClient
{
    class Program
    {
        static async Task Main(string[] args)
        {
            string connectionString = "YOUR_PRIMARY_CONNECTION_STRING";
            CloudStorageAccount storageAccount = CloudStorageAccount.Parse(connectionString);
            CloudTableClient tableClient = storageAccount.CreateCloudTableClient();

            CloudTable table = tableClient.GetTableReference("students");
            TableQuery<Student> tableQuery = new TableQuery<Student>();

            TableQuerySegment<Student> studentsSegment =
                await table.ExecuteQuerySegmentedAsync(tableQuery, token: null);

            studentsSegment.Results.ForEach(i =>
                Console.WriteLine("{0,5} {1,10} {2,-10}", i.PartitionKey, i.Name, i.Score));

            Console.ReadKey();
        }
    }
}
Let’s walk through the previous code snippet:
First of all make sure you reference Microsoft.Azure.Cosmos.Table in your usings so you can access all the models, methods and functionality the library offers.
Secondly, make sure you change your main method from by synchronous to asynchronous by changing the return type from void to Task and adding the async option. you will need to do that so you can await and execute asynchronous calls in your Main method.
Asynchronous Main methods were introduced with C# 7.1 – you will want to make sure you’re using that version or later to establish this.
We have also used the Connection String variable to contain the reference we have copied from our Cosmos DB instance, please refer to the beginning of this part to find out where to get that value in Azure.
The rest of the code is simply a validation/parsing of the connection string then using a CreateCloudTableClient factory method to instantiate Cosmos DB table client for our further communications.
We also, reference the students table to target that particular data container in our Cosmos DB account, this step is important because a Cosmos DB account could contain many, many other tables.
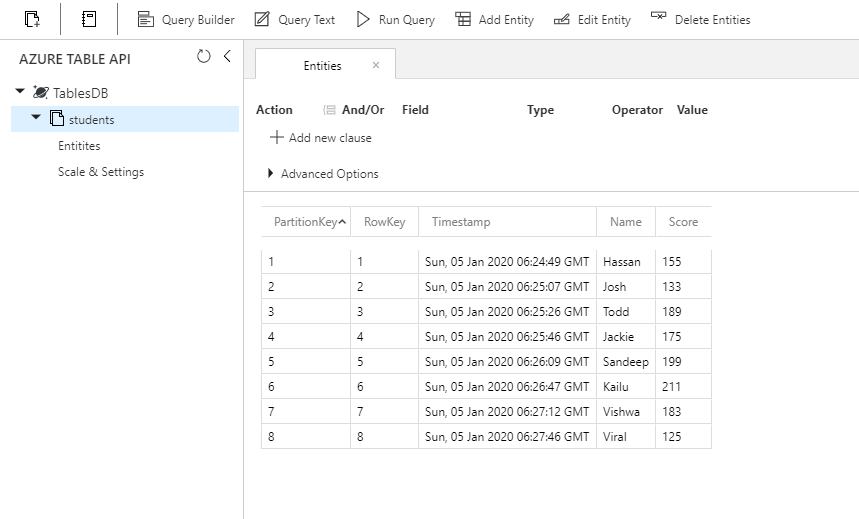
Our TableQuery in this basic example is completely empty, but in the next steps I’m going to show you how you can leverage that object to run OData queries shortly – but for now, running the code above results the following Console output as follows:
1     Hassan 155
    2       Josh 133
    3       Todd 189
    4     Jackie 175
    5    Sandeep 199
    6      Kailu 211
    7     Vishwa 183
    8      Viral 125
OData Querying
Now that we have successfully retrieved all the data we entered in our Cosmos DB table, let’s execute some of the powerful features of OData.
Filtering
Let’s start with the filtering feature of OData to only return students with score higher than 150 as follows:
TableQuery<Student> tableQuery = new TableQuery<Student>
{
     FilterString = "Score gt 150"
};
The result will be as follows:
1     Hassan 155
    3       Todd 189
    4     Jackie 175
    5    Sandeep 199
    6      Kailu 211
    7     Vishwa 183
You can also establish the same filtering process by modifying your code as follows:
TableQuery<Student> tableQuery = new TableQuery<Student>();
tableQuery.Where("Score gt 150");
And here’s a third option as well:
TableQuery<Student> tableQuery = new TableQuery<Student>();
string filter = TableQuery.GenerateFilterConditionForInt("Score", QueryComparisons.GreaterThan, 150);
tableQuery.Where(filter);
For filtering with the last option, the library offers multiple methods for comparing several primitive data types, such as GenerateFilterConditionForBinary, GenerateFilterConditionForDate, GenerateFilterConditionForInt and many other options, the default method GenerateFilterCondition compares against strings by default.
You can also use the same pattern to combine multiple filters as follows:
TableQuery<Student> tableQuery = new TableQuery<Student>();

string filter = TableQuery.CombineFilters(
     TableQuery.GenerateFilterConditionForInt("Score", QueryComparisons.GreaterThan, 150),
     TableOperators.And,
     TableQuery.GenerateFilterCondition("Name", QueryComparisons.Equal, "Hassan"));

tableQuery.Where(filter);
Selecting
Now, let’s experiment with selecting particular properties off of our results, for instance, if we only care about students names, regardless of their score, we can implement the following code:
TableQuery<Student> tableQuery = new TableQuery<Student>();
List<string> columns = new List<string> { "Name" };
tableQuery.Select(columns);
The above code will yield the following results:
1     Hassan
    2       Josh
    3       Todd
    4     Jackie
    5    Sandeep
    6      Kailu
    7     Vishwa
    8      Viral
The Score property are not in display in our code because we declared it as nullable property, therefore the Console writer will ignore it if not fulfilled by Cosmos API response.
Ordering
You can also execute ordering in an ascending or descending fashion based on a particular property such as Name as follows:
TableQuery<Student> tableQuery = new TableQuery<Student>();
tableQuery.OrderBy("Name");
The above code result the following details:
1     Hassan 155
    4     Jackie 175
    2       Josh 133
    6      Kailu 211
    5    Sandeep 199
    3       Todd 189
    8      Viral 125
    7     Vishwa 183
You can also leverage the ordering in descending fashion by using OrderByDesc the exact same way.
Take
You can also leverage the Take functionality by getting only a specific count of the final result to be returned as follows:
TableQuery<Student> tableQuery = new TableQuery<Student>();
tableQuery.Take(take: 3);
The above code should returning the following results:
1     Hassan 155
    2       Josh 133
    3       Todd 189
Final Notes
- The Cosmos DB team has an extensive documentation about all the capabilities of the technology and thorough details on the client library you can find that documentation in this link.
- There are few capabilities the library & the API do not offer such as IN and Expand functionality, mainly due to the non-relational nature of Cosmos and Table API.
- This is the link to a github repository for the code we used in this article.
The post Integrating Cosmos DB with OData (Part 3) appeared first on OData.
...