Posted by Cheng Xing and Michael Broughton, Google
Posted by Cheng Xing and Michael Broughton, Google
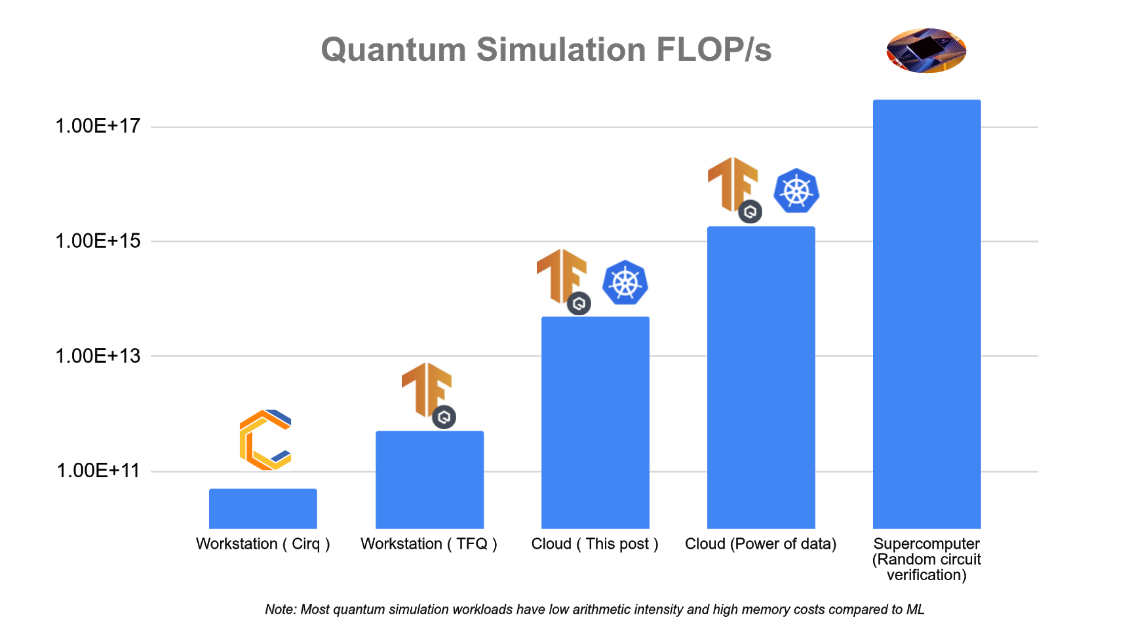
From our experiments in the multi-worker setting, training a 23-qubit QCNN with 1,000 training examples, which corresponds to roughly 3,000 circuits simulated using full state vector simulation takes 5 minutes per epoch on a 32 node (512 vCPU) cluster, which costs a few US dollars. By comparison, the same training job on a single-worker would take roughly 4 hours per epoch. Pushing things a little bit farther, GitHub repository. README.md contains the quickest way to get this tutorial up and running. This tutorial will instead focus on walk through each step in detail, to help you understand the underlying concepts and integrate them with your own projects. Let’s get started!
The first step is to create the infrastructure resources in Google Cloud. If you have an existing Google Cloud environment, the exact steps might vary, due to organizational policy constraints for example. This is a guideline to the most common set of necessary steps. Note that you will be charged for Google Cloud resources you create, and . If you are part of an academic institution, you may be eligible for , which already contains many of the tools mentioned later.
A script automating the steps below is available in To get your cloud environment ready, first follow these quick start guides: For purposes of this tutorial, you could stop the Kubernetes Engine quickstart right before the instructions for creating a cluster. In addition, install For reference, shell commands throughout the tutorial will refer to these variables. Some of them will make more sense later on in the tutorial in the context of each command. To check your roles, run: After you’ve completed the quickstart guides, run this command to create a Kubernetes cluster: To make your Cloud Storage data accessible by your QCNN jobs, give permissions to your IAM service account: With the cloud environment set up, you can now install the necessary Kubernetes tools into the cluster. You’ll need To install You can now take the : The . This is the main infrastructure platform executing your QCNN jobs in this tutorial. gsutil, the Cloud Storage command-line tool (if you are using Cloud Shell, gsutil is already installed): BASH gcloud components install gsutil${CLUSTER_NAME}: your preferred Kubernetes cluster name on Google Kubernetes Engine. ${PROJECT}: your Google Cloud project ID. ${NUM_NODES}: the number of VMs in your cluster. ${MACHINE_TYPE}: the of owner, or all of the following roles: container.admin iam.serviceAccountAdmin storage.admin with your Google Cloud project ID and search for your user account. BASH gcloud projects get-iam-policy ${PROJECT} with your Google Cloud project ID and preferred cluster name. BASH gcloud container clusters create ${CLUSTER_NAME} --workload-pool=${PROJECT}.svc.id.goog --num-nodes=${NUM_NODES} --machine-type=${MACHINE_TYPE} --zone=${ZONE} --preemptible--num-nodes is the number of . If you are trying this tutorial for the first time, we recommend “n1-standard-2”, with 2 vCPUs and 7.5GB of memory. --zone is the Google Cloud feature, which ties . In order to have fine-grained access control, an IAM service account is recommended to access various Google Cloud products. Here you’ll create a service account to be used by your QCNN jobs. Kubernetes service account is the mechanism to inject the credentials of this IAM service account into your worker container. --preemptible uses Compute Engine , so we recommend including your project name as part of the bucket name. The bucket region is recommended to be the region containing your cluster’s zone. The region of a zone is the part of the zone name without the section after the last hyphen. For example, the region of zone "us-west1-a" is "us-west1". BASH gsutil iam ch serviceAccount:${SERVICE_ACCOUNT_NAME}@${PROJECT}.iam.gserviceaccount.com:roles/storage.admin gs://${BUCKET_NAME}2. Preparing Your Kubernetes Cluster
tf-operator, a component from KubeFlow. is a subcomponent which simplifies the management of TensorFlow jobs. tf-operator can be installed separately without the larger KubeFlow installation. tf-operator, run: (Note that tf-operator uses Kustomize to manage its deployment files, so it needs to be installed here as well) BASH docker pull k8s.gcr.io/kustomize/kustomize:v3.10.0
docker run k8s.gcr.io/kustomize/kustomize:v3.10.0 build "github.com/kubeflow/tf-operator.git/manifests/overlays/standalone?ref=v1.1.0" | kubectl apply -f -3. Training with MultiWorkerMirroredStrategy
BASH git clone [email protected]:tensorflow/quantum.git && cd quantum && git checkout origin/research && cd qcnn_multiworkerCode Setup
training directory contains the necessary pieces for performing distributed training of your QCNN. The combination of training/qcnn.py and common/qcnn_common.py is the same as the hybrid QCNN example in TensorFlow Quantum, but with a few feature additions: tf.distribute.MultiWorkerMirroredStrategy.
At the beginning of environment variable is typically used for this purpose, but in our case, the tf-operator injects it automatically behind the scenes.
After the model is trained, weights are uploaded to your Cloud Storage bucket to be accessed later by the inference job.
if task_type == 'worker' and task_id == 0:
    qcnn_weights_path='/tmp/qcnn_weights.h5'
    qcnn_model.save_weights(qcnn_weights_path)
upload_blob(args.weights_gcs_bucket, qcnn_weights_path, f'qcnn_weights.h5')Before proceeding to the Kubernetes deployment setup and launching your workers, several parameters need to be configured in the tutorial source code to match your own setup. The provided script, Within the worker spec, there are a few notable fields: The output of You can also verify that model weights are saved by visiting the is TensorFlow’s visualization toolkit. By integrating your TensorFlow Quantum model with TensorBoard, you get many visualizations about your model out of the box, such as training loss & accuracy, visualizing the model graph, and program profiling. in Kubernetes, the QCNN job needs to be packaged as a container image using , which is the most fundamental unit of work that can be scheduled. Typically, users leverage existing resource types such as to create and manage workloads. You’ll instead use TFJob (as specified in the `kind` field), which is not a Kubernetes built-in resource type but rather a , which exposes a well-known network endpoint visible within the Kubernetes cluster to give access to the worker’s gRPC training server. Other workers can communicate with its server by simply pointing to <service_name>:<port> (the alternative form of <service_name>.<service_namespace>.svc:<port> works as well). 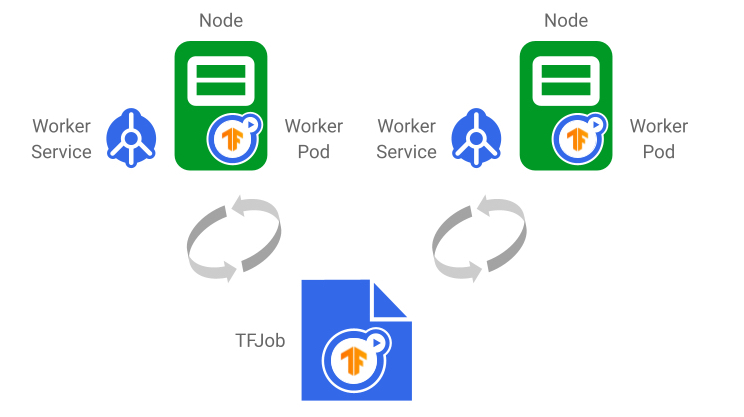
The TFJob generates one Service and Pod per worker replica. Once the TFJob is updated, changes are reflected in the underlying Services and Pods. Worker status is also reported in the TFJob. 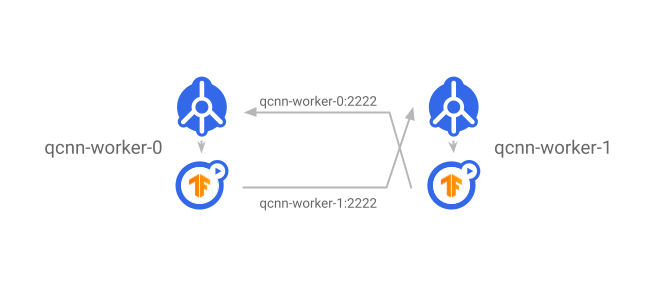
The Service exposes worker servers to the rest of the cluster. Each worker communicates with other workers by using the destination worker’s Service name as the DNS name.
To create the TFJob: BASH kubectl apply -f training/qcnn.yamlInspecting the Deployment
Congratulations! Your distributed training is now underway. To check the job’s status, run kubectl get pods a few times (or add -w to stream the output). Eventually you should see there are the same number of qcnn-worker Pods as your replicas parameter, and they all have status Running: To access the worker’s log output, run: TEXT NAME READY STATUS RESTARTS
qcnn-worker-0 1/1 Running 0
qcnn-worker-1 1/1 Running 0 or add BASH kubectl logs <worker_pod_name>-f to stream the output. The output of qcnn-worker-0 looks like this: TEXT …
I tensorflow/core/distributed_runtime/rpc/grpc_server_lib.cc:411] Started server with target: grpc:/
/qcnn-worker-0.default.svc:2222
…
I tensorflow/core/profiler/rpc/profiler_server.cc:46] Profiler server listening on [::]:2223 selecte
d port:2223
…
Epoch 1/50
…
4/4 [==============================] - 7s 940ms/step - loss: 0.9387 - accuracy: 0.0000e+00 - val_loss: 0.7432 - val_accuracy: 0.0000e+00
…
I tensorflow/core/profiler/lib/profiler_session.cc:71] Profiler session collecting data.
I tensorflow/core/profiler/lib/profiler_session.cc:172] Profiler session tear down.
…
Epoch 50/50
4/4 [==============================] - 1s 222ms/step - loss: 0.1468 - accuracy: 0.4101 - val_loss: 0.2043 - val_accuracy: 0.4583
File /tmp/qcnn_weights.h5 uploaded to qcnn_weights.h5.qcnn-worker-1 should be similar except the last line is missing. The chief worker (worker 0) is responsible for saving weights of the entire model. Code Setup
To enable TensorBoard for your job, create a TensorBoard callback and pass it into model.fit(): The PYTHON tensorboard_callback = tf.keras.callbacks.TensorBoard(log_dir=args.logdir,
histogram_freq=1,
update_freq=1,
profile_batch='10, 20')
…
history = qcnn_model.fit(x=train_excitations,
y=train_labels,
batch_size=32,
epochs=50,
verbose=1,
validation_data=(test_excitations, test_labels),
callbacks=[tensorboard_callback])profile_batch parameter enables the TensorFlow Profiler in programmatic mode, which samples the program during the training step range you specify here. You can also enable the sampling mode, which allows on-demand profiling initiated either by a different program or through the TensorBoard UI. PYTHON tf.profiler.experimental.server.start(args.profiler_port)TensorBoard Features
Here we’ll highlight a subset of TensorBoard’s many powerful features used in this tutorial. Check out the
In this tutorial, we use both the programmatic mode, in which profiling is done for a predefined training step range, as well as the sampling mode, in which profiling can be done on-demand. For a MultiWorkerMirroredStrategy setup, currently programmatic mode only outputs profiling data from the chief (worker 0), whereas sampling mode is able to profile all workers.
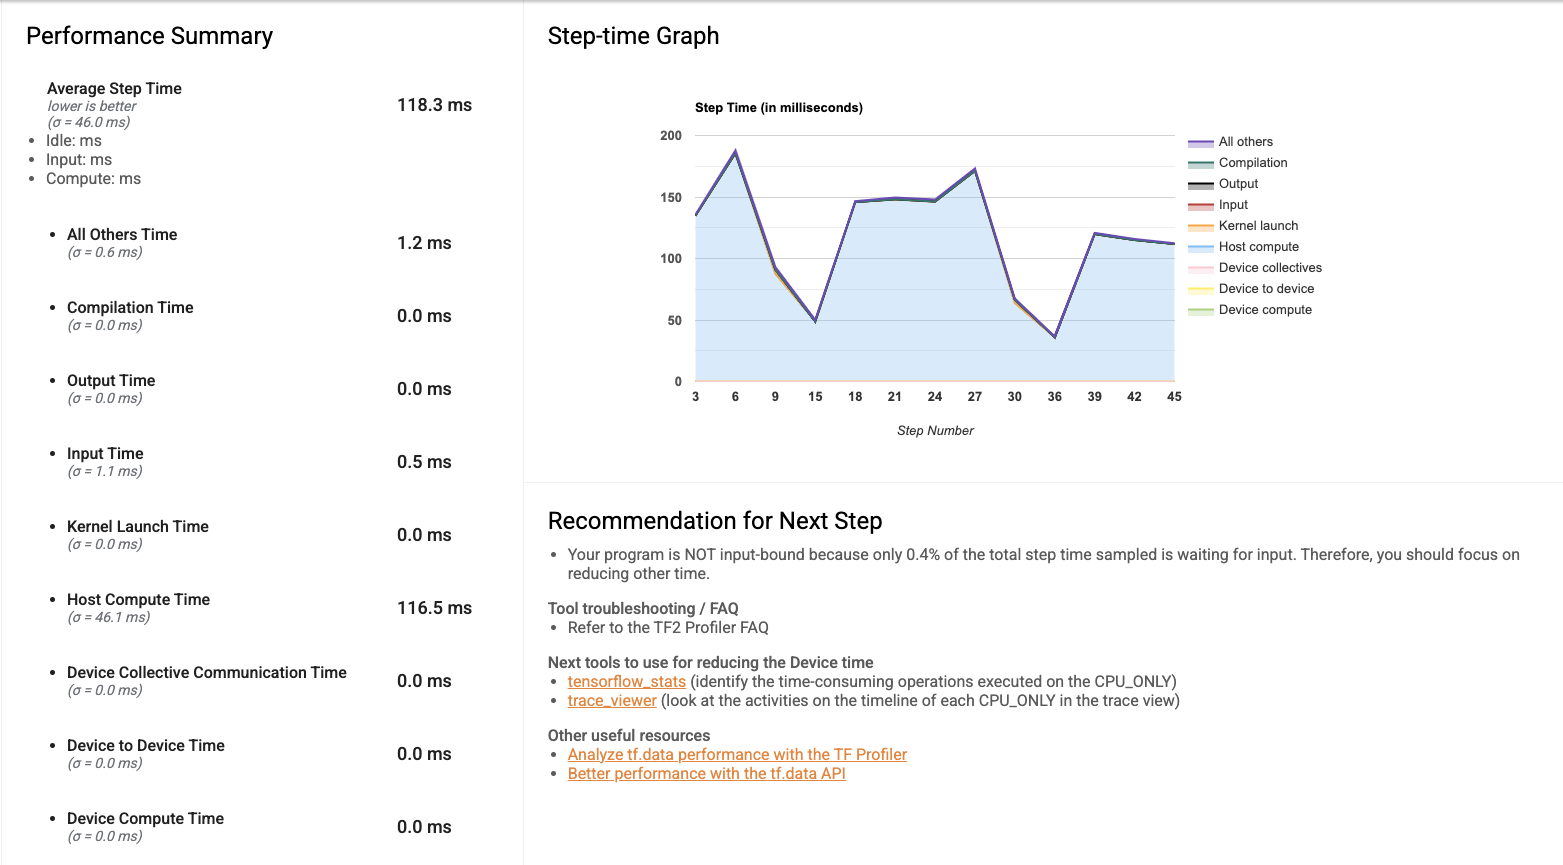
When you first open the Profiler, the data displayed is from the programmatic mode. The overview page gives you a sense of how long training took during each step. This will act as a reference as you experiment with different methods of improving training performance, whether that’s by scaling infrastructure (adding more VMs to the cluster, using VMs with more CPU and memory, integrating with hardware accelerators) or improving code efficiency.

To view the TensorBoard UI, you can create a TensorBoard instance in Kubernetes. The Kubernetes setup is in training/tensorboard.yaml. This file contains two objects:
tensorboard --logdir=gs://${BUCKET_NAME}/${LOGDIR_NAME} --port=5001 --bind_allqcnn. Now that you’ve tried out the multi-worker setup, try setting it up with your project! As all the tools mentioned in this tutorial continue to grow, best practices for training with multiple workers will change over time. Check back on the tutorial directory in the
 Ähnliche Beiträge
Thematisch verwandte Begriffe: Training, with, Multiple, Workers · 6 Treffer
Videos werden geladen ...
Beiträge werden geladen ...
Videos werden geladen ...
Beiträge werden geladen ...
Videos werden geladen ...
Beiträge werden geladen ...
Videos werden geladen ...
Beiträge werden geladen ...
Videos werden geladen ...
Installiere tsecurity.de direkt auf deinen Home-Bildschirm für das ultimative Vollbild-Magazinerlebnis ohne Browser-Leisten.
Reiche interessante Links, Zero-Days oder Debatten ein. Die Community entscheidet per Upvote über die Veröffentlichung.
SOCIAL SHARE CARD GENERATOR