

 800+ IT
News
als RSS Feed abonnieren
800+ IT
News
als RSS Feed abonnieren📚 CI/CD Pipelines for Data Processing Applications on Azure Part 1: Container Instances
💡 Newskategorie: AI Nachrichten
🔗 Quelle: towardsdatascience.com

A Step-by Step Guide to Deploying Docker Containers with GitHub Actions
Introduction
Manually creating and deploying resources to Azure and other cloud providers is relatively easy and may, in some case, be enough. However, more often than not, deployed resources will need to change over time, which in turn requires a lot of extra work maintaining and redeploying resources. In order to automate these tasks, developers and data professionals can instead use an infrastructure-as-code (IaC) approach and create pipelines for continuous integration and deployment (CI/CD). This approach enables developers to write code that automatically defines and redeploys resources whenever changes are made.
In this step-by-step guide, we will build pipelines for a data processing application to perform the following tasks:
- Provision a Container registry
- build and push a Docker Image to the registry
- create a Container Instance that runs the data processing workload
- enable ‘managed identity’ access to Azure Key Vault, which allows our application to retrieve access keys to other resources such as storage accounts
- deploy the above resources to a test and a production environment using different triggers for running the pipelines
Getting started
For the purpose of demonstration, the application itself consists of a very simple R-script that loads a dataset, prints the first few rows and returns the dataset to a storage account. Keep in mind, that the application code is not important to the rest of the pipeline and can easily be substituted by your own code.
To get started you will need an Azure account. You may also want to install the Azure CLI on your local system. However, you can also choose to run Azure CLI commands through the Cloud Shell found in the Azure portal.
As our application transfers data to and from Azure Blob Storage and returns, you may find it useful to install Azure Storage Explorer, which makes it a little easier to upload files and verify that the application runs correctly and returns the processed data.
Step 1: Cloning the repo and setting up static resources.
First you will need to clone this repo. The README-file details how to do this using RStudio, but you’re free to use your preferred IDE.
Next, using the Azure Portal, create the following resources:
- a resource group that will contain all other resources.
- a storage account with a blob container with two folders: one for input files and another for output files. In our case, these should be named ‘input’ and ‘output’, respectively. Store a small dataset as a csv-file named ‘input_data.csv’ inside the input container.
- a key vault in which you will need to store the primary access key to your storage account as a secret.
In step 3, you will need the name of your key vault as well as the name of your secret containing the primary access key.
Step 2: linking GitHub to Azure
In order to update Azure resources, we need to grant GitHub permission to do so.
First, login to your Azure account using the Azure CLI.
az login
Then copy the id value from the JSON output, which is the subscription id. Paste the subscription id into the command below and run it. This creates a ‘service principal’ with role-based access control, which may be thought of as a user acting on your behalf when deploying or updating resources with a GitHub Actions workflow.
az ad sp create-for-rbac \
      --name "your-app-name" \
      --role Owner \
      --scopes /subscriptions/<your-subscription-id>/resourceGroups/<your-resource-group-name> \
      --sdk-auth
Copy the entire JSON output and go to your GitHub repo and click settings > Secrets and variables > Actions.
Create a new repository secret and name it AZURE_CREDENTIALS. Paste in the JSON output from the above command and save.
Step 3: modifying scripts
In this scenario, we are deploying a simple R-script that doesn’t do much. As such, the Dockerfile is also kept very simple. Both these files will obviously need to be modified according to your requirements and preferred programming language. However, if you’re new to this, it might be useful to get your pipeline up and running with the code as is before applying your own code.
If you choose to proceed with the current R-script (script.R), you will only need to modify the values {keyvault-name} , {access-key-name} and {storage-account-name} (omitting the brackets).
Next, modify the following values under env: in the two workflow files called workflow.yml and workflow_release_prod.yml in the .github/workflows/ directory:
env:
  RESOURCEGROUP_NAME: my-rg
  REGISTRY_NAME: my-cr
  SHORT_NAME: mycr
  ACI_NAME: my-ci-test
  KV_NAME: my-kv
  ENVIRONMENT: test
  CPU: 1
  MEMORY: 1.5
Step 4: running the pipeline and container instance
When all relevant changes have been made and pushed to the ‘main’ branch, you should see your pipeline running under the Actions pane. This is because the workflow is set up with a branch trigger so that it runs when the main branch is updated.
If you don’t encounter any errors, your container instance should be ready to run in ten minutes or so. Go to the Azure portal, find your new container instance and click Start. In the Logs pane, you may see your script running in the console. After completion, verify that a new cv-file called output_data.csv has landed in your blob container’s ‘output’ folder.
And that’s it! If you wish, you can now manually trigger the second workflow that creates an identical container instance intended for production workloads.
To get an understanding of what goes on in the CI/CD pipeline, please read the section below.
Understanding the workflow logic
The workflow.yml file defines five steps, or jobs, in our pipeline that deploys resources to a test environment.
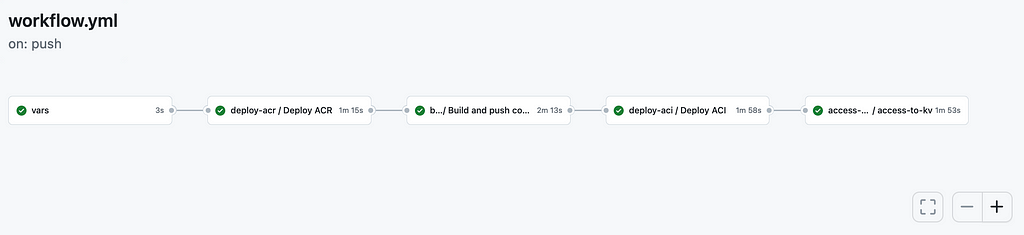
First we pass the previously set environment variables required for the remaining steps as outputs.
  vars:
    runs-on: ubuntu-latest
    outputs:
      resource_group: ${{ env.RESOURCEGROUP_NAME }}
      acr_name: ${{ env.REGISTRY_NAME }}
      short_name: ${{ env.SHORT_NAME }}
      aci_name: ${{ env.ACI_NAME }}
      kv_name: ${{ env.KV_NAME }}
      environment: ${{ env.ENVIRONMENT }}
      cpu: ${{ env.CPU }}
      memory: ${{ env.MEMORY }}
    steps:
      - run: echo "Exposing env vars"
In step two, we create or update an existing container registry. Note that the needs key indicates that this step must wait for the previous step to complete. The uses key tells us that another file is used for this step while the with key is used to pass required values. We also need to pass or repository secret.
  deploy-acr:
    needs: vars
    uses: ./.github/workflows/deploy_acr.yml
    if: github.ref == 'refs/heads/main'
    with:
      environment: ${{ needs.vars.outputs.environment }}
      resource_group: ${{ needs.vars.outputs.resource_group }}
      acr_name: ${{ needs.vars.outputs.acr_name }}
    secrets:
      azure_credentials: ${{ secrets.AZURE_CREDENTIALS }}
At the top of the deploy_acr.yml file used in this step, we see that the script runs whenever called upon in the workflow as well as the required inputs that we provided in the workflow.yml file.
on:
  workflow_call:
    inputs:
      environment:
        required: true
        type: string
      resource_group:
        required: true
        type: string
      acr_name:
        required: true
        type: string

    secrets:
      azure_credentials:
        required: true
In the bottom part of deploy_acr.yml, we have a multistep process running three predefined actions. The first action checks out the repo, then we login to Azure using the service principal credentials that we created and stored. Finally, we use the action called azure/arm-deploy@v1 to deploy the container registry. Note that this step uses Bicep, which is a popular language for configuring and deploying Azure resources. AT the bottom of this article, you can find some excellent ressources to learn more about Bicep.
jobs:
  deploy-acr:
    name: Deploy ACR
    runs-on: ubuntu-latest
    environment: ${{ inputs.environment }}
    steps:
      - uses: actions/checkout@v2
      - uses: azure/login@v1
        with:
          creds: ${{ secrets.azure_credentials }}
      - name: Deploy bicep
        uses: azure/arm-deploy@v1
        with:
          resourceGroupName: ${{ inputs.resource_group }}
          template: bicep/acr.bicep
          parameters:
            acrName=${{ inputs.acr_name }}
            acrSku=Basic
          failOnStdErr: false
Then, a Docker Image is built and pushed to the registry in step three using the file called build_push_container.yml, which runs Azure CLI commands to retrieve crendetials for the Container registry, as well as Docker commands to build and push the Docker Image.
In step four, the container instance is provisioned based on our Docker image. This step is carried out by means of the file called deploy_aci.yml, which, in turn, used the predefined action called ‘azure/aci-deploy@v1’.
In the final step using the file kv_access.yml, we grant the container instance permission to access the key vault through a ‘managed identity’, which means that the container can retrieve secrets from the key vault directly without using an access key. In order to achieve this, we need to update the deployed container instance using the Azure CLI command az container create and provide the various parameters that we used earlier. In addition, we provide the following setting:
— assign-identity — scope ${{ steps.rg_id_step.outputs.rg_id }}
As a final note, you may have noticed the following lines in workflow.yml:
on:
  push:
    branches:
      - main
  workflow_dispatch:
These lines indicate when and under what conditions our pipeline should run. In our scenario, we want the pipeline to run when changes are pushed to the ‘main’ branch. In addition, we want to be able to run it manually. This is enabled by adding workflow_dispatch: . In the production pipeline defined in workflow_prod_release.yml, you’ll notice that releasing to production only has a manual trigger. There are many other ways to configure how pipeline runs are triggered. For instance, you may ignore changes in specific files or folders, such that only changes to the application code will trigger new deployments.
Further reading
If you want to learn more about GitHub Actions an bicep, I highly recommend the following resources from the MS Learn platform:
GitHub Actions
https://learn.microsoft.com/en-us/training/modules/introduction-to-github-actions/
https://learn.microsoft.com/en-us/training/modules/learn-continuous-integration-github-actions/
https://learn.microsoft.com/en-us/training/modules/github-actions-automate-tasks/
https://learn.microsoft.com/en-us/training/modules/github-actions-ci/
https://learn.microsoft.com/en-us/training/modules/github-actions-cd/
Bicep:
https://learn.microsoft.com/en-us/training/paths/fundamentals-bicep/
https://learn.microsoft.com/en-us/training/paths/bicep-github-actions/
CI/CD Pipelines for Data Processing Applications on Azure Part 1: Container Instances was originally published in Towards Data Science on Medium, where people are continuing the conversation by highlighting and responding to this story.
...