



Hi Folks! This will be the final post in our series on infrastructure and containers. We will utilize Terragrunt and our infrastructure in this section, and at the conclusion, we will have our application operating on Fargate on AWS.
The docker image I’ll be using in this lesson comes from Sonic, an old game that many people associate with their early years. You may use this image or find it on my dockerhub, whichever you would like.
DIRECTORIES
Again, I’ll leave our directory structure here so you can guide yourself:
app

modules

    ├── amazon_vpc

    ├── aws_loadbalancer

    ├── aws_fargate

    ├── aws_roles

    ├── aws_ecs_cluster

    └── aws_targetgroup

    └── aws_certificate_manager


terragrunt

    └── dev

        └── us-east-1

            ├── aws_ecs

            │   ├── cluster

            │   └── service

            ├── aws_loadbalancer

            ├── amazon_vpc

            ├── aws_targetgroup

            ├── aws_roles

            ├── aws_certificate_manager

            └── terragrunt.hcl
TERRAGRUNT
First, let’s look at our terragrunt.hcl, located in us-east-1. It will be used for all common variables in our code, as well as for creating our backend settings and the lock in the dynamodb database.
Typical variables are going to be region, project_name, domain_name, env, host_headers and container_port.
terragrunt.hcl
remote_state {

  backend = "s3"

  generate = {

    path      = "backend.tf"

    if_exists = "overwrite"

  }

  config = {

    bucket           = "sonic-iac-series"

    key              = "dev/${path_relative_to_include()}/terraform.tfstate"

    region           = "us-east-1"

    encrypt          = true

    dynamodb_table   = "terraform-state-lock"

  }

}


inputs = {

   region            = "us-east-1"

   project_name      = "sonic-iac"

   env               = "dev"

   domain_name       = "your domain"

   host_headers      = "sonic.your domain"

   container_port    = "8080"


  tags = {

     ambiente        = "dev"

     projeto         = "sonic-iac"

     plataforma      = "aws"

     gerenciado      = "terraform/terragrunt"

   }

}


generate "provider" {

    path      = "provider.tf"

    if_exists = "overwrite"

    contents = <<EOF

provider "aws" {

  profile   = "default"

  region    = "us-east-1"

}

EOF

}
VPC
The first resource to be created will be the VPC, as it will be needed for most of our resources.
terragrunt

    └── dev

        └── us-east-1

             └── amazon_vpc

                 └── terragrunt.hcl
We will use a range of /25, starting with IP 172.35.0.221, to construct our VPC. Four subnets — two public and two private — will be created inside it.
- VPC: 172.35.0.128/25
- Public Subnet 1: 172.35.0.128/27
- Public Subnet 2: 172.35.0.160/27
- Private Subnet 1: 172.35.0.192/27
- Private Subnet 2: 172.35.0.224/27
These code files will be created within:
terragrunt.hcl
include {

  path = find_in_parent_folders()

}


inputs = {

    vpc_cidr_block              = "172.35.0.128/25"

    public_subnet1_cidr_block   = "172.35.0.128/27"

    public_subnet2_cidr_block   = "172.35.0.160/27"

    private_subnet1_cidr_block  = "172.35.0.192/27"

    private_subnet2_cidr_block  = "172.35.0.224/27"

    availability_zone1 = "us-east-1a"

    availability_zone2 = "us-east-1b"

}

terraform {

  source = "../../../../modules/amazon_vpc"

  extra_arguments "custom_vars" {

    commands = [

        "apply",

        "plan",

        "import",

        "push",

        "refresh"

    ]

  }

}
IAM PERMISSIONS
The next thing to be created will be permissions for our resources.
terragrunt

    └── dev

        └── us-east-1

             └── aws_roles

                 └── terragrunt.hcl
terragrunt.hcl
include {

  path = find_in_parent_folders()

}


terraform {

  source = "../../../../modules/aws_roles"

  extra_arguments "custom_vars" {

    commands = [

        "apply",

        "plan",

        "import",

        "push",

        "refresh"

    ]

  }

}
AWS CERTIFICATE MANAGER
These are the configurations for applying our certificate; we will generate the certificate and use our domain to validate it.
terragrunt

    └── dev

        └── us-east-1

             └── aws_certificate_manager

                 └── terragrunt.hcl
terragrunt.hcl
include {

  path = find_in_parent_folders()

}


terraform {

  source = "../../../../modules/aws_certificate_manager"

  extra_arguments "custom_vars" {

    commands = [

        "apply",

        "plan",

        "import",

        "push",

        "refresh"

    ]

  }

}
AWS LOAD BALANCER
Let’s set up our loadbalancer using Terragrunt now. This will help distribute our traffic and guarantee that our application is highly available.
terragrunt

    └── dev

        └── us-east-1

             └── aws_loadbalancer

                 └── terragrunt.hcl
Our Terragrunt setup looks like this. It’s important to note that in order to increase everything’s dynamic nature, we use dependencies between modules.
terragrunt.hcl
include {

  path = find_in_parent_folders()

}


dependency "vpc" {

  config_path = "../amazon_vpc"

}


dependency "acm" {

  config_path = "../aws_certificate_manager"

}


inputs = {

  vpc_id       = dependency.vpc.outputs.vpc_id

  subnet_id_1  = dependency.vpc.outputs.public_subnet1_id

  subnet_id_2  = dependency.vpc.outputs.public_subnet2_id

  alb_internal = false

  certificate_arn = dependency.acm.outputs.acm_arn

  priority_listener_rule  = "1"

}

terraform {

  source = "../../../../modules/aws_loadbalancer"

  extra_arguments "custom_vars" {

    commands = [

      "apply",

      "plan",

      "import",

      "push",

      "refresh"

    ]

  }

}
AWS TARGET GROUP
Here we will configure our Target Group with Terragrunt, it is super essential for directing traffic to the correct servers for our application.
terragrunt

    └── dev

        └── us-east-1

             └── aws_targetgroup

                 └── terragrunt.hcl
terragrunt.hcl
include {

  path = find_in_parent_folders()

}

dependency "loadbalancer" {

  config_path = "../aws_loadbalancer"

}

  dependency "vpc" {

  config_path = "../amazon_vpc"

}


dependency "acm" {

  config_path = "../aws_certificate_manager"

}


inputs = {

  vpc_id                  = dependency.vpc.outputs.vpc_id

  subnet_id_1             = dependency.vpc.outputs.public_subnet1_id

  subnet_id_2             = dependency.vpc.outputs.public_subnet2_id

  certificate_arn         = dependency.acm.outputs.acm_arn

  listener_ssl_arn        = dependency.loadbalancer.outputs.listener_ssl_arn

  priority_listener_rule  = "2"

  health_check_path       = "/"

}


terraform {

  source = "../../../../modules/aws_targetgroup"

  extra_arguments "custom_vars" {

    commands = [

      "apply",

      "plan",

      "import",

      "push",

      "refresh"

    ]

  }

}
ECS CLUSTER
In this step we will create our ECS cluster that will host our application.
terragrunt

    └── dev

        └── us-east-1

             └── aws_ecs

                 └── cluster

                       └── terragrunt.hcl
terragrunt.hcl
include {

  path = find_in_parent_folders()

}


terraform {

  source = "../../../../../modules/aws_ecs_cluster"

  extra_arguments "custom_vars" {

    commands = [

        "apply",

        "plan",

        "import",

        "push",

        "refresh"

    ]

  }

}
FARGATE AND ECR
We will construct our fargate service, the repository in the ECR, and a record on our domain as the final configuration file.
terragrunt

    └── dev

        └── us-east-1

             └── aws_ecs

                 └── service

                       └── terragrunt.hcl
terragrunt.hcl
include {

  path = find_in_parent_folders()

}

dependency "loadbalancer" {

  config_path = "../../aws_loadbalancer"

}

  dependency "vpc" {

  config_path = "../../amazon_vpc"

}

dependency "role" {

  config_path = "../../aws_roles"

}


dependency "targetgroup" {

  config_path = "../../aws_targetgroup"

}


dependency "cluster" {

  config_path = "../cluster"

}


inputs = {

  vpc_id                = dependency.vpc.outputs.vpc_id

  subnet_id_1           = dependency.vpc.outputs.private_subnet1_id

  subnet_id_2           = dependency.vpc.outputs.private_subnet2_id

  alb_dns_name          = dependency.loadbalancer.outputs.alb_dns_name

  sg_alb                = dependency.loadbalancer.outputs.alb_secgrp_id

  target_group_arn      = dependency.targetgroup.outputs.tg_alb_arn

  cluster_arn           = dependency.cluster.outputs.cluster_arn

  ecs_role_arn          = dependency.role.outputs.ecs_role_arn

  instance_count        = "1"

  container_vcpu        = "512"

  container_memory      = "1024"

  aws_account_id        = "your account number"

}


terraform {

  source = "../../../../../modules/aws_fargate"

  extra_arguments "custom_vars" {

    commands = [

        "apply",

        "plan",

        "import",

        "push",

        "refresh"

    ]

  }

}
APPLY
After the entire structure has been created, you must apply terragrunt to all directories that contain terragrunt.hcl in the following order.
terragrunt/dev/us-east-1
terragrunt/dev/us-east-1/amazon_vpc
terragrunt/dev/us-east-1/aws_roles
terragrunt/dev/us-east-1/aws_certificate_manager
terragrunt/dev/us-east-1/aws_loadbalancer
terragrunt/dev/us-east-1/aws_targetgroup
terragrunt/dev/us-east-1/aws_ecs/cluster
terragrunt/dev/us-east-1/aws_ecs/fargate
Use this command on terminal to apply. You need use in each directory
terragrunt apply
or in the root folder use:
terragrunt run-all apply
ECR
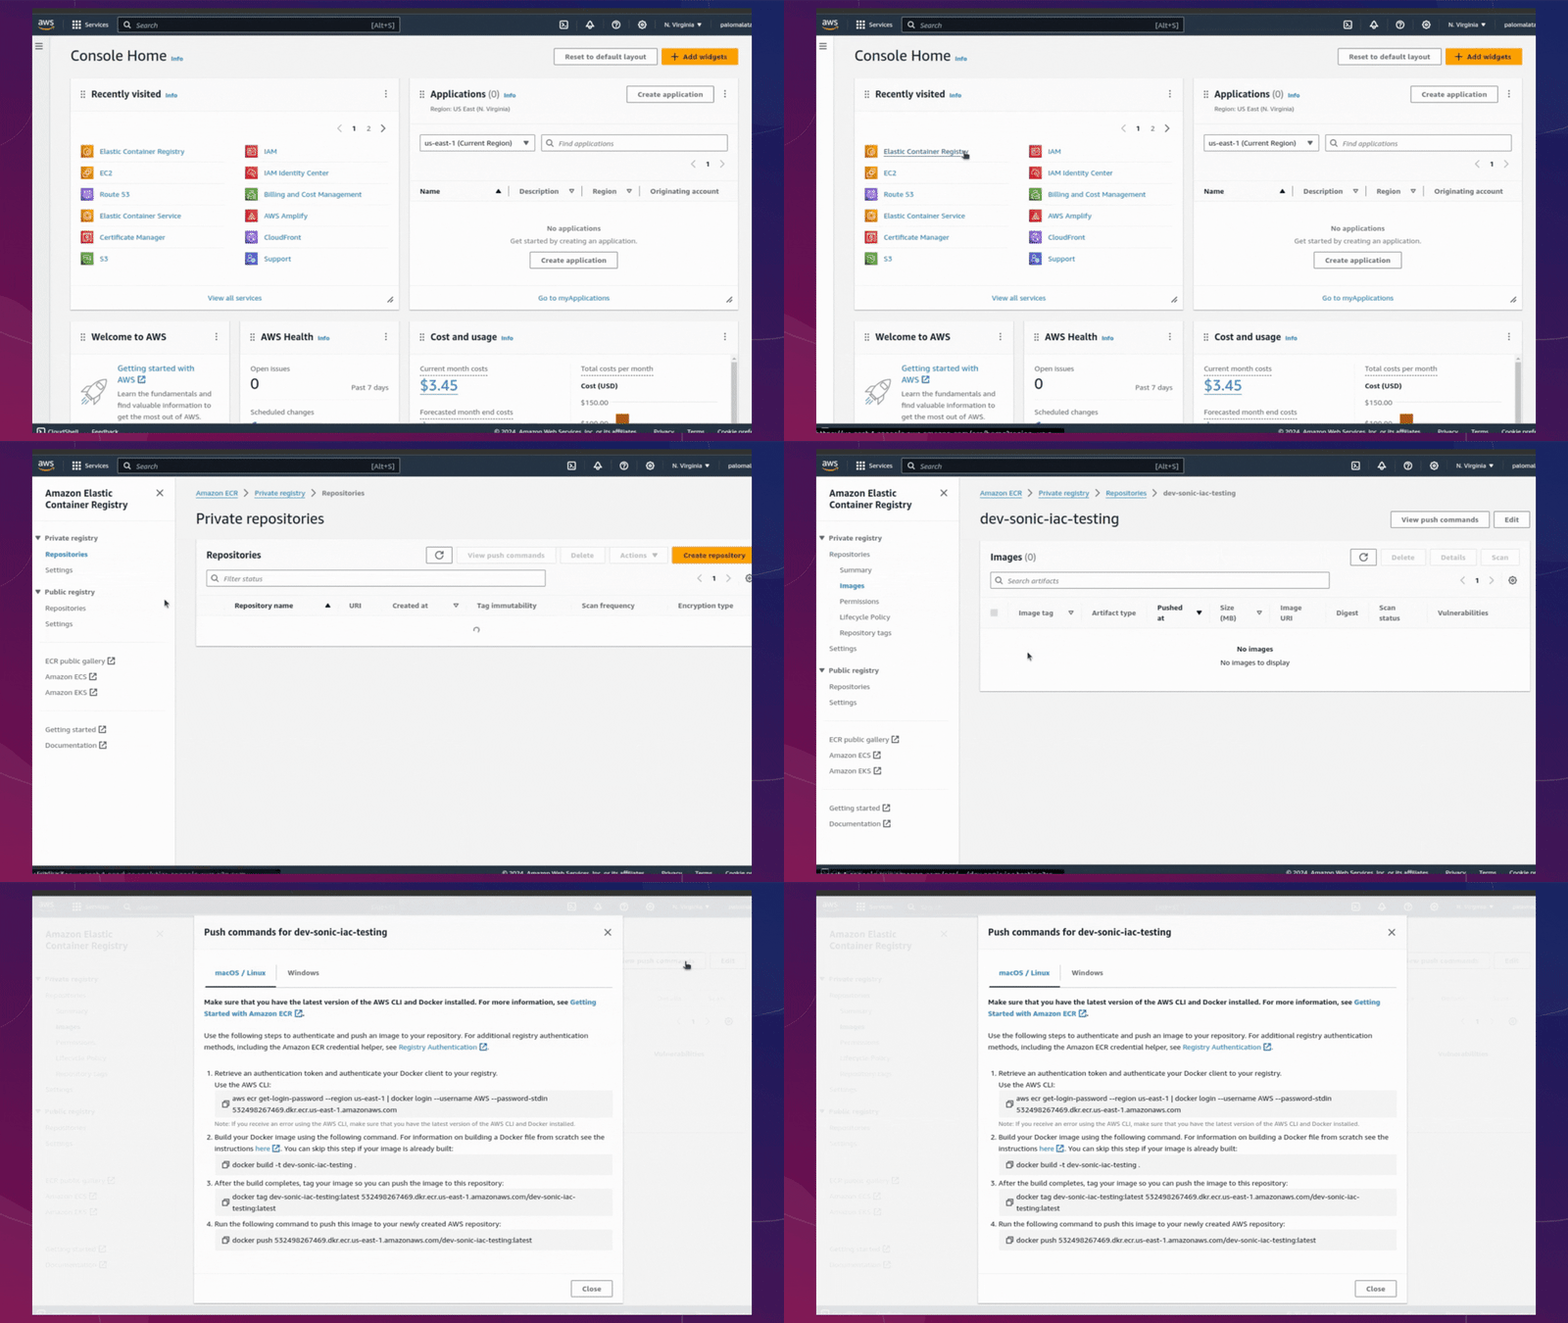
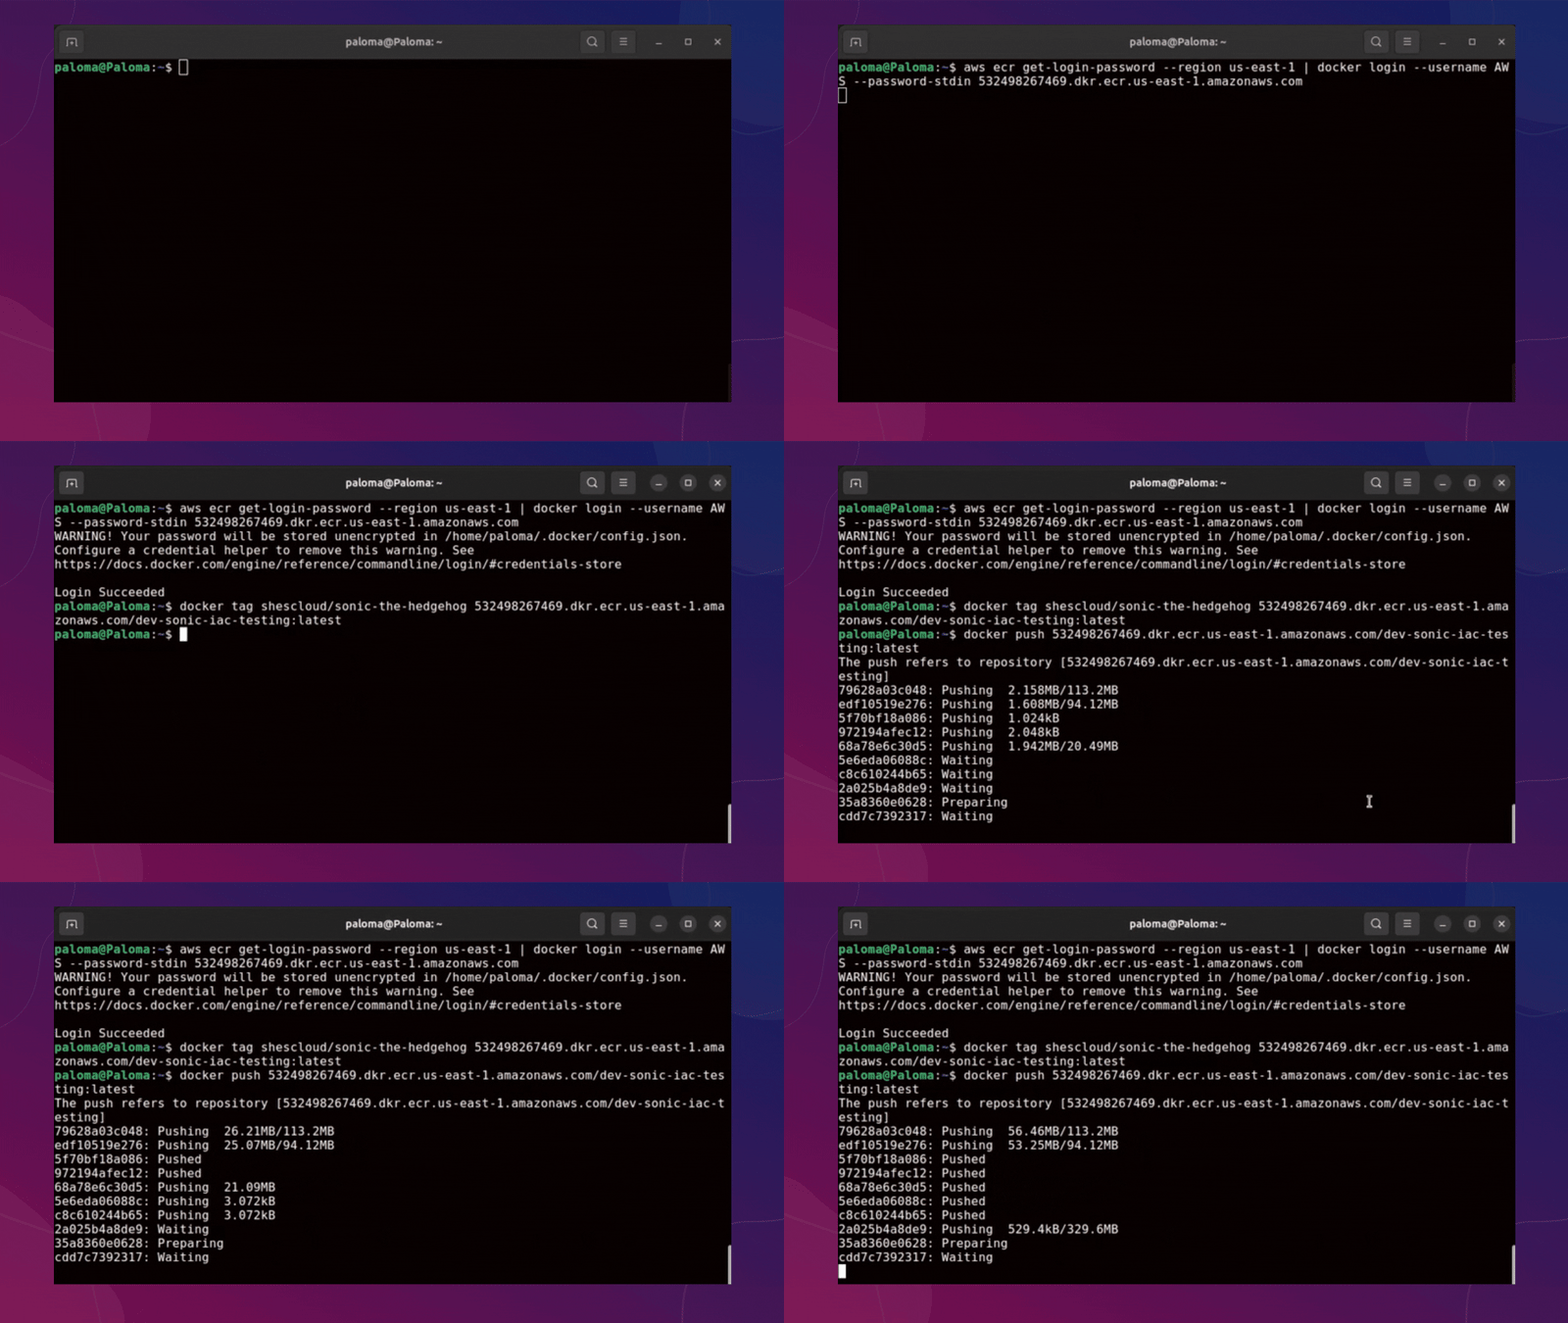
Now we have applied all our infrastructure and our ECR repository has been created, we must upload our image for use in our container.
The image must be downloaded from Docker Hub as an initial step. You can use another image if you prefer or your own from your application.
use this command to download my sonic image:
docker pull shescloud/sonic-the-hedgehog

TESTING
I used a domain I had and our application was temporarily hosted at sonic.shescloud.tech.

DESTROY
If you are using it for study, or as a way to complete a test, don’t forget to destroy all resources at the end to avoid unnecessary costs. To delete everything, we will do a process similar to apply, but in the opposite way.
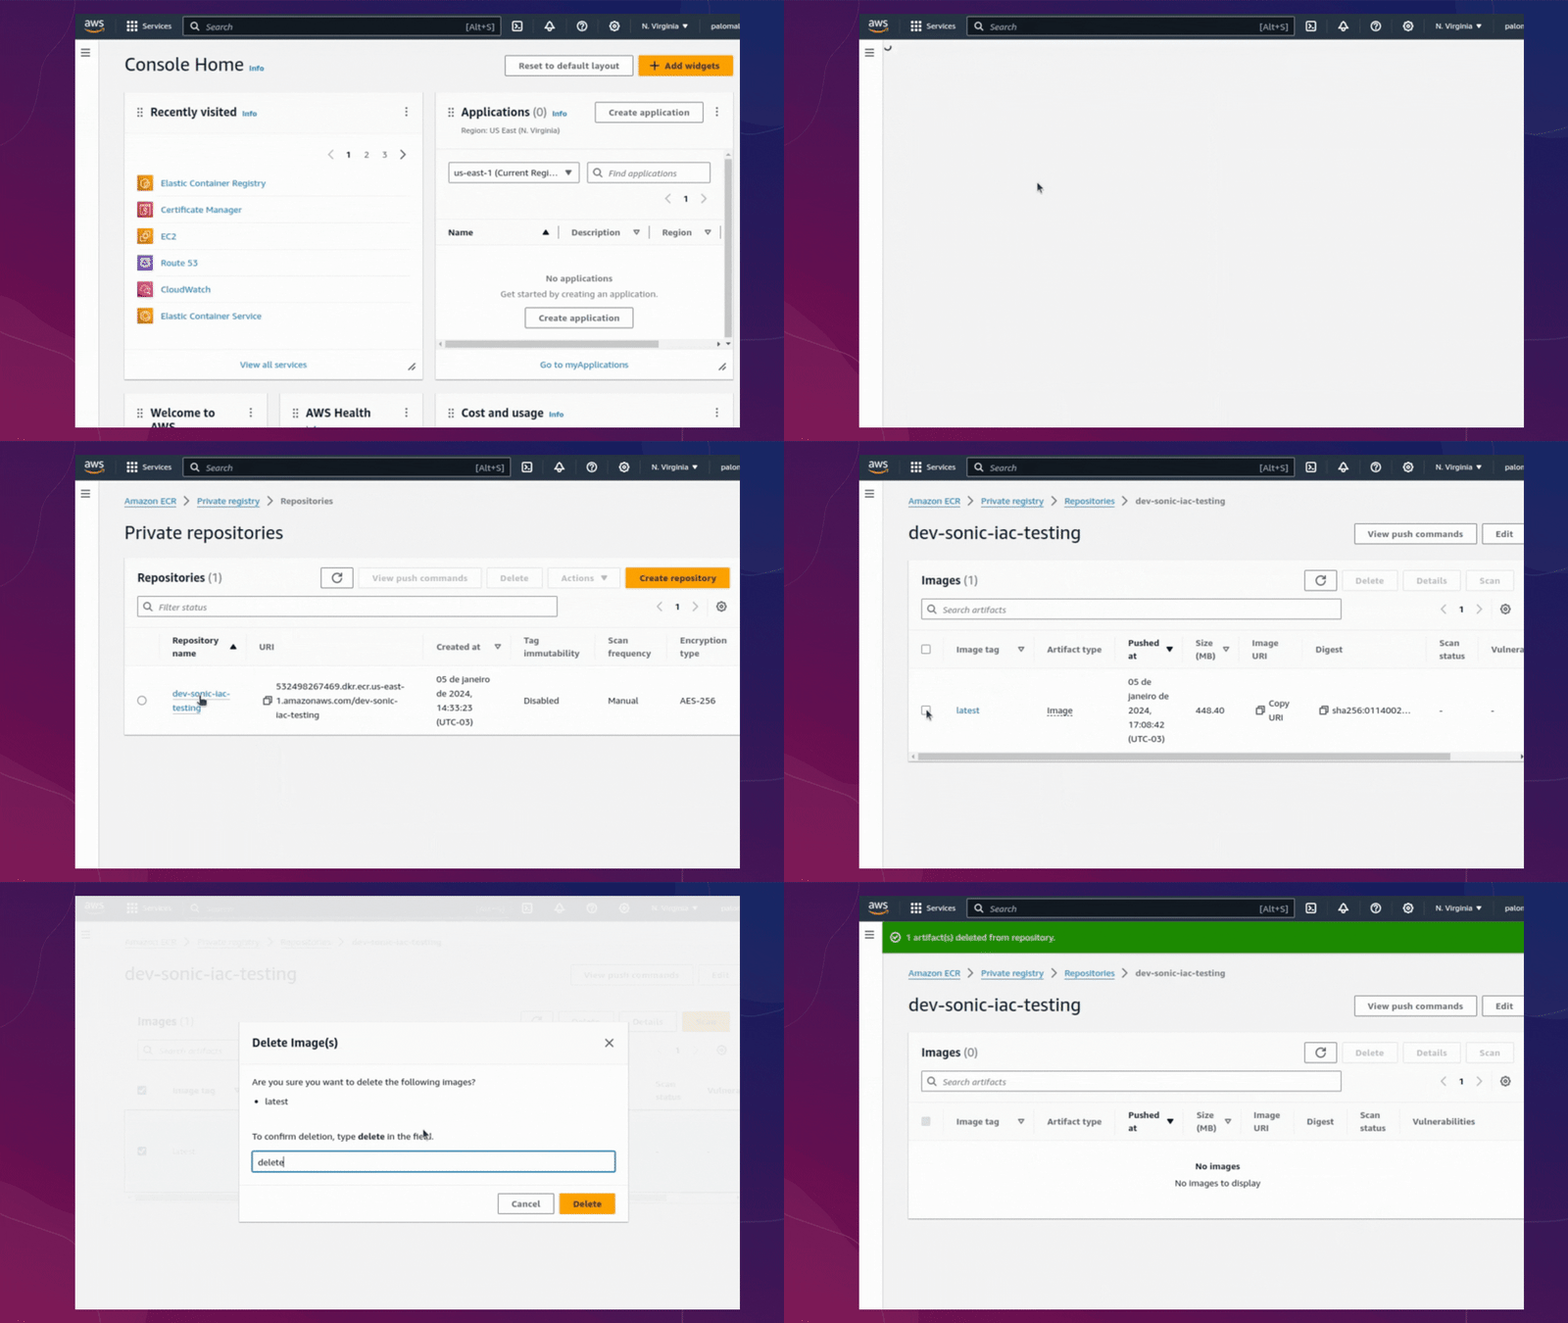
Before deleting everything via terragrunt, you need to access your AWS account, go to the ECR service and delete the image from the repository. After completing this step, you can proceed with destroying each of the repositories.
Now, you must destroy to all directories that contain terragrunt.hcl in the following order.
- terragrunt/dev/us-east-1/aws_ecs/fargate
- terragrunt/dev/us-east-1/aws_ecs/cluster
- terragrunt/dev/us-east-1/aws_targetgroup
- terragrunt/dev/us-east-1/aws_loadbalancer
- terragrunt/dev/us-east-1/aws_roles
- terragrunt/dev/us-east-1/aws_certificate_manager
- terragrunt/dev/us-east-1/amazon_vpc
- terragrunt/dev/us-east-1
Use this command on terminal to destroy. You need use in each directory
terragrunt destroy
or in the root folder use:
`terragrunt run-all destroy
`
GITHUB
You can check the repository with the code on my github:
https://github.com/shescloud/terraform-terragrunt-fargate
And that’s it folks! I hope you enjoyed it and get a lot out of this code. See u soon!