



Imagine you just completed the first version of an exciting data science project in Jupyter Notebook. You have spent several hours researching and prototyping, and finally, your model delivers solid results, and your analysis is compelling. The next big question that comes to mind is: How can I deploy this Jupyter Notebook in my application?
Machine learning projects often go through multiple iterative stages. At first, engineers create a model through extensive research, development, and prototyping. Then, there is an iterative phase of model training, tuning, and fine-tuning, all done in Jupyter Notebooks. This Jupyter Notebook can then be converted to a deployable artifact, and deployed across several environments.
In a typical startup environment, these stages generate artifacts passed across teams. One of the most difficult challenges is deploying these artifacts. ModelKits solve this problem by allowing you to create and manage flexible artifacts that can easily be deployed across several environments.
ModelKits are a component of KitOps, and in this article, you’ll learn how to transition from your Jupyter Notebook to a fully deployed application using a ModelKit.
TL;DR
- The stages involved in model deployment using ModelKit are unpacking the untuned model, fine-tuning the model, packaging the ModelKit, and pushing to a remote registry.
- Various teams can quickly unpack artifact components such as models, code, and datasets to different directories.
- ModelKits can easily be deployed to a Kubernetes cluster across several environments using CI/CD tools like GitHub Actions or GitLab CI.
Stages involved in bringing your models to production
Machine learning pipelines usually go through multiple stages, such as feature engineering, model building, hyperparameter tuning, and model deployment. A ton of research, development, and prototyping is done during these stages using the Jupyter Notebook IDE. Various team members, such as Data Scientists, ML Engineers, and DevOps Engineers, produce outputs in the form of artifacts. Data Scientists produce model artifacts, and DevOps Engineers produce container images. These artifacts are usually passed from one team to another, and generally these teams don’t have access or familiarity with eachother’s tools. For this reason, there needs to be a secure and shareable artifact across various teams.
With ModelKits, these artifacts are isolated components. A data scientist can easily make changes to the dataset, and the ML engineer will not need to rebuild the entire Kit file. It rebuilds the changes, and you can then pass this modified ModelKit to the next stage.
The processes involved in the deploying an ML model using ModelKit are:
Untuned: The dataset is prepared for model tuning and validation at this stage. The ModelKit includes only the datasets and the base model.
Tuned: At this stage, the model has completed training. The ModelKit includes the model alongside the dataset for validation. Other assets are optional, depending on the project's requirements.
Challenger: Here, the model is prepared to replace the current champion model.
Champion: The model is deployed in production, which updates the tag to show that the model is in production and creates a second reference to the same ModelKit.
After creating the champion tag, you deploy your changes to the remote registry, for example Jozu Hub.
In the following sections, you will learn how to implement these stages and create sharable artifacts with ModelKit.
Prerequisites
To follow along with this tutorial, you will need the following:
- **A container registry:** You can use [the GitHub Package](https://docs.github.com/en/packages/learn-github-packages/introduction-to-github-packages) registry, [GitLab registry](https://docs.gitlab.com/ee/user/packages/container_registry/), or [DockerHub](https://hub.docker.com/). In this article, you will make use of the GitHub Package registry.

- **Code hosting platforms:** You can use GitHub or GitLab. This article uses GitHub. [Here](https://github.com/Techtacles/jupyter-to-kitops) is a link to the code samples used.
Step 1: Unpacking a ModelKit
First, you must make sure you have the Kit CLI installed locally. If you have not installed it, follow this guide. Once installed, run the command below:
kit version
You should see an output like the one shown in the image:

Next, log in to your Kit registry. Log in using either GitHub Container Registry (ghcr) or DockerHub. For this article, log in to ghcr using the command:
kit login ghcr.io
To log in to ghcr, your username is your GitHub username, and your password is your GitHub personal access token.
After successfully logging in, unpack a sample ModelKit locally. Grab any ModelKit from the package registry. You will be making use of a lightweight Scikit-learn model provided by ModelKit. Unpack it with the command shown:
Note: You can also select to pull from one of the many quickstart ModelKits hosted on Jozu Hub.
kit unpack ghcr.io/jozu-ai/ModelKit-examples/scikitlearn-tabular:latest
Upon unpacking the model, a Kit file and directories like data, models, and notebooks will be automatically created for you. The data folder contains the train and test data. The models directory contains the Scikit learn model, and the notebooks directory contains your code.
The directory tree is shown below:
|-- dataset

        |-- train.csv

        |-- test.csv

|-- models

        |-- scikit_class_model_v2

|-- notebooks

        |-- customer_satisfaction.ipynb

|-- kitfile
The primary focus is on the notebooks folder. Create a Jupyter Notebook and install the required packages.
!pip install autogluon

!pip install scikit-learn
After installing the required libraries, import them in your Jupyter Notebook.
import pandas as pd

from sklearn.model_selection import train_test_split

from autogluon.features.generators import AutoMLPipelineFeatureGenerator

from sklearn.preprocessing import RobustScaler

from sklearn.linear_model import LogisticRegression

from sklearn.metrics import classification_report

import joblib
After importing the libraries successfully, the next step is to preprocess your data. For preprocessing, the missing values were dropped, and the data was split into training and validation data. The script for preprocessing is shown below:
def preprocess(data):

    data = data.dropna()

    data = data.drop(columns=['Unnamed: 0','id'])

    X = data.drop(columns=['satisfaction'])

    y = data['satisfaction']

    y = [1 if labels=='satisfied' else 0 for labels in data['satisfaction']]

    X_train, X_val, y_train, y_val = train_test_split(X, y, random_state=42, train_size = .80)

    return X_train, X_val, y_train, y_val
Still within your Jupyter Notebook, the next thing you do is feature transformation:
def transformation(X_train, X_val, y_train, y_val):

    auto_ml_pipeline_feature_generator = AutoMLPipelineFeatureGenerator()

    auto_ml_pipeline_feature_generator.fit(X=X_train)

    X_train_transformed = auto_ml_pipeline_feature_generator.transform(X=X_train)

    #Scaling the data

    scaler = RobustScaler()

    X_train_normalized = scaler.fit_transform(X_train_transformed)

    return X_train_normalized, y_train, auto_ml_pipeline_feature_generator, scaler
Next, you build your model and save it to the models folder. The script for building and saving your model, from the Jupyter Notebook is shown in the block below.
def train_model(X_train_normalized,y_train, y_val, feature_gen, scaler):

    lr_model = LogisticRegression()

    lr_model.fit(X_train_normalized, y_train)

    # Printing the classification report

    print(f"The training classification report is {classification_report(lr_model.predict(X_train_normalized), y_train)}")

    X_val_transformed = feature_gen.transform(X=X_val)

    X_val_norm = scaler.transform(X_val_transformed)

    print(f"The test classification report is {print(classification_report(lr_model.predict(X_val_norm), y_val))}")

    return lr_model


def save_model(model):

    model_name = "scikit_class_model_v2.joblib"

    joblib.dump(model, r"../models/"+model_name)

    print(f"Successfully saved {model_name} to ../models/{model_name}")
Let’s chain it all together:
data = pd.read_csv(r'../data/train.csv')

X_train, X_val, y_train, y_val = preprocess(data)

X_train_normalized, y_train, feature_gen, scaler = transformation(X_train, X_val, y_train, y_val)

model = train_model(X_train_normalized,y_train, y_val, feature_gen, scaler)

save_model(model)
When you run the code, you should see an output similar to what is shown in the image:
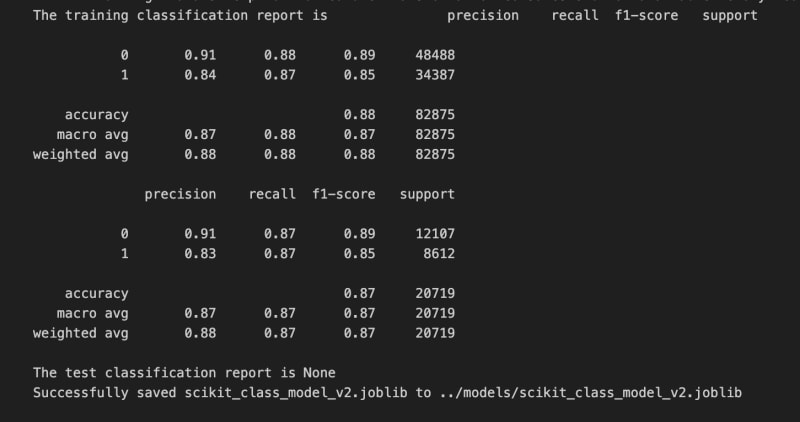
At this point, you need to modify your ModelKit to package the code, models, and datasets in the following stages. The modified Kitfile is:
manifestVersion: v1.0.0

package:

  name: Scikit-learn Tabular Example

  description: 'Train a model using Scikit-learn and Tabular data '

  license: Apache-2.0

  authors: [Jozu]

model:

  name: joblib Model

  path: ./models/scikit_class_model_v2.joblib

  license: Apache-2.0

  framework: Scikit-learn

  version: 1.0.0

  description: Example model using Scikit-learn

code:

  - path: ./notebooks

    description: Model training and testing code

datasets:

  - name: training data

    path: ./data/train.csv

    description: This contains the training data

  - name: training data

    path: ./data/test.csv

    description: This contains the test data
Step 2: Packing and pushing the ModelKit
The next thing you want to do is to pack your ModelKit. To do that, run the command:
kit pack . -t ghcr.io/<your-GitHub-username>/<your-GitHub-repository>:<tag>
Tag the package as tuned. After executing the kit pack command, you should see an output similar to the one below:

Step 3: Pushing your ModelKit to a remote repository
To push the ModelKit, run the command:
kit push ghcr.io/<your-GitHub-username>/<your-GitHub-repository>:<tag>
After executing the command, you should see an output:

With a successful push to your remote repository, you can view the packages you have uploaded.
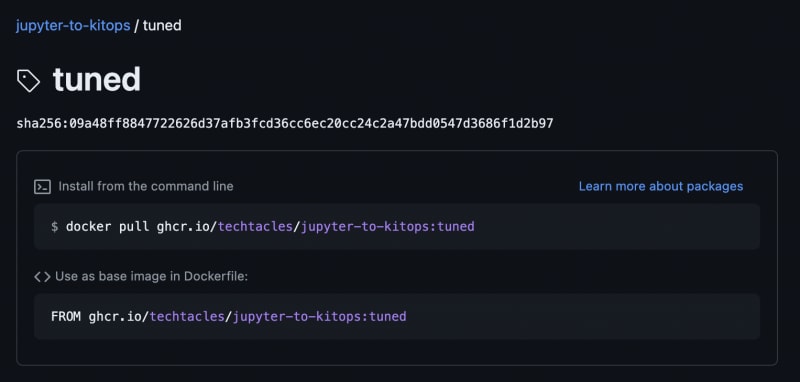
You can then fine-tune your model, adjust parameters, and add new rows to the dataset. Simply tag your ModelKit after each change. This way, you maintain a version-controlled artifact that captures all your modifications.
Let’s make another change and upgrade the tag to the challenger tag.
lr_model = LogisticRegression(penalty=None, class_weight="balanced")
The penalty for the logistic regression model was adjusted from l2 to None. Additionally, the class weight was adjusted from None to Balanced.
Pack the new ModelKit and upgrade the tag to the challenger tag using the code below:
kit pack . -t ghcr.io/techtacles/jupyter-to-kitops:challenger

kit push ghcr.io/techtacles/jupyter-to-kitops:challenger
Once you've done that, it is time to deploy your challenger model. Simply retag it with the champion tag using the command:
kit tag ghcr.io/techtacles/jupyter-to-kitops:challenger ghcr.io/techtacles/jupyter-to-kitops:champion
Push the champion model to your remote registry.
kit push ghcr.io/techtacles/jupyter-to-kitops:champion

Step 4: Deployment
Now that your tagged ModelKit is in a remote registry, you can implement a deployment strategy to a production environment. Using Kubernetes, the Kit artifact can become a pod that can be deployed in a Kubernetes cluster, such as in AWS EKS.
For instance, deployment to Kubernetes can be done through an init container. Use an image with the kit CLI and unpack only the model to the shared volume of the pod. For unpacking the model to a shared volume, run the command:
kit unpack ghcr.io/techtacles/jupyter-to-kitops:champion --model -d <path-to-create>
After unpacking the model, you can run a prediction on the model.
import joblib

model = joblib.load("<path-to-unpacked-model>")

prediction = model.predict(<prediction-vector>)

print(prediction)
An example of the use of this unpacked model to make a prediction is shown in the image below.
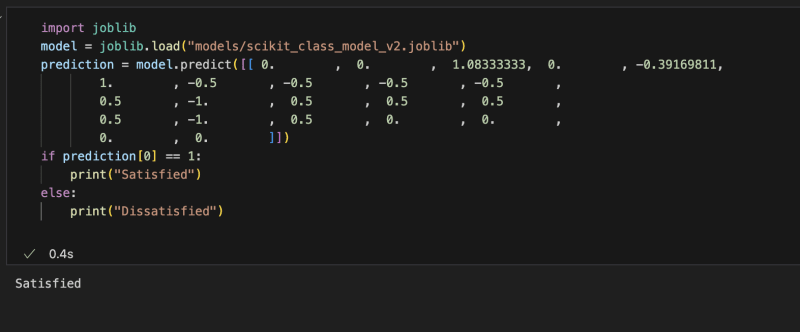
The prediction vector can be varied, depending on the dataset used in training your model.
You can also build a backend logic where this model can be integrated with a frontend application using Nodejs or Flask.

In the image above, you have a frontend application featuring input forms where you can enter values. This frontend can seamlessly integrate with a Flask application, allowing you to leverage the latest version of your packaged Kit file to make predictions. The image below shows a sample prediction generated by the model using this setup.

You can find the code samples used in this GitHub repository .
Similarly, you can decide to unpack the dataset to a different directory with this command:
ghcr.io/techtacles/jupyter-to-kitops:champion --datasets -d <path>
Integration with CI/CD
Manual deployment is error-prone, time-consuming, and does not scale. It also hinders collaboration. No developer wants to deal with any of these issues. After spending countless hours iterating through the phases of building and prototyping your model, you still have to deal with deployment challenges. This is the reality of manual deployment.
CI/CD comes to the rescue. It allows you to build, test, and deploy your models across several environments, such as development, acceptance, and production. Tools like Jenkins, GitHub Actions, and GitLab CI make this easy and convenient.
ModelKits integrates seamlessly with your CI/CD tools, such as GitHub Actions. In most CI/CD pipelines, bash commands are easy to execute. Within your GitHub Actions workflow, you can easily log in to the registry, pack the ModelKit, and push to your container registry. Your deployment strategy, such as Kubernetes, can then deploy the champion tag as a pod.
Conclusion
This article shows how easy it is to deploy your Jupyter Notebooks into a production-ready environment using a ModelKit. ModelKits make it easy for developers to make changes to artifacts and pass them on to the next stage. In case of any errors, they can easily roll back artifacts to the previous working version. You can also make use of tags to automate triggers for production workflows. Does it ever get easier than this?
ModelKits allow you to easily integrate machine learning workflows into your existing DevOps pipeline. Artifact metadata such as models, configurations, and datasets are packaged as shareable OCI artifacts, enhancing collaboration between various teams.
If you have questions about integrating KitOps with your team, join the conversation on Discord and start using KitOps today!