An open-source initiative to help you deploy generative search based on your local files and self-hosted (Mistral, Llama 3.x) or commercial LLM models (GPT4, GPT4o, etc.)
I have previously written about on Towards Data Science. However, there has been a major update worth revisiting. Initially, VerifAI was developed as a biomedical generative search with referenced and AI-verified answers. This version is still available, and we now call it VerifAI BioMed. It can be accessed here: , . The user needs to define the path to the interface, API key, and model deployment name that will be used. We are soon adding support where users can modify or change the prompt that is used for generation. In case no path to an interface is provided and no key, the model will download the Mistral 7B model, with the QLoRA adapter that we have fine-tuned, and deploy it locally. However, in case you do not have enough GPU RAM, or RAM in general, this may fail, or work terribly slowly.
You can set also MAX_CONTEXT_LENGTH, in this case it is set to 128,000 tokens, as that is context size of GPT4o. The context length variable is used to build context. Generally, it is built by putting in instruction about answering question factually, with references, and then providing retrieved relevant documents and question. However, documents can be large, and exceed context length. If this happens, the documents are splitted in chunks and top n chunks that fit into the context size will be used to context.
The next part contains the HuggingFace name of the model that is used for embeddings of documents in Qdrant. Finally, there are names of indexes both in OpenSearch (INDEX_NAME_LEXICAL) and Qdrant (INDEX_NAME_SEMANTIC).
As we previously said, VerifAI has a component that verifies whether the generated claim is based on the provided and referenced document. However, this can be turned on or off, as for some use-cases this functionality is not needed. One can turn this off by setting USE_VERIFICATION to False.
Installing datastores
The final step of the installation is to run the install_datastores.py file. Before running this file, you need to install Docker and ensure that the Docker daemon is running. As this file reads configuration for setting up the user names, passwords, or API keys for the tools it is installing, it is necessary to first make a configuration file. This is explained in the next section.
This script sets up the necessary components, including OpenSearch, Qdrant, and PostgreSQL, and creates a database in PostgreSQL.
python install_datastores.py
Note that this script installs Qdrant and OpenSearch without SSL certificates, and the following instructions assume SSL is not required. If you need SSL for a production environment, you will need to configure it manually.
Also, note that we are talking about local installation on docker here. If you already have Qdrant and OpenSearch deployed, you can simply update the configuration file to point to those instances.
Indexing files
This configuration is used by both the indexing method and the backend service. Therefore, it must be completed before indexing. Once the configuration is set up, you can run the indexing process by pointing index_files.py to the folder containing the files to be indexed:
python index_files.py <path-to-directory-with-files>
We have included a folder called test_data in the repository, which contains several test files (primarily my papers and other past writings). You can replace these files with your own and run the following:
python index_files.py test_data
This would run indexing over all files in that folder and its subfolders. Once finished, one can run VerifAI services for backend and frontend.
Running the generative search
The backend of VerifAI can be run simply by running:
python main.py
This will start the FastAPI service that would act as a backend, and pass requests to OpenSearch, and Qdrant to retrieve relevant files for given queries and to the deployment of LLM for generating answers, as well as utilize the local model for claim verification.
Frontend is a folder called client-gui/verifai-ui and is written in React.js, and therefore would need a local installation of Node.js, and npm. Then you can simply install dependencies by running npm install and run the front end by running npm start:
cd ..
cd client-gui/verifai-ui
npm install
npm start
Finally, things should look somehow like this:
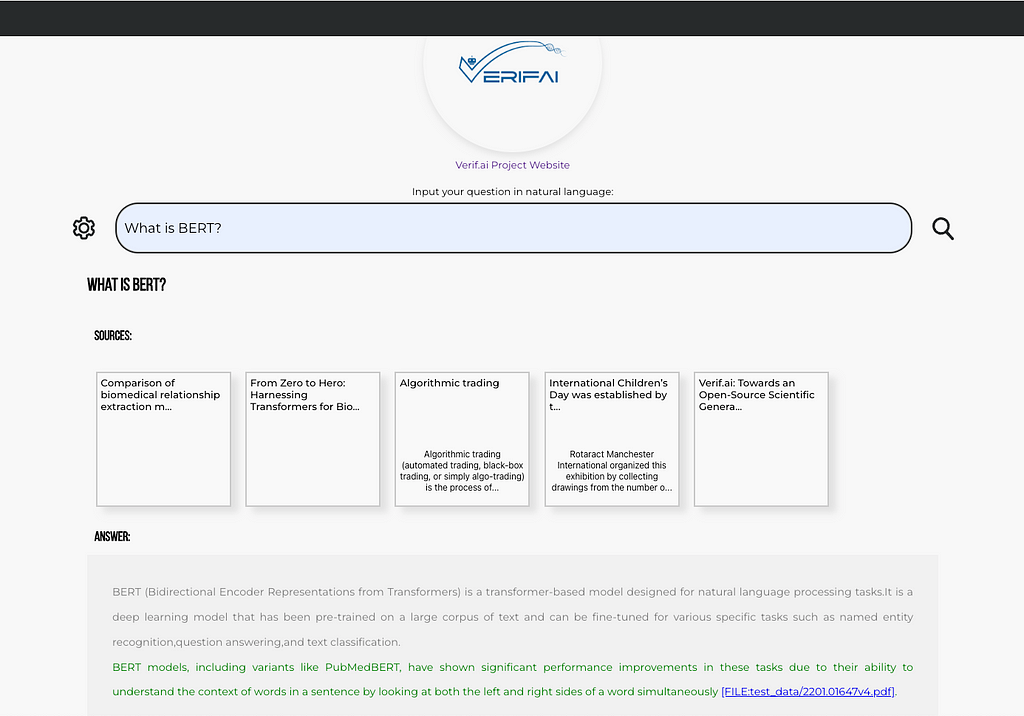
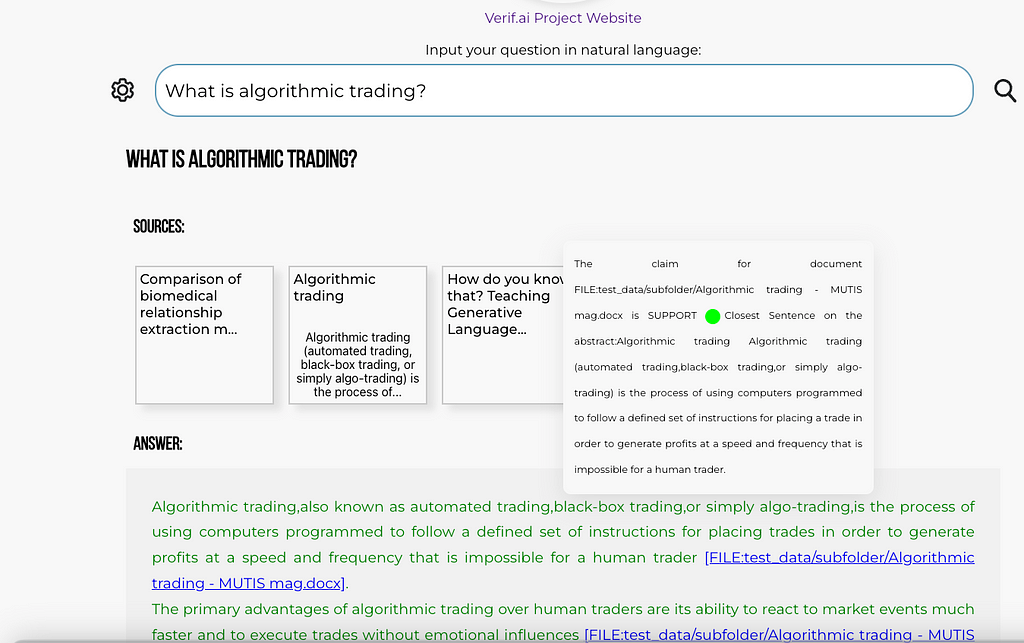
Contributing and future direction
So far, VerifAI has been started with the help of funding from the Next Generation Internet Search project as a subgrant of the European Union. It was started as a collaboration between The Institute for Artificial Intelligence Research and Development of Serbia and Bayer A.G.. The first version has been developed as a generative search engine for biomedicine. This product will continue to run at ), we are welcoming contributions by anyone, via pull requests, bug reports, feature requests, discussions, or anything else you can contribute with (feel free to get in touch — for both BioMed and Core (document generative search, as described here) versions website will remain the same — was originally published in Towards Data Science on Medium, where people are continuing the conversation by highlighting and responding to this story.

SOCIAL SHARE CARD GENERATOR