



Originally published at https://www.nocobase.com/en/tutorials/task-tutorial-workflow.
Congratulations on reaching the final chapter! Here, we’ll introduce and briefly explore the powerful workflow features in NocoBase. This feature lets you automate tasks within the system, saving time and enhancing efficiency.
Challenge Solution from the Previous Chapter
Before diving in, let’s quickly recap the solution to the last challenge. We successfully set up comment permissions for the "Partner" role as follows:
Add Permission : Allows users to post comments.
View Permission : Allows users to view all comments.
Edit Permission : Users can edit only their own comments.
Delete Permission : Users can delete only their own comments.
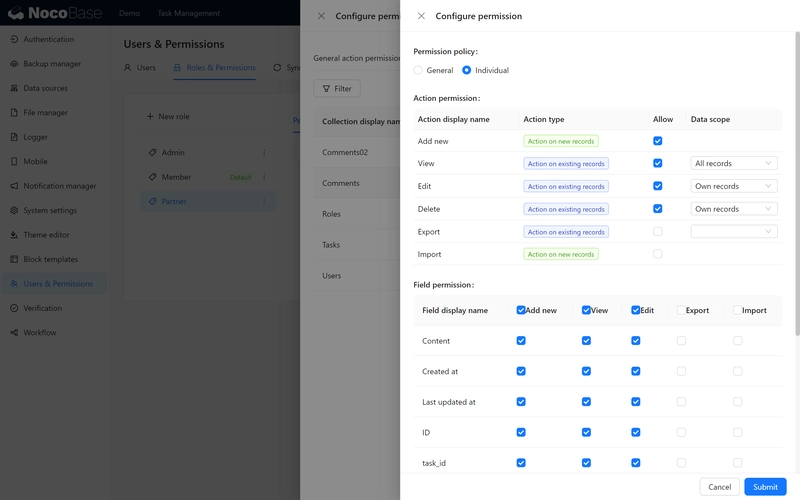
With these permissions, Tom can freely post comments, view others’ comments, and ensure that only he can edit or delete his own posts.
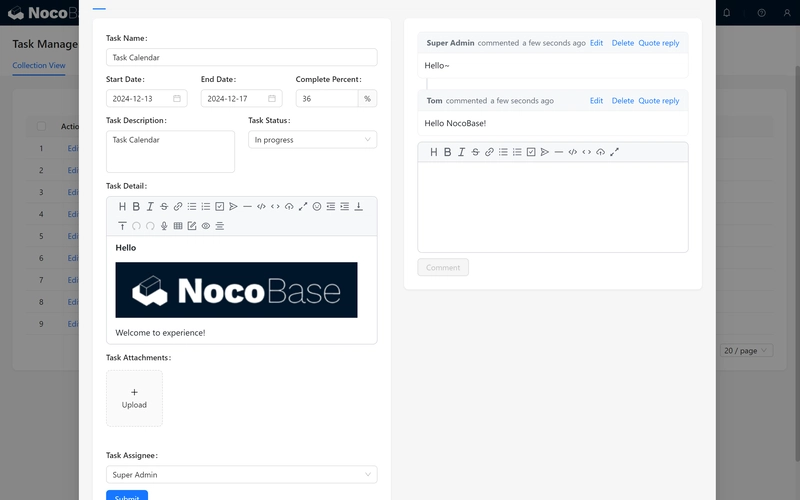
Now, let’s implement an automation: whenever a task assignee is changed, the system will automatically send a notification to the new assignee, informing them of the task transfer.
Workflow: The Workflow Plugin is a powerful automation tool commonly used in Business Process Management (BPM) to design and configure business processes based on data models.
By defining triggers and configuring process nodes, this plugin automates the flow of business processes, enabling efficient task management and data-driven operations.
7.1 Creating a Workflow
7.1.1 Setting Up a Workflow in the Admin Page
First, switch to the Root Role – the system administrator role with all permissions. Then, navigate to the Workflow Module.
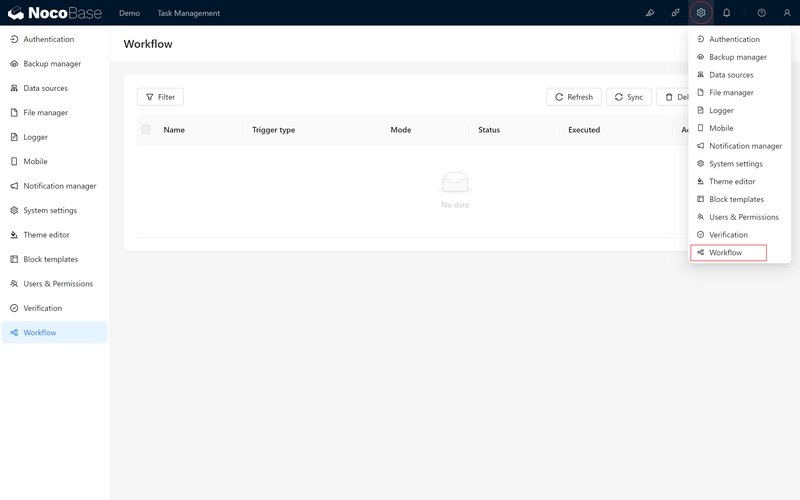
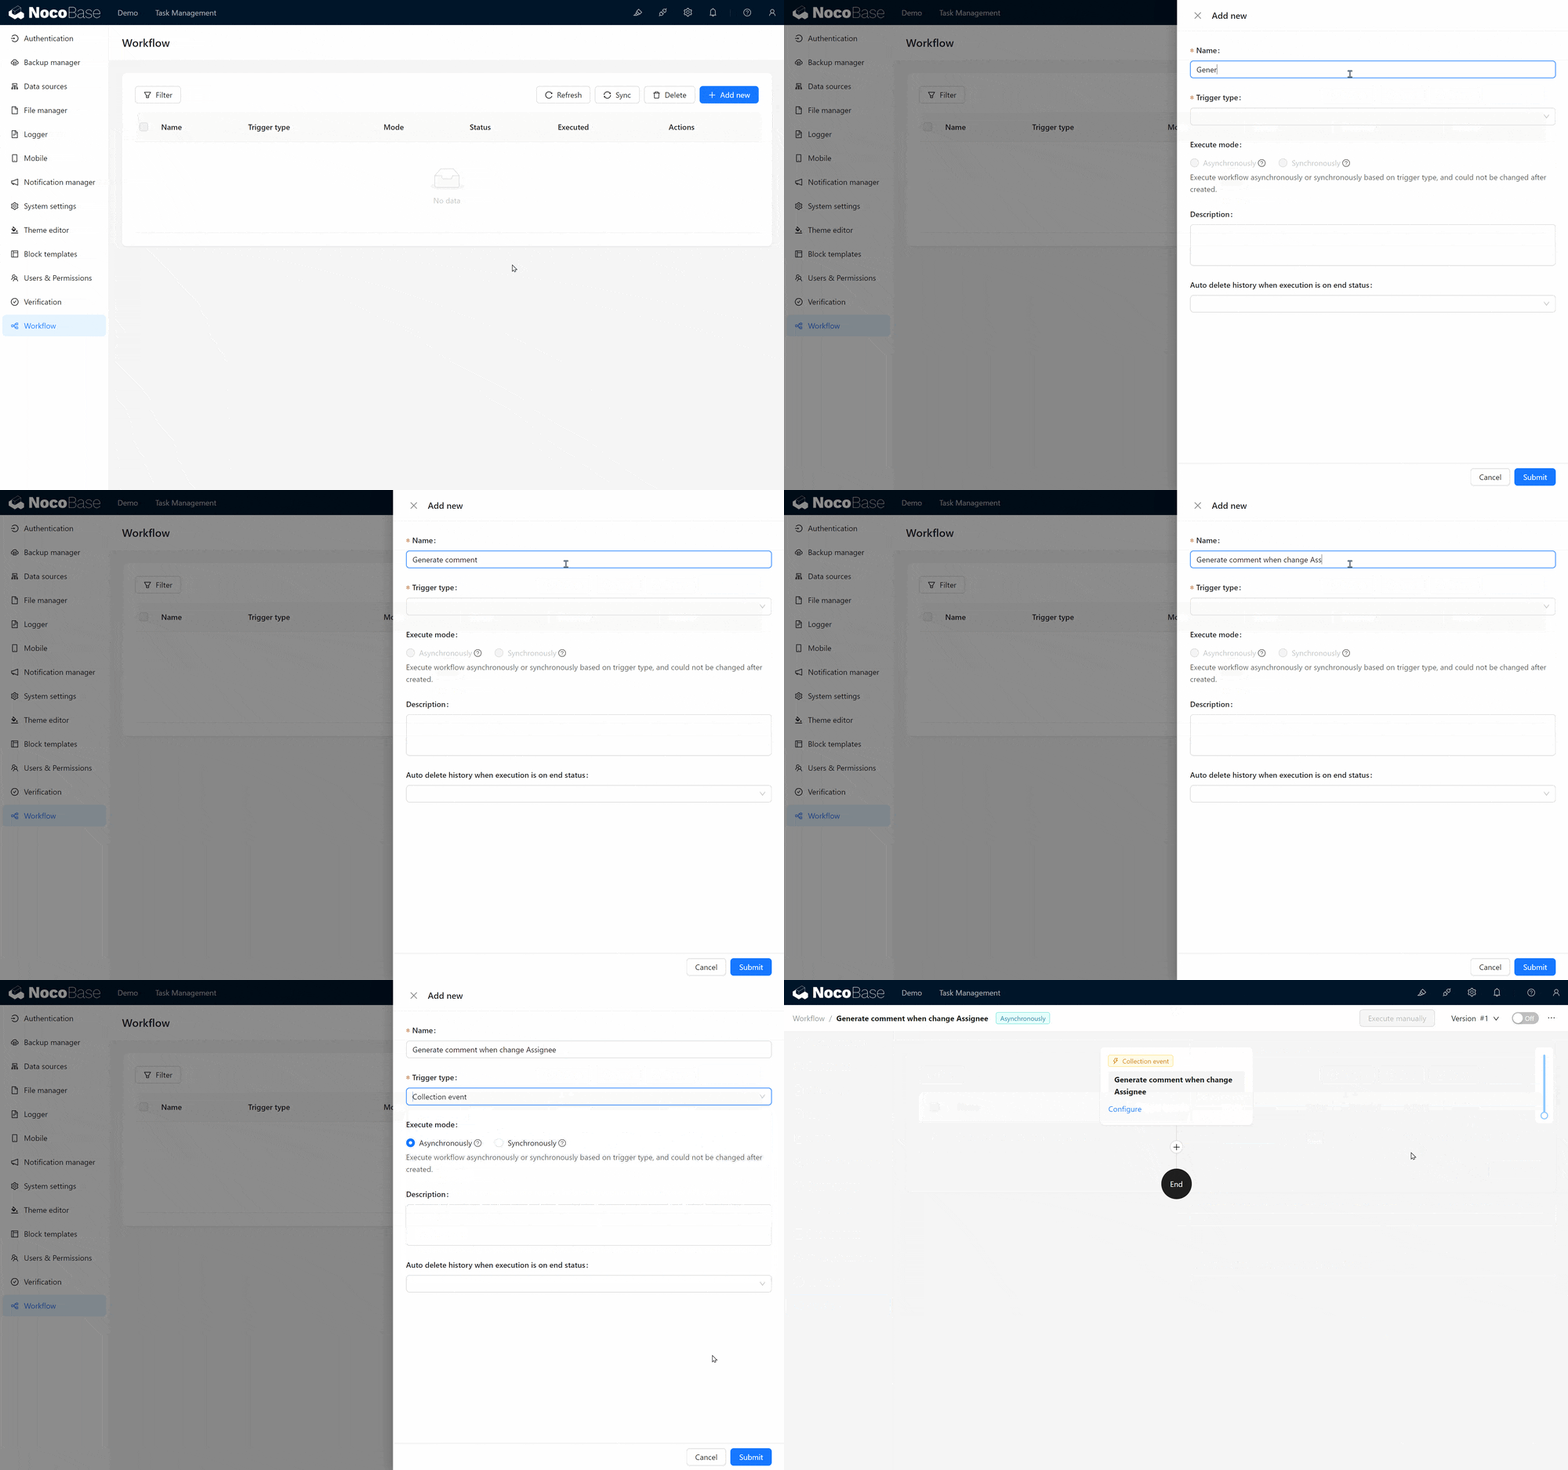
Click the “Add” button in the top right corner to create a new workflow, and fill in the basic information:
Name: Send a system notification when the assignee is changed.
Trigger Type: Select "Collection Event."
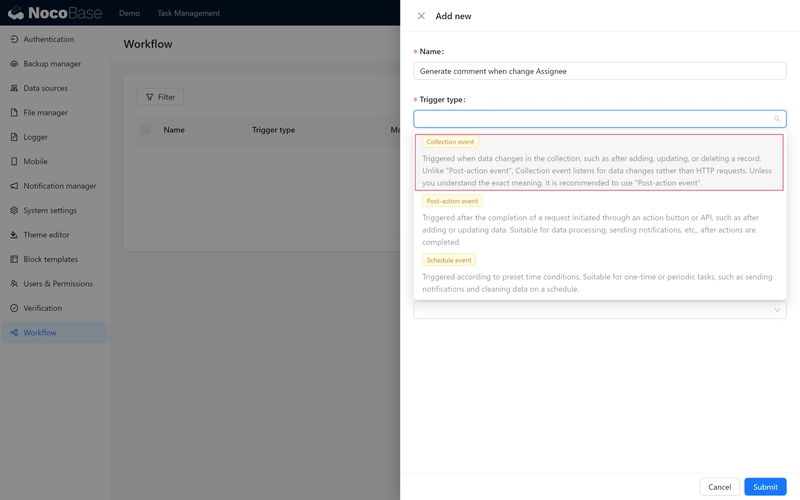
7.1.2 Explanation of Trigger Types
Collection Event: Triggers when changes occur within a collection (add, modify, delete). This is ideal for tracking updates to task fields, such as when the assignee changes.
Scheduled Task: Automatically triggers at specified times, suitable for schedule-based automation.
Post-action Event: Binds to an action button and triggers after a user action, like clicking "save" on a form.
In future cases, you may also find trigger types such as "Pre-action Event," "Custom Action Event," and "Approval," which can be unlocked through additional plugins.

In this scenario, we use the Collection Event to monitor changes to the "Task Assignee" field in the "Task" collection. After submitting the workflow, click Configure to enter the workflow settings page.
7.2 Configuring Workflow Nodes
7.2.1 Setting Trigger Conditions
Let’s begin building the automated notification process by configuring the first node and setting conditions to automatically activate the workflow under specific circumstances.
Collection: Select "Task." (This collection triggers the workflow and pulls relevant data. We want the workflow to activate when the "Task" collection is updated.)
Trigger on: Select "After adding or updating data."
Trigger Field: Choose "Task Assignee."
Only triggers when match conditions: Select "Task Assignee / ID" "exists," ensuring a notification is only sent when a task is assigned.
Preload associations: Choose "Task Assignee," enabling its information to be used in the following steps.
7.2.2 Enabling the "In-app Message" Channel
Next, we’ll create a node to send notifications.
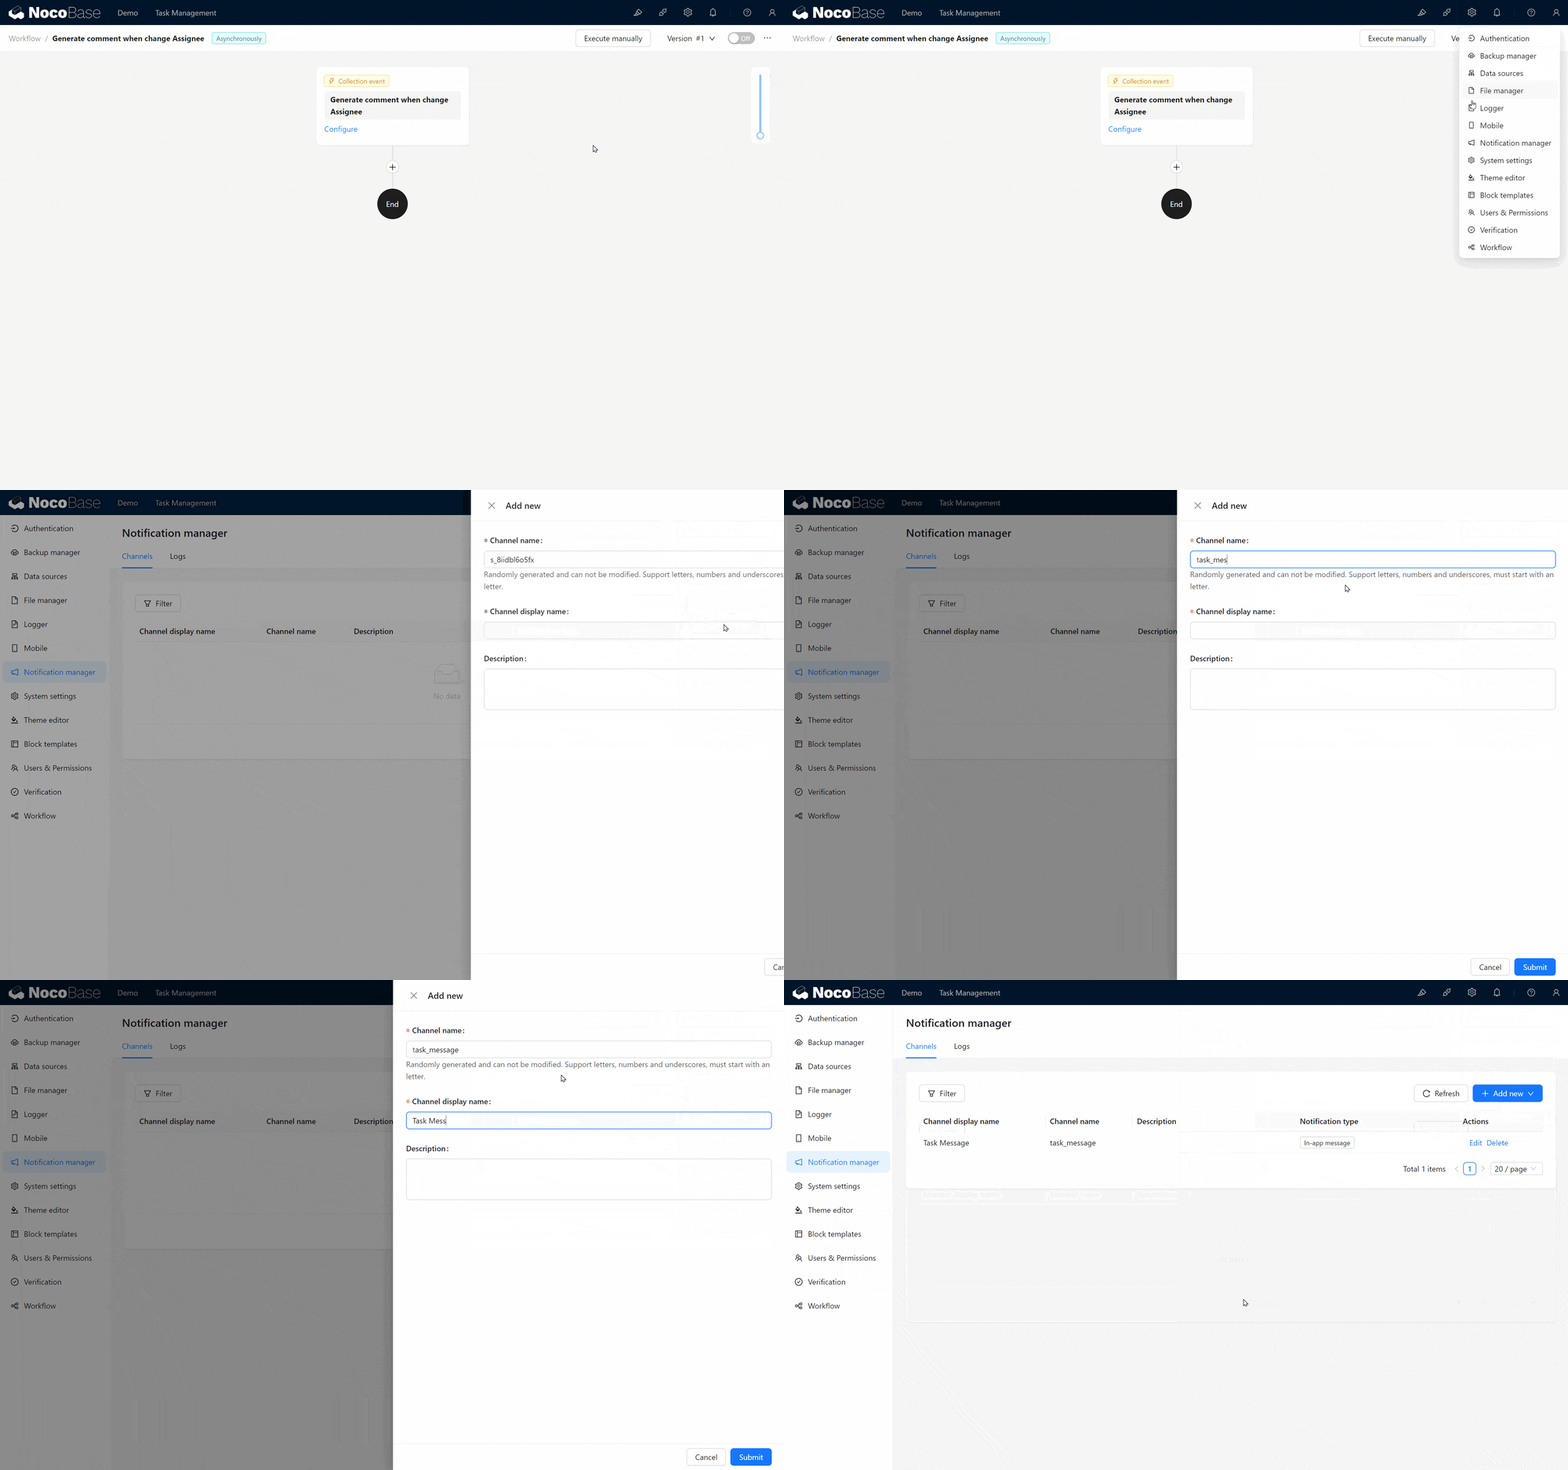
Before proceeding, we need to create an “In-app Message” channel for notifications.
- Go back to Plugin Management, select "Notification Management," and create a task notification (task_message).
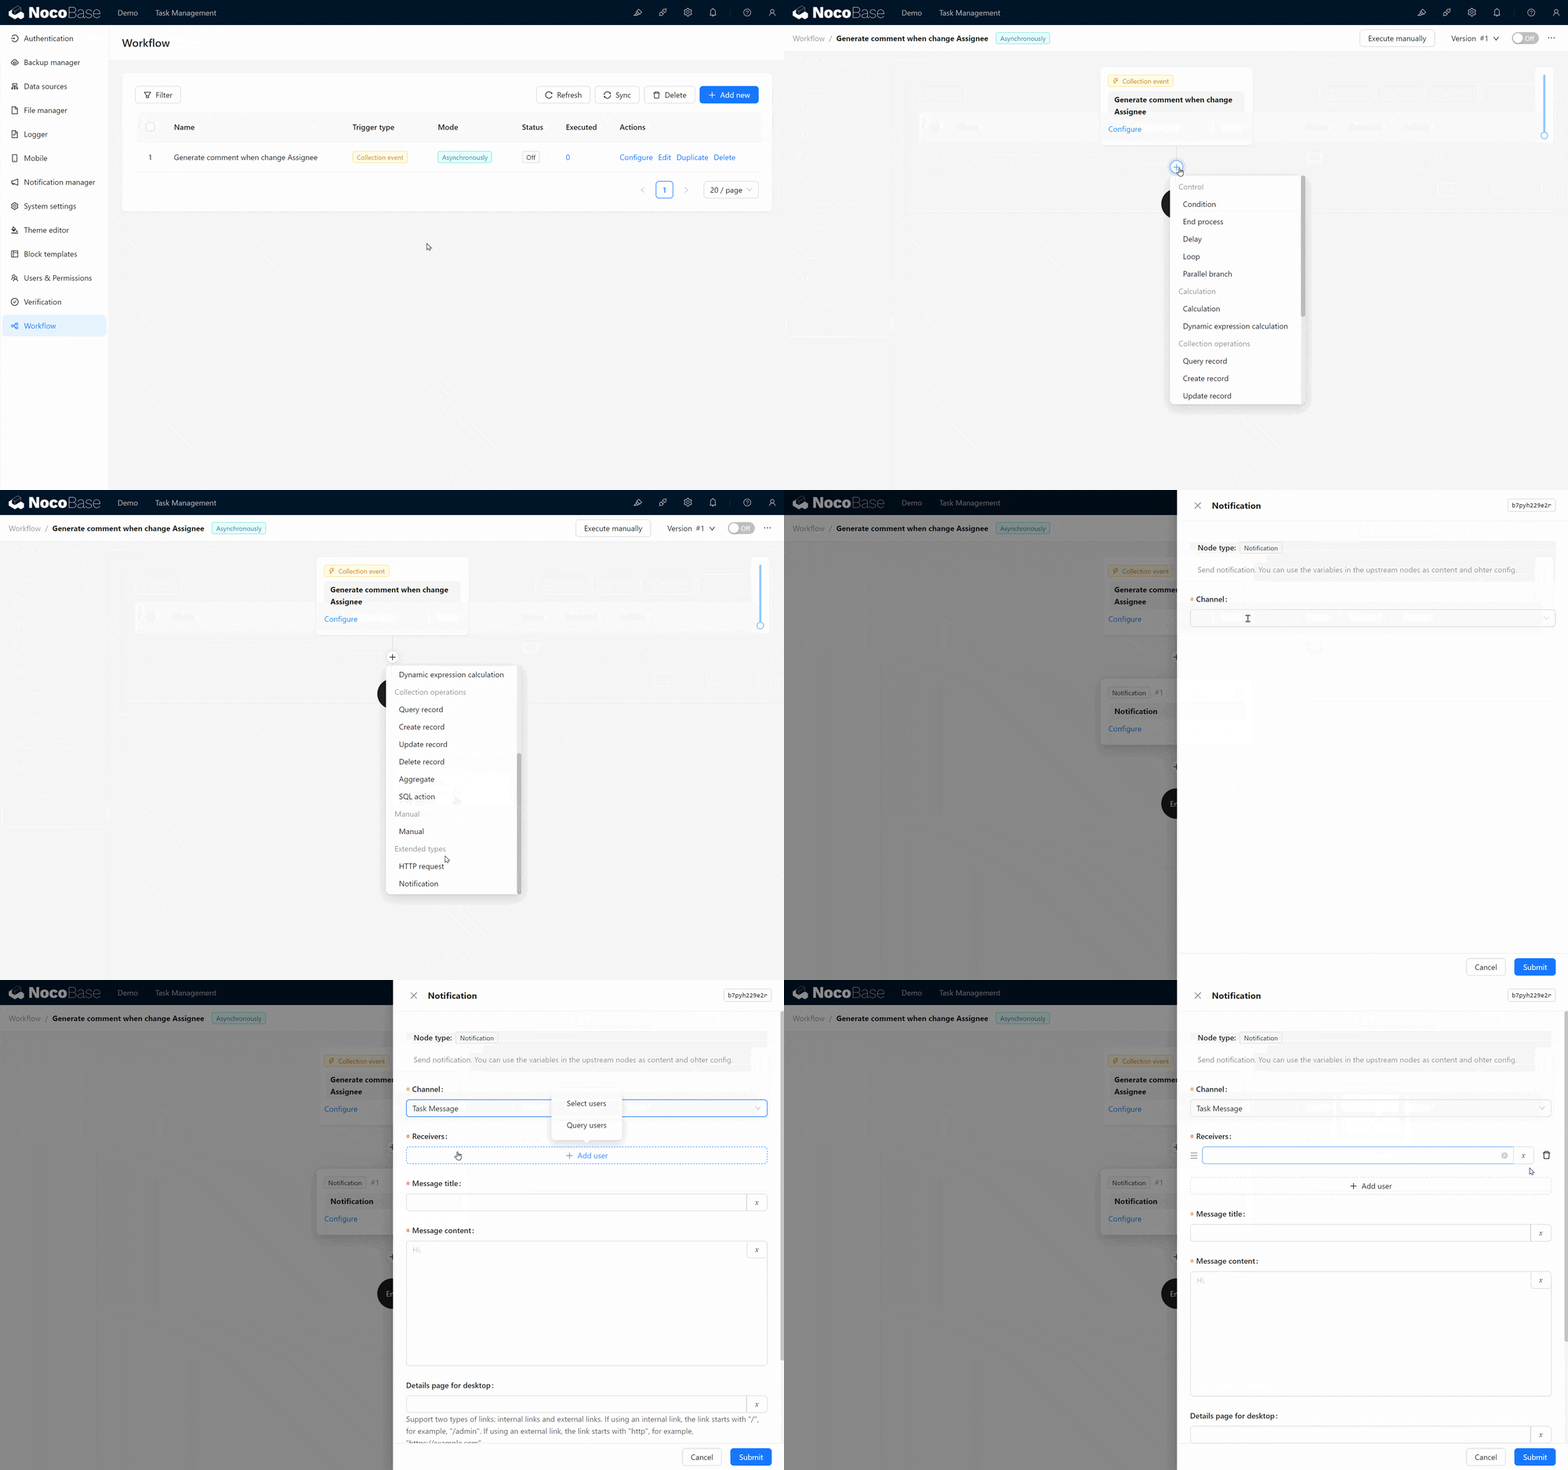
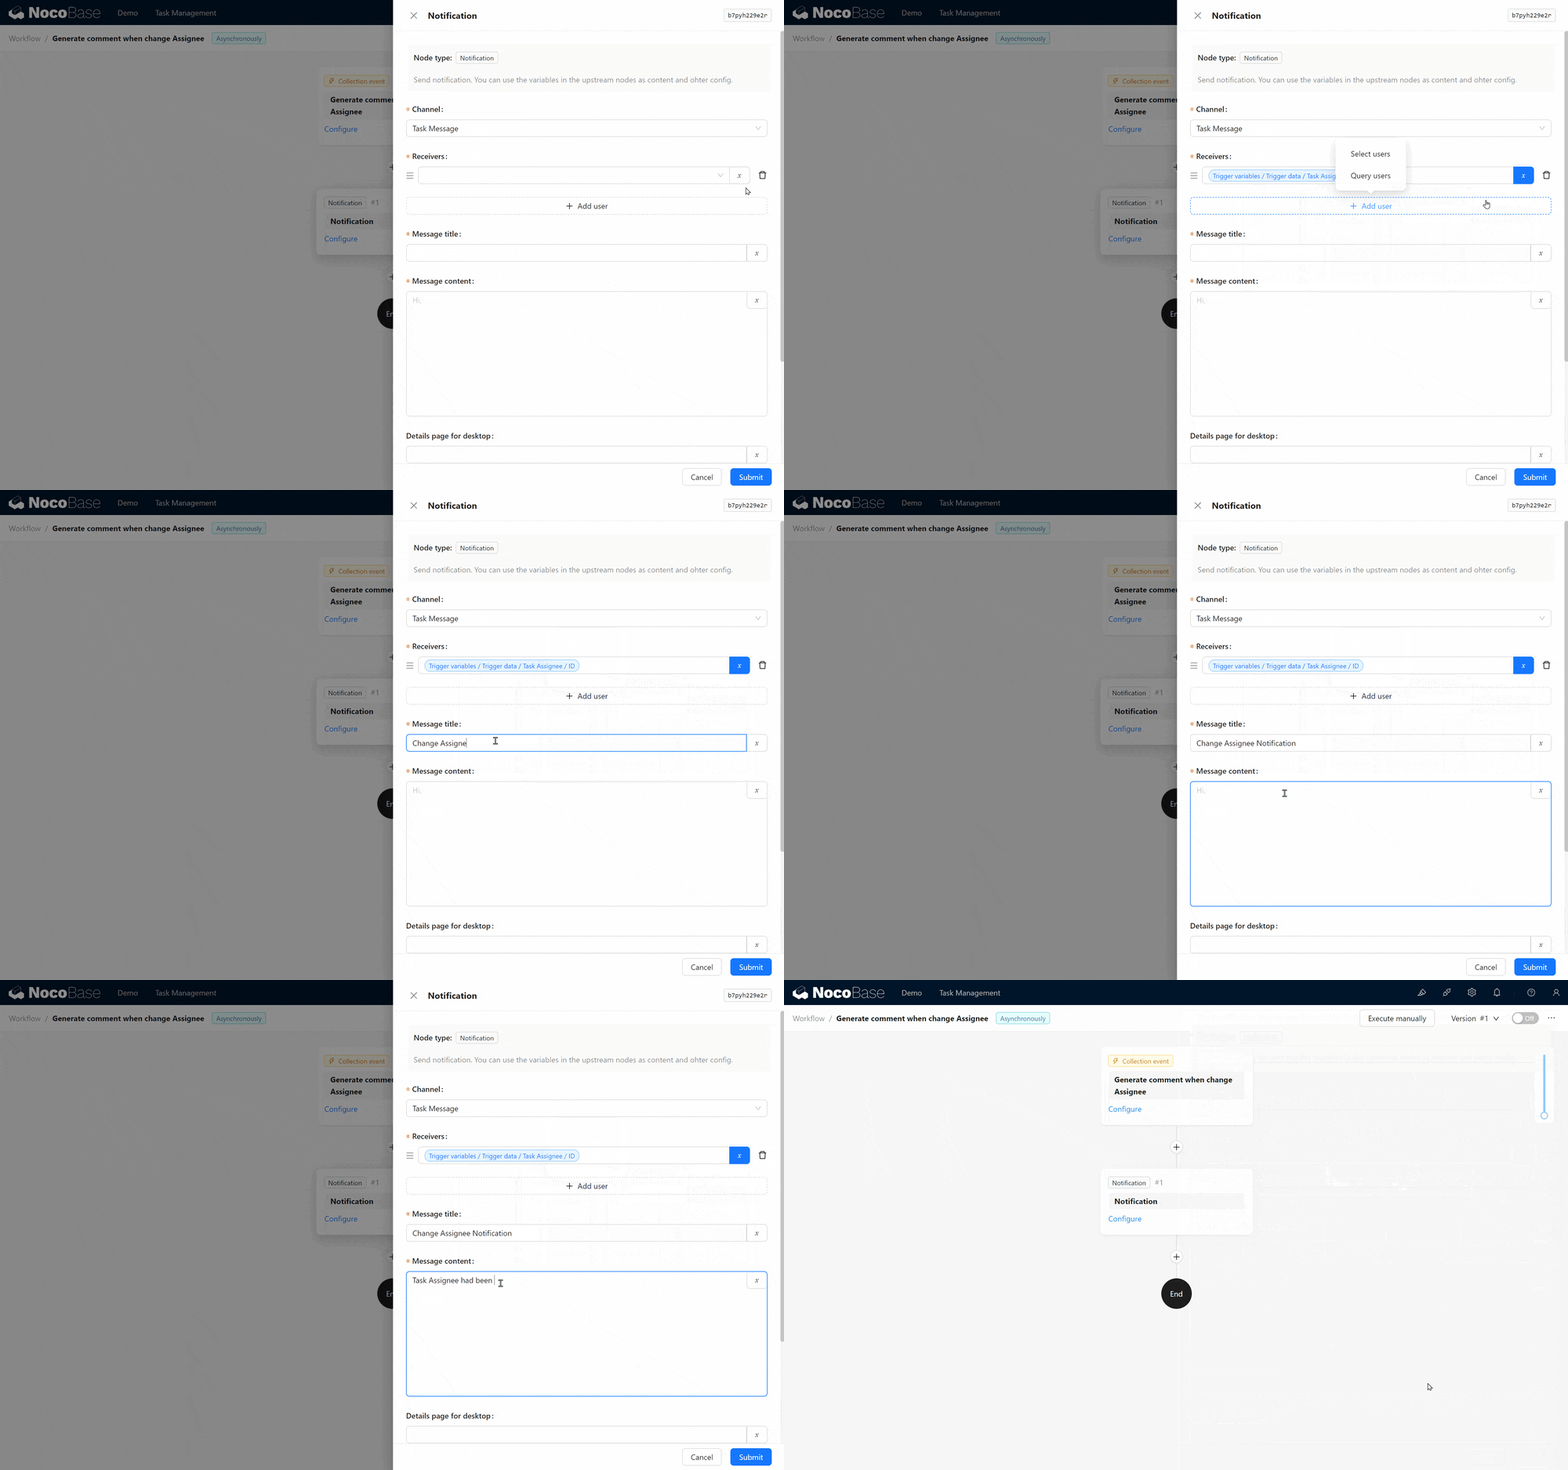
- After creating the channel, return to the workflow and add a “Notification” node.
Node Configuration:
Channel: Select "Task Notification."
Receivers: Choose “Trigger Variable / Trigger Data /Task Assignee / ID” to target the new assignee.
Message Title: Enter “Assignee Change Reminder.”
Message Content: Enter “You have been assigned as the new task assignee.”
Once complete, click the toggle in the upper right to activate this workflow.
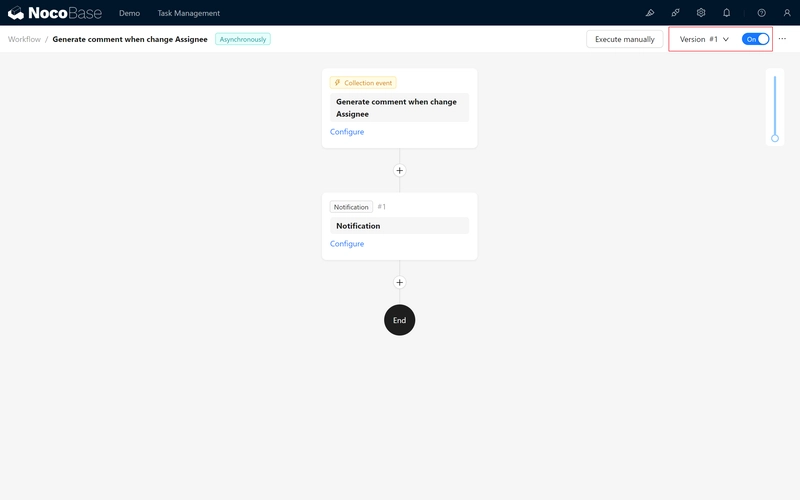
Configuration complete!
7.2.3 Testing the Notification
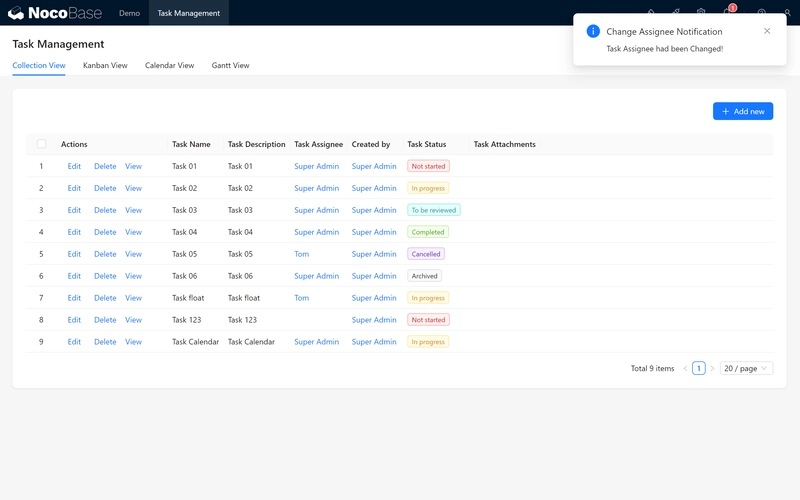
It’s an exciting moment. Go back to the page, edit any task, change the assignee, and click submit. The system has now sent the notification!
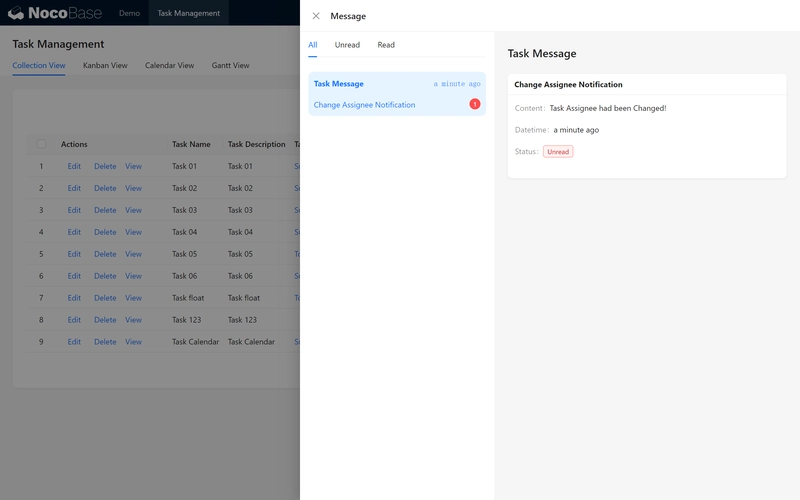
That’s the basic workflow setup. However, there’s one more improvement to make:
The notification should dynamically insert task information so users know which task was reassigned.
7.3 Refining the Workflow
7.3.1 Version Management

Return to the workflow configuration. You’ll notice the workflow interface is now grayed out and cannot be edited.
No worries. Click the ellipsis in the upper right corner > Duplicate to New Version, and you’ll enter the new version’s configuration page. The previous version is retained, so by clicking the Version button, you can switch back to historical versions (note: executed workflow versions cannot be modified).
7.3.2 Enhancing Notification Content
Now, let’s personalize the notification by adding details about the task transfer.
Edit the Notification Node.
Change the message content to: “Task 《【Task Name】》 has been reassigned to: 【Task Assignee / Nickname】.”
- Use the variable panel on the right to add the task name and Task Assignee fields.
- Then, click the toggle in the upper right to activate this version.

With the updated workflow version activated, you’ll see the task name in the system notification upon the next test.

Summary
Fantastic! You’ve successfully created an automated workflow that triggers based on changes to task ownership. This feature not only saves time but also enhances team collaboration. At this point, our task management system has gained powerful capabilities.
Conclusion and Next Steps
You’ve now completed a fully functional task management system from scratch – covering task creation, comments, role permissions, workflows, and system notifications.
The flexibility and extensibility of NocoBase open up limitless possibilities for you. In the future, you can explore more plugins, customize features, or create complex business logic. With this knowledge, you’ve mastered the basics and core concepts of NocoBase.
We look forward to seeing your next innovation! For any questions, feel free to consult the NocoBase official documentation or join the NocoBase community for discussions.
Keep exploring and unleash endless potential!