



Introduction
Hey, Angular devs🅰️, as we already know, GraphQL provides precise data fetching and reduces over-fetching. In this tutorial, I’ll walk you through how to configure GraphQL in Angular, covering both authenticated (private APIs) and unauthenticated (public APIs) setups.
Prerequisites
Before we dive in, make sure you’ve got:
- An Angular project, using the command
ng new my-app
- Apollo Angular Setup for GraphQL using the command
ng add apollo-angular
- Optional: State management using
NgRx Signal Storefor the private apis approach.
Installation
Let's set up a new angular project using:
ng new ang-grapql-setup
After successful installations, let's proceed to install Apollo Angular using the command:
ng add apollo-angular
This will add the following packages to the app:
apollo-angular - Angular integration
apollo/client - Core GraphQL client
graphql - Query language parser
Now, let's install NgRx Signals using the command:
ng add @ngrx/signals
This will add the package @ngrx/signals to help us manage the state.
Section 1: GraphQL Setup For Public APIs
Let's start with a simple public API connection - the fastest way to get GraphQL working in the Angular app.
Configuration
Create graphql-provider-public-api.config.ts:
// src/app/config/graphql-provider-public-api.config.ts

export const apolloOptionsFactory = () => {

  const graphqlURI = environment.GRAPHQL_URI_NO_TOKEN;

  const httpLink = inject(HttpLink);


  return {

    link: httpLink.create({ uri: graphqlURI }),

    cache: new InMemoryCache(),

    defaultOptions: {

      watchQuery: {

        fetchPolicy: 'cache-first',

        errorPolicy: 'all',

      },

      query: {

        fetchPolicy: 'cache-first',

        errorPolicy: 'all',

      },

    },

  };

};


export const graphqlProviderConfig: ApplicationConfig['providers'] =

  [

    Apollo,

    {

      provide: APOLLO_OPTIONS,

      useFactory: apolloOptionsFactory,

    },

  ];
In the above code, the apolloOptionsFactory function pulls in the GraphQL server URI from your environment config and uses Angular’s inject to grab the HttpLink service, creating a direct connection to the endpoint.
We set up an InMemoryCache to store query results, reducing unnecessary network calls and apply default options like cache-first to prioritize cached data while fetching fresh results when needed.
The errorPolicy: "all" ensures we get both data and errors, giving us the flexibility in handling responses.
Finally, the graphqlProviderConfig ties it all together, providing Apollo Client to the app.
App Configuration
Update app.config.ts with the graphqlProviderConfig
// src/app/app.config.ts

export const appConfig: ApplicationConfig = {

  providers: [

    provideZoneChangeDetection({ eventCoalescing: true }),

    provideRouter(routes),

    provideHttpClient(),

    graphqlProviderConfig,

  ],

};
Setup Public API Query
Let’s set up a query from a public GraphQL API to fetch country details.
// src/app/graphql/queries.ts

export const FETCH_COUNTRIES = gql`

  query {

    countries {

      name

      capital

      currency

    }

  }

`;
Now, let's set up a countries component to fetch and display the data:
// src/app/countries/countries.component.ts

@Component({

  selector: 'app-countries',

  imports: [CommonModule],

  templateUrl: './countries.component.html',

})

export class CountriesComponent {

  protected data: Countries[] = [];


  constructor(private readonly apollo: Apollo) {

    this.apollo

      .query<CountriesResponse>({ query: FETCH_COUNTRIES })

      .subscribe((result) => (this.data = result.data.countries));

  }

}
Displaying the Data
Now the countries template, we set up to display the countries' data we need:
// src/app/countries/countries.component.html

@if (data; as countries) {

<div class="grid">

  @for (country of countries; track country.name) {

  <div class="card">

    <h3>{{ country.name }}</h3>

    <p>Currency: {{ country.currency }}</p>

    <p>Capital: {{ country.capital || "N/A" }}</p>

  </div>

  }

</div>

}
Expected Output:
Here's how the output looks when everything is working correctly from the countries' public API based on the query setup:

The view shows countries their capital and currency
Section 2: GraphQL Setup For Private API's With Authentication
For us to access a private API, we will need an access token, and so for that, let's update or create a new config file graphql-provider-private-api.config.ts with these improvements:
// src/app/config/graphql-provider-private-api.config.ts

export const apolloOptionsFactory = () => {

  const graphqlURI = environment.GRAPHQL_URI_WITH_TOKEN;

  const httpLink = inject(HttpLink);

  const userStore = inject(UserStore);


  const errorLink = onError(({ graphQLErrors, networkError }) => {

    if (graphQLErrors) {

      graphQLErrors.forEach(({ message }) => {

        console.error(`[GraphQL error]: ${message}`);

        if (message.includes('Bad credentials')) {

          userStore.logout();

        }

      });

    }

    if (networkError) {

      console.error(`[Network error]: ${networkError.message}`);

    }

  });


  const authMiddleware = new ApolloLink((operation, forward) => {

    const token = userStore.authData().app_token;


    if (!token) {

      console.warn('No token available');

      return forward(operation);

    }


    operation.setContext({

      headers: new HttpHeaders().set('Authorization', `Bearer ${token}`),

    });


    return forward(operation);

  });


  const httpLinkHandler = httpLink.create({ uri: graphqlURI });

  const link = ApolloLink.from([errorLink, authMiddleware, httpLinkHandler]);


  return {

    link,

    cache: new InMemoryCache(),

    defaultOptions: {

      watchQuery: {

        fetchPolicy: 'network-only',

        errorPolicy: 'all',

      },

      query: {

        fetchPolicy: 'network-only',

        errorPolicy: 'all',

      },

    },

  };

};


export const graphqlProviderConfig: ApplicationConfig['providers'] = [

  Apollo,

  {

    provide: APOLLO_OPTIONS,

    useFactory: apolloOptionsFactory,

  },

];
In this configuration, the apolloOptionsFactory constructs a secure GraphQL client through three layered operations.
First, the errorLink handles authentication failures by automatically logging out users when it detects invalid credentials and logs all GraphQL/network errors.
Second, the authMiddleware intercepts each request to inject the bearer token from UserStore into authorization headers, gracefully bypassing when no token exists.
Finally, the httpLinkHandler establishes the connection to the GraphQL endpoint. These links chain together through ApolloLink.from(), creating a pipeline that wraps every request with authentication and error handling while maintaining consistent cache-first query policies across the application.
Update App Configuration
The application configuration in app.config.ts follows the same pattern as the public api setup but now imports the authentication-ready provider from the new configuration file src/app/config/graphql-provider-private-api.config.ts:
// src/app/app.config.ts

export const appConfig: ApplicationConfig = {

  providers: [

    provideZoneChangeDetection({ eventCoalescing: true }),

    provideRouter(routes),

    provideHttpClient(),

    graphqlProviderConfig,

  ],

};
State Management for Private APIs
While the focus is on GraphQL configuration, we need a robust way to manage the authentication state for private APIs, so for that we're going to leverage the Signal Store for this implementation.
Here's how we'll handle the state management:
// src/app/store/user.store.ts

const initialState = {

  authData: { app_token: '' },

  isAuthenticated: false

};


export const UserStore = signalStore(

  { providedIn: 'root' },

  withState(initialState),

  withMethods((store) => ({

    setToken(token: string) {

      patchState(store, {

        authData: { app_token: token },

        isAuthenticated: !!token

      });

      localStorage.setItem('github_token', token);

    },

    initialize() {

      const token = localStorage.getItem('github_token');

      if (token) {

        this.setToken(token);

      }

    },

    logout() {

      patchState(store, initialState);

      localStorage.removeItem('github_token');

    }

  }))

);
Authentication Flow: Login Component
Before we can make authenticated queries, we need a way to collect and store the private api token.
Here's a minimal login component that bridges our state management and GraphQL setup:
// src/app/login/login.component.ts

@Component({

  selector: 'app-login',

  imports: [FormsModule],

  templateUrl: './login.component.html',

})

export class LoginComponent {

  protected token = '';

  private readonly userStore = inject(UserStore);

  private readonly router = inject(Router);


  login() {

    if (this.token) {

      this.userStore.setToken(this.token);

      this.router.navigate(['/profile']);

    }

  }

}


// src/app/login/login.component.html

<div>

  <h2>Login with GitHub Token</h2>

  <input [(ngModel)]="token" type="password" placeholder="GitHub Token" />

  <button (click)="login()">Login</button>

</div>
Making Authenticated GraphQL Queries
Now that we have our authentication flow done, let's set up a query from a private GitHub's GraphQL API to get a user's GitHub profile details.
// src/app/graphql/queries.ts

export const FETCH_USER = gql`

  query {

    viewer {

      login

      name

      email

      bio

      avatarUrl

      company

      location

      websiteUrl

      repositories(first: 5, orderBy: { field: UPDATED_AT, direction: DESC }) {

        nodes {

          name

          description

          url

          createdAt

          updatedAt

          isPrivate

        }

      }

    }

  }

`;
Implementing the Authenticated Component
With our GraphQL query ready, let's examine the component that brings everything together. This AuthenticatedComponent demonstrates:
- Token verification before making requests
- Proper loading and error states
- Type-safe data handling
- Automatic logout on authentication failures
// src/app/authenticated/authenticated.component.ts

@Component({

  selector: 'app-authenticated',

  standalone: true,

  imports: [CommonModule],

  templateUrl: './authenticated.component.html'

})

export class AuthenticatedComponent {

  private readonly apollo = inject(Apollo);

  private readonly userStore = inject(UserStore);

  private readonly router = inject(Router);


  userData: GitHubUser | null = null;

  error: string | null = null;

  loading = false;


  ngOnInit() {

    this.userStore.initialize();

    this.fetchUserData();

  }


  protected fetchUserData() {

    if (!this.userStore.isAuthenticated()) {

      this.router.navigate(['/login']);

      return;

    }


    this.loading = true;

    this.error = null;


    this.apollo.query<GitHubUserResponse>({

      query: FETCH_USER,

    }).subscribe({

      next: ({ data }) => {

        this.userData = data.viewer;

        this.loading = false;

      },

      error: (err) => {

        this.error = err.message;

        this.loading = false;

        this.userStore.logout();

      }

    });

  }

}
Displaying the Data
The template uses Angular's new @if syntax for conditional rendering:
// src/app/authenticated/authenticated.component.html

@if (loading) {

<p>Loading GitHub profile...</p>


} @if (error) {

<p class="error">Sorry something went wrong</p>

} @if (userData) {


<div class="profile-header">

  <img [src]="userData.avatarUrl" width="100px" alt="Avatar" class="avatar" />

  <h2>{{ userData.name }}</h2>

  <p>{{ userData.login }}</p>

  <p>{{ userData.bio }}</p>

  <p *ngIf="userData.company">Works at {{ userData.company }}</p>

  <p *ngIf="userData.location">📍 {{ userData.location }}</p>

  <p *ngIf="userData.websiteUrl">

    <a [href]="userData.websiteUrl" target="_blank">{{

      userData.websiteUrl

    }}</a>

  </p>

</div>


<h3>Recent Repositories</h3>

<div class="repositories">

  <div class="repo-card">

    @for (repo of userData.repositories.nodes; track repo.name) {

    <h4>

      <a [href]="repo.url" target="_blank">{{ repo.name }}</a>

      @if (repo.isPrivate) {

      <span class="private-badge">Private</span>

      }

    </h4>


    @if (repo.description) {

    <p>{{ repo.description }}</p>

    }

    <div class="repo-meta">

      <span>Updated {{ repo.updatedAt | date }}</span>

    </div>

    }

  </div>

</div>

}
After implementing these components, our Angular application now successfully:
- Authenticates with GitHub's GraphQL API
- Fetches protected user data
- Displays user profile with repository information
Here's how the final output looks when everything is working correctly:
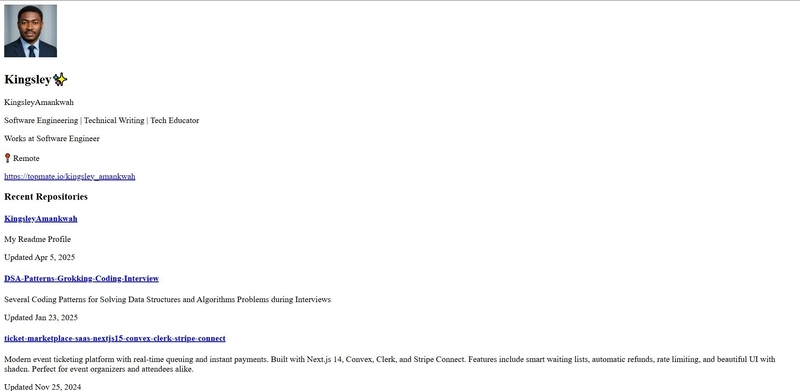
The authenticated view showing user profile and recent repositories
Key Takeaways:
| Feature | No Auth Setup | With Auth Setup |
|---|---|---|
| Configuration | Simple HttpLink | Auth middleware + error handling |
| State Management | None | signal store with token persistence |
| Error Handling | Basic console logging | Automatic token cleanup + user feedback |
| Data Freshness | cache-first | network-only for sensitive data |
| Security | Public API only | Token in headers + localStorage |
| Persistence | No token storage | Automatic token rehydration on app start |
| UI Integration | Simple data display | Loading states + error messages |
Conclusion
In this tutorial, we learned how to setup and make use of GraphQL public apis and private apis(requires authentication) in an angular application.
By understanding this setup, the same patterns can be adapted to work with any GraphQL API in Angular.
Explore the complete project:
🔗 GitHub Repository
Connect with me:
💼 LinkedIn
🐦 X (Twitter)
Happy coding! 🚀
SOCIAL SHARE CARD GENERATOR