



Overview
This section explains how to set up a Kubernetes (K8s) cluster on Google Cloud Platform (GCP) using Terraform. Instead of using GCP's managed Kubernetes service, we will install open-source Kubernetes manually inside virtual machines (VMs).
Objective
In software and microservice architecture design, it is essential to consider the scalability, availability, and performance of the application. I am proposing the following design considerations when selecting Kubernetes as part of the software architecture:
- When the application requires high performance, availability, scalability, and security
- When greater control over and maintenance of the infrastructure is needed
- When the application architecture involves complex microservices
- When opting for open-source solutions (optional)
When Kubernetes may not be the right choice:
- If the application is small and can be supported by a cloud provider’s managed services, such as AWS ECS with Fargate (serverless technology)
- If the application does not require high throughput
- If the goal is to minimize IT operational costs and reduce infrastructure management responsibilities
In this setup, I considered the following points while building Kubernetes (K8s) on GCP:
- Terraform: Used to easily deploy, manage, and destroy the cluster infrastructure.
- HAProxy: Implemented an open-source load balancer instead of relying on GCP’s native load balancer. HAProxy provides high-performance load balancing.
- GCP RBAC: Leveraged GCP’s Role-Based Access Control to simplify node joining, manage Kubernetes-related files in GCP Buckets, and associate service accounts with bucket roles and virtual machines.
- Minimal Permissions: As a best practice, configured minimal necessary roles for infrastructure components to enhance security.
- Firewall Rules: Configured the following rules: Public → HAProxy (port 80) and HAProxy → Kubernetes Worker Nodes (port 30080).
- Public and Private Subnets: Separated application workloads and network traffic by isolating resources into public and private subnets.
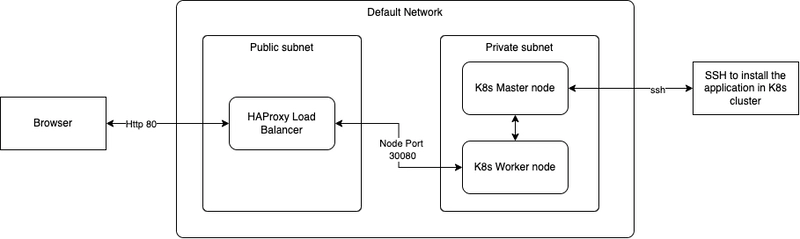
Note: This is not a production-ready architecture. In production environments, the default network should not be used. Instead, you should create your own VPCs, such as separate networks for Management, Development, and Production environments (for eg: following HIPAA-compliant recommended network architecture practices).
Prerequisites
We have to setup the following tools and accounts
- Create GCP account [we can create free tier account]
- Install Terraform in your machine [Min Terraform v1.9.3]
- Install gcloud command line in your machine
Login GCP account
Login the GCP account through gcloud CLI command. Execute following command
gcloud auth login
(Optional) Re-authenticate for a Specific Project
To log in and set a GCP project:
gcloud config set project PROJECT_ID
Replace GCP PROJECT_ID with your actual project.
Configure the env variables
Following environment variables need to configure. Replace the GCP project id with {your-gcp-project-id}.
CLOUDSDK_CORE_PROJECT: This variable configure the GCP project id to use thegcloudcli command
TF_VAR_gcp_project_id: This variable to configure the GCP project id to use the terraform
export CLOUDSDK_CORE_PROJECT={your-gcp-project-id}

export set TF_VAR_gcp_project_id={your-gcp-project-id}
Terraform Structure
Following the terraform module maintain to deploy the resources in the GCP account
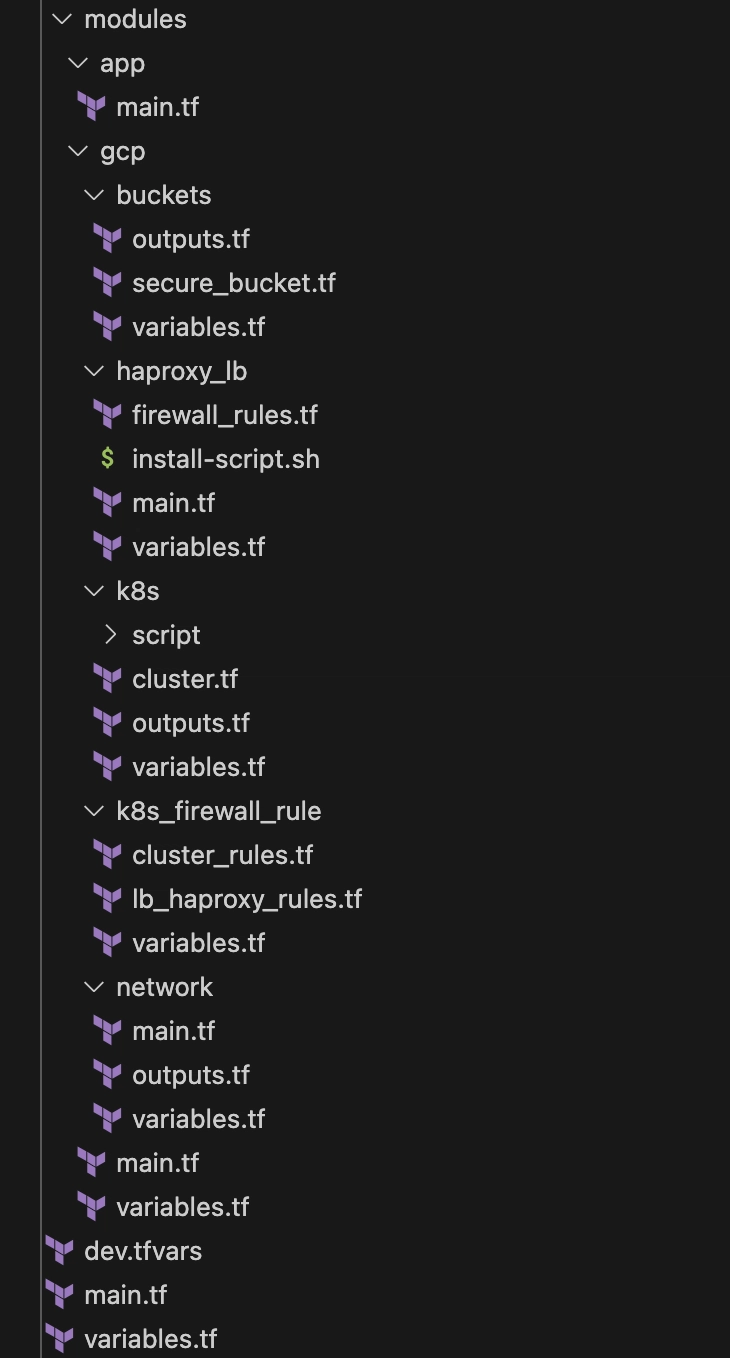
Create the Terraform workspace
The following command is used to create a Terraform workspace. A workspace in Terraform functions similarly to managing different environments in software development, such as dev and prod. In this setup, the workspace helps differentiate resources for each environment within the same GCP project.
We are following a consistent naming convention for resource creation in the GCP account:
Naming Pattern: {project-id}-{env}-{resource-name}
Examples for the dev environment:
myp-dev-secure-bucketmyp-dev-k8s-master-nodemyp-dev-k8s-worker-node-1
Examples for the prod environment:
myp-prod-secure-bucketmyp-prod-k8s-master-nodemyp-prod-k8s-worker-node-1
Note: As a best practice, production workloads should be managed in a separate GCP project. This approach improves production performance, enhances security, and ensures complete isolation between development and production environments.
terraform workspace new dev
Terraform Configuration
Resource configurations can be defined in a dev.tfvars variable file. Different variable files can be maintained for different environments (e.g., dev.tfvars, prod.tfvars).
For example, project-specific values such as the project ID and project name for each environment can be configured in these files.
For example:
#--------------------- Development Project Configuration ---------------------

#Development Project configuration, this project configuration is used to maintain resources for this project. eg: project_id will be used to create the GCP resources

project_id   = "myp"

project_name = "My Project"

# --------------------- GCP Project and Regsion Configuration ---------------------

gcp_region = "us-east1"

gcp_zone   = "us-east1-b"

#--------------------- Network Configuration ---------------------

nw_network_name          = "default"

nw_subnet_public_address_range = "10.0.0.0/24"

nw_subnet_private_address_range = "10.0.1.0/24"
Setup the resources in GCP
Run the following Terraform command to create the resources in the GCP .
terraform init --upgrade

terraform plan -var-file="dev.tfvars"

terraform apply -var-file="dev.tfvars"
It creates the following resources in GCP project account
- Service Account:
- VPC Network (default)→Subnet:
- myp-dev-private-subnet
- myp-dev-public-subnet
- VPC Network (default)→Firewall:
- myp-dev-haproxy-lb-allow-http
- myp-dev-k8s-incoming-from-haproxy-lb
- myp-dev-k8s-wroker-incoming-from-k8s-master
- myp-dev-k8s-wroker-egress-to-k8s-master
- myp-dev-k8s-outgoing-to-haproxy-lb-allow
- Buckets:
- Bucket name: myp-dev-{uniqueid}-secure-bukcet
- Unique id can be configured in the
dev.tfvars
- Unique id can be configured in the
- Folder name: /k8s/master-node
- Permission
- Bucket name: myp-dev-{uniqueid}-secure-bukcet
- VM Instances
- myp-dev-haproxy-lb-1
- myp-dev-k8s-master-node
- myp-dev-k8s-worker-node-1
Verify the services are installed in the K8s VM and HAProxy VM
We can verify whether the services have been installed successfully. The following steps can help monitor and validate the status of the services.
SSH into Master VM in the GCP console
Verify all initial script execute properly while start the VM
#For Google Cloud VM Instances:

#When using the metadata_startup_script in a GCP VM, the startup script output is logged to:

tail -500f /var/log/syslog


cat /var/log/syslog | grep "Intalled the tools!"

cat /var/log/syslog | grep "Container configure default configuration!"

cat /var/log/syslog | grep "Enabiling IP forwarding"

cat /var/log/syslog | grep "Configured the paramters of VM for K8s!"

cat /var/log/syslog | grep "Kubernetes has initialized successfully!"

cat /var/log/syslog | grep "Uploaded token into bucket!"
SSH into Worker VM in the GCP console
Verify all initial script execute properly while start the VM
tail -500f /var/log/syslog

cat /var/log/syslog | grep "Joined the master node successfully!"
SSH into HAProxy VM in the GCP console
- Verify all initial script execute properly while start the VM
    tail -500f /var/log/syslog

    cat /var/log/syslog | grep "Restart HAPorxy!"


    ##Output:

    startup-script: Restart HAPorxy!
- Verify HAProxy configuration and checking internal IP configure of k8s backend service
cat /etc/haproxy/haproxy.cfg


#Following information will be added in the configuration, Output:

frontend http_front

        bind *:80

        mode http

        default_backend haproxy_ingress_backend

backend haproxy_ingress_backend

    mode http

    balance roundrobin

    server k8s-node1 <worker-node-internip>:30080 check maxconn 32
- Verify the tcp connection 30080 port
sudo apt install telnet -y

telnet <worker-node-internip> 30080
Verify the Bucket
Check the bucket storage to verify whether the file /k8s/master-node/join_node.sh has been uploaded.
This shell script is used to join worker nodes to the Kubernetes cluster. It will be downloaded and executed on each worker node during the setup process.
Verify the nodes join
We can verify the worker nodes are joined with master node. Following step helps monitor the services
SSH into Master VM in the GCP console
- Verify the nodes are joined in the K8s cluster. Execute following command
#Login into ubuntu user

sudo su ubuntu

##Check the nodes

kubectl get nodes
Following Output:
NAME                            STATUS   ROLES           AGE   VERSION

myp-dev-k8s-master-node     Ready    control-plane   26m   v1.32.3

myp-dev-k8s-worker-node-1   Ready    <none>          25m   v1.32.3
- Verify the pods are installed eg: network plugin (Calico in this case)
##Check the pods

kubectl get pods --all-namespaces


##Following Output:

NAMESPACE     NAME                                                  READY   STATUS    RESTARTS   AGE

kube-system   calico-kube-controllers-7498b9bb4c-44pf8              1/1     Running   0          29m

kube-system   calico-node-b4bnh                                     1/1     Running   0          28m

kube-system   calico-node-bhpv8                                     1/1     Running   0          29m

kube-system   coredns-668d6bf9bc-8tdsb                              1/1     Running   0          29m

kube-system   coredns-668d6bf9bc-j6q4p                              1/1     Running   0          29m

kube-system   etcd-myp-default-k8s-master-node                      1/1     Running   0          29m

kube-system   kube-apiserver-myp-default-k8s-master-node            1/1     Running   0          29m

kube-system   kube-controller-manager-myp-default-k8s-master-node   1/1     Running   0          29m

kube-system   kube-proxy-4qgkc                                      1/1     Running   0          28m

kube-system   kube-proxy-zvlsb                                      1/1     Running   0          29m

kube-system   kube-scheduler-myp-default-k8s-master-node            1/1     Running   0          29m
Install Web Applications K8s cluster
We are deploying nginx-web as a sample application on the worker nodes and connecting to it through the HAProxy load balancer.
Since we are using HAProxy as the load balancer in our architecture, we need to configure an HAProxy Ingress Controller to properly route incoming requests to the applications running inside the pods.
Install the HAProxy ingress controller into master VM in the GCP console
- Install helm
#Login to ubuntu user

sudo su ubuntu


#Install helm

curl https://baltocdn.com/helm/signing.asc | sudo apt-key add -

sudo apt-get install apt-transport-https --yes

echo "deb https://baltocdn.com/helm/stable/debian/ all main" | sudo tee /etc/apt/sources.list.d/helm-stable-debian.list

# Install

sudo apt update

sudo apt install helm


#Check the version

helm version


#Output:

version.BuildInfo{Version:"v3.17.2", GitCommit:"cc0bbbd6d6276b83880042c1ecb34087e84d41eb", GitTreeState:"clean", GoVersion:"go1.23.7"}
- Add HAProxy repo
helm repo add haproxytech https://haproxytech.github.io/helm-charts

helm repo update
- Install the HAProxy ingress controller and expose the http and https Node Port to connect the HAProxy Load Balancer
helm install haproxy-kubernetes-ingress haproxytech/kubernetes-ingress \

    --create-namespace \

    --namespace haproxy-controller \

    --set controller.service.type=NodePort \

    --set controller.service.nodePorts.http=30080 \

    --set controller.service.nodePorts.https=30443 \

    --set controller.service.nodePorts.stat=30002 \

    --set controller.service.nodePorts.prometheus=30003


#Verify the service

kubectl get svc -n haproxy-controller haproxy-kubernetes-ingress

#Output

haproxy-kubernetes-ingress   NodePort   10.109.135.187   <none>        80:30080/TCP,443:30443/TCP,443:30443/UDP,1024:30002/TCP   103s
Install sample nginx server in the K8s and create ingress resource of HAProxy
- Install
nginx-webserver on K8s and expose80port
kubectl create deployment nginx-web --image=nginx --port=80

kubectl get deployments.apps -o wide

kubectl expose deployment nginx-web --port=80 --target-port=80 --type=ClusterIP

kubectl get  svc


#Output

NAME         TYPE        CLUSTER-IP       EXTERNAL-IP   PORT(S)   AGE

kubernetes   ClusterIP   10.96.0.1        <none>        443/TCP   60m

nginx-web    ClusterIP   10.110.173.152   <none>        80/TCP    16m
- Create the ingress resource to rout the request into
nginx-web:80application
#Install VI editor to create the resource file

sudo apt install vim -y

vi nginx-ingress.yaml


#Copy following configuration insuide `nginx-ingress.yaml`

#nginx-ingress.yaml

apiVersion: networking.k8s.io/v1

kind: Ingress

metadata:

    name: nginx-ingress

    namespace: default

    annotations:

    ingress.class: "haproxy"

spec:

    rules:

    - http:

        paths:

        - path: /

        pathType: Prefix

        backend:

            service:

            name: nginx-web

            port:

                number: 80
- Apply the ingress resource
kubectl apply -f nginx-ingress.yaml
- Identify the worker node Ip and test access of app through Node Port of worker node
kubectl get nodes -o wide

curl http://<worker-node-ip>:30080
We will see following output of Nginx server home page
<h1>Welcome to nginx!</h1>

<p>If you see this page, the nginx web server is successfully installed and

working. Further configuration is required.</p>

<p>For online documentation and support please refer to

<a href="http://nginx.org/">nginx.org</a>.<br/>

Commercial support is available at

<a href="http://nginx.com/">nginx.com</a>.</p>

<p><em>Thank you for using nginx.</em></p>

</body>

</html>
- Identify the
haporxayexternal Ip address from GCP console and execute following command on browser
http://<haproxy-vm-external-ip>
Destroy the resources in GCP account
Execute following commands to destroy / clean the resources which are created on GCP
terraform destroy -var-file="dev.tfvars"
Git Repo : (setup-k8s-cluster-on-gcp)[https://github.com/developerhelperhub/setup-k8s-cluster-on-gcp]