



Introduction
Most applications require that an individual is verified and permitted to access resources. This ensures the security of the app.
Strapi provides you with authentication mechanisms which include email and password, AuthO, AWS Cognito, GitHub, Google, etc. through its Users and Permissions providers feature. Thus, authentication bottlenecks are solved using Strapi.
Next.js on the other hand is a popular frontend framework that allows users to build applications with the power of React components. It also supports authentication, session management and authorization through Middleware, Data Access Layer and Data Object Layer. Learn more here.
In this tutorial, you will learn how to implement Strapi email and password authentication with Next.js frontend.
Tutorial Series
We will divide this tutorial into two series:
- Part 1 - Email and Password registration, Email confirmation, and Login
- Part 2 - Session Management, Data Access, password reset, and changing password
GitHub Repository: Full Code for Strapi and Next.js Authentication Project
The complete code for this project can be found in this repo: strapi-email-and-password-authentication
Tutorial Goals
In this tutorial, here are the concepts we will cover:
- Strapi Email and Password registration (signup) flow.
- Strapi Email confirmation flow.
- Strapi Email and Password Login (sign-in) flow
- Strapi Forgot Password flow
- Strapi Reset password flow
- Changing Password in Strapi with Authorization
- Next.js server actions, authentication, session management, middleware, and data access layer.
Prerequisites
Before we begin, ensure you have the following:
Node.js runtime: Only Active LTS or Maintenance LTS versions are supported (currently v18, v20, and v22).- A basic knowledge of Next.js and React should suffice.
- A SendGrid API Key. Visit this page to learn how to get yours.
- Optionally, a HTTP client. Postman is recommended.
Introduction to Strapi Email and Password Authentication
Authentication refers to the process of verifying that an entity has the correct credentials or permission to access resources.
Strapi offers multiple authentication methods to secure your application:
Users & Permissions Plugin:
This is Strapi's built-in authentication system that provides email/password authentication, role-based access control, and third-party provider authentication.
API Tokens: This allows authenticating REST and GraphQL API queries without user accounts, different token types such as read-only, full access, or custom.
Third-Party Authentication Providers:
Strapi supports numerous third-party authentication providers through the Users & Permissions plugin:
Social providers: Facebook, Google, Twitter, GitHub, Discord, Twitch, Instagram, VK, LinkedIn, Reddit
Enterprise providers: Auth0, AWS Cognito, etc.
Single Sign-On (SSO):
For enterprise users, Strapi offers SSO capabilities:
Available with Enterprise plan. SSO allows administrators to authenticate through an identity provider (e.g. Microsoft Azure Active Directory).
The email and password authentication in Strapi uses the Users & Permissions plugin and follows RESTful API patterns.
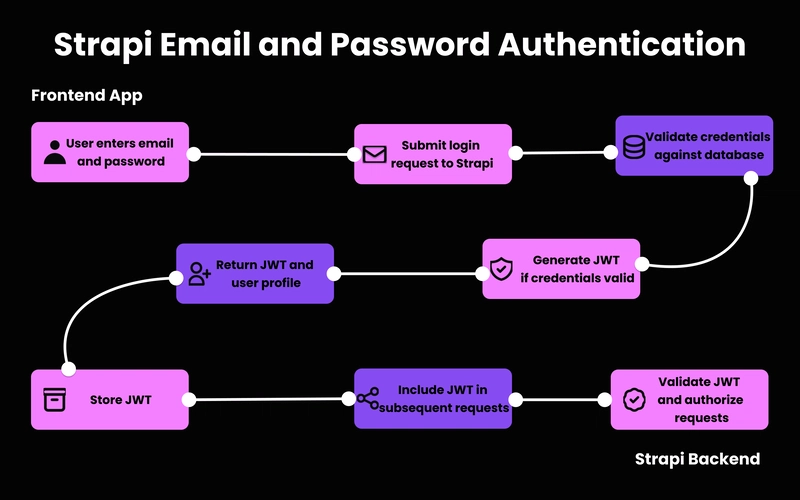
If you are interested in knowing the concepts without digging into the technical aspect of this tutorial, please visit this documentation page.
Now, let's install Strapi!
Strapi Installation and Setup
Create a folder where both your Strapi and Next.js app will reside. Give it any name.
Strapi Installation
Let's begin by installing Strapi. To create a new Strapi project, run the command below in your terminal. Ensure you are in the directory where you want to keep both your Strapi backend and Next.js frontend.
npx create-strapi@latest
The command above will be followed with some questions from the terminal.
Depending on your preferred setup, you can select the answer you want. Here are the answers for this project.
? What is the name of your project? strapi-backend

...

? Please log in or sign up. Skip

? Do you want to use the default database (sqlite) ? Yes

? Start with an example structure & data? No

? Start with Typescript? Yes

? Install dependencies with npm? Yes

? Initialize a git repository? No
NOTE: The name of the project is
strapi-backend.
Start Strapi Development Server
Once you have successfully installed Strapi, cd into your strapi project and run the Strapi develop command.
cd strapi-backend

npm run develop
This should start up your Strapi application in the URL: http://localhost:1337/admin. Enter your new admin credentials to continue.
This is what your Strapi dashboard should look like after registering the new admin:

To learn more about creating a Strapi project, read the Strapi CLI documentation page.
In the next section, we will configure the Strapi email plugin to allow us to send emails.
Configuring Strapi Email Plugin with SendGrid (Step-by-Step)
In this project, you will need the Strapi Email plugin to send emails.
For example, a confirmation email will be sent to a user when they register or sign up. So, you need to configure your Strapi Email plugin.
When you head over to Settings > Email Plugin > Configuration as shown below:

You will notice that the default email provider is sendmail, this is for local development. However, for production-ready applications, we will be using SendGrid as our email provider.
Install SendGrid provider
Providers can be installed using npm or yarn using the following format @strapi/provider-<plugin>-<provider> --save.
Install the SendGrid email provider which is available in the Strapi marketplace in your Strapi backend project by running the command below:
npm i @strapi/provider-email-sendgrid
Upon success, configure your provider as shown below:
Configure SendGrid Provider
Navigate to your Strapi project and locate the configuration file for plugins, ./config/plugins.ts. Add the following code:
module.exports = ({ env }) => ({

  email: {

    config: {

      provider: "sendgrid",

      providerOptions: {

        apiKey: env("SENDGRID_API_KEY"), // Required

      },

      settings: {

        defaultFrom: env("SENDGRID_EMAIL"),

        defaultReplyTo: env("SENDGRID_EMAIL"),

      },

    },

  },

});
Ensure you have your SendGrid API key and SendGrid email present in your Strapi project environment variable (strapi-backend/.env):
# Path: strapi-backend/.env

# ... Other environment variables


# SendGrid API Key

SENDGRID_API_KEY=YOUR_API_KEY

SENDGRID_EMAIL=YOUR_SENDGRID_EMAIL
Restart Strapi App
Restart your Strapi development server and visit the email configuration page. You will notice that the email provider is now SendGrid and the default email address is the one you provided in the configuration file.

🖐️ NOTE: The test feature on this page might not work in development mode, because it might not be using your SendGrid configuration.
Great! Let's dive into Next.js installation in the next section.
Next.js Installation
Install Next.js
Install Next.js using the command below. Ensure you are in the directory where you installed your Strapi project.
npx create-next-app@latest
During installation, ensure you follow the prompts. For this project, here are the answers to the prompts.
✔ What is your project named? … nextjs-frontend

✔ Would you like to use TypeScript? … Yes

✔ Would you like to use ESLint? … No

✔ Would you like to use Tailwind CSS? … Yes

✔ Would you like your code inside a `src/` directory? … Yes

✔ Would you like to use App Router? (recommended) … Yes

✔ Would you like to use Turbopack for `next dev`? … Yes

✔ Would you like to customize the import alias (`@/*` by default)? … No
NOTE: The project name is
nextjs-frontend
Start Next.js Development Server
Upon successful installation, cd into your Next.js project and run the command below to start your Next.js development server:
cd nextjs-frontend

npm run dev
Visit http://localhost:3000 to view your application.
👋 NOTE: Want to learn more about how to integrate Strapi and Next.js? Visit the Strapi and Next.js integration guide.
In the next section, we will perform some essential setups.
Create Starter Files, Dependencies and Templates
Before we begin implementing Strapi email and password authentication, we need to first install some dependencies, create some starter files and code templates.
Install Dependencies
Install the following dependencies:
axios: For HTTP requests.
jose: JavaScript module for JSON Object Signing and Encryption, providing support for JSON Web Tokens (JWT) and so on.
react-toastify: Allows us to add toast notifications.
npm i axios jose react-toastify
Create Pages
nextjs-frontend/

├── ...

├── .env

├── middleware.ts

└── src/

    └── app/

        ├── actions/

        │   └── auth.ts

        ├── auth/

        │   ├── signup/

        │   │   └── page.tsx

        │   ├── login/

        │   │   └── page.tsx

        │   ├── confirm-email/

        │   │   └── page.tsx

        │   ├── signup-success/

        │   │   └── page.tsx

        │   ├── forgot-password/

        │   │   └── page.tsx

        │   ├── change-password/

        │   │   └── page.tsx

        │   └── reset-password/

        │       └── page.tsx

        ├── components/

        │   ├── NavBar.tsx

        │   └── LogOutButton.tsx

        ├── lib/

        ├── layout.tsx

        ├── page.tsx

        └── globals.css
Create the following folders and files inside the nextjs-frontend/src/app folder.
actions: This is where server actions logic will reside. Create theauth.tsfile inside it.
auth: This will hold pages related to authentication. Inside this folder, create the following:
signup>page.tsx
login>page.tsx
confirm-email>page.tsx
signup-success>page.tsx
forgot-password>page.tsx
change-password>page.tsx
reset-password>page.tsx

components: Inside this folder, create the following:
NavBar.tsx: Represents the navigation bar.LogOutButton.tsx: Represents the button for logging out.lib: This will hold the logic for session management, API requests, type definitions, and Data Access Layer (DAL).
Create Environment Variable File
Inside the root of your frontend project folder nextjs-frontend, create the .env file. And add the environment variable for your Strapi API endpoint.
# Path: nextjs-frontend/.env


STRAPI_ENDPOINT="http://localhost:1337"
Create Next.js Middleware File
Middleware allows you to run code before a request is completed. We will use it to protect some pages.
Inside the nextjs-frontend/src folder, create the middleware.ts file.
Modify Pages and Files
Global CSS
Since we are using Tailwind CSS in this tutorial, head over to ./src/app/globals.css and delete other codes. Leave only the Tailwind import.
/* Path: nextjs-frontend/src/app/globals.css *./


@import "tailwindcss";
Log-Out Button
Inside the nextjs-frontend/src/app/components/LogOutButton.tsx, add the following code:
// Path: nextjs-frontend/src/app/components/LogOutButton.tsx


"use client";


export default function LogOut() {

  return (

    <button className="cursor-pointer w-full sm:w-auto px-6 py-2 bg-red-500 text-white rounded-lg shadow-md hover:bg-red-600 transition">

      Sign Out

    </button>

  );

}
Navigation Bar Component
Inside the nextjs-frontend/src/app/components/NavBar.tsx file, add the following code:
// Path: nextjs-frontend/src/app/components/NavBar.tsx


import Link from "next/link";


export default async function NavBar() {

  return (

    <nav className="flex items-center justify-between px-6 py-4 bg-white shadow-md">

      {/* Logo */}

      <Link href="/" className="text-xl font-semibold cursor-pointer">

        MyApp

      </Link>

      <div className="flex">

        <Link

          href="/auth/signin"

          className="px-4 py-2 rounded-lg bg-blue-500 text-white font-medium shadow-md transition-transform transform hover:scale-105 hover:bg-blue-600 cursor-pointer"

        >

          Sign-in

        </Link>

      </div>

    </nav>

  );

}
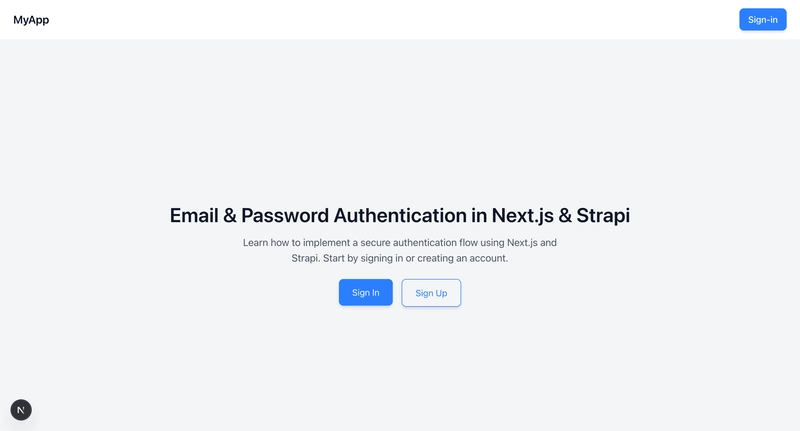
Home Page
Inside the nextjs-frontend/src/app/page.tsx file, replace the code inside with the following code:
// Path: nextjs-frontend/src/app/page.tsx


import Link from "next/link";


export default async function Home() {

  return (

    <div className="flex flex-col items-center justify-center min-h-screen bg-gray-100 text-gray-900 p-6">

      {/* Title */}

      <h1 className="text-3xl sm:text-4xl font-semibold mb-4">

        Email & Password Authentication in Next.js & Strapi

      </h1>


      {/* Subtitle */}

      <p className="text-center text-lg text-gray-600 max-w-xl">

        Learn how to implement a secure authentication flow using Next.js and

        Strapi. Start by signing in or creating an account.

      </p>


      {/* Buttons */}

      <div className="mt-6 flex space-x-4">

        <Link href="/auth/login">

          <button className="px-6 py-3 text-white bg-blue-500 rounded-lg shadow-md hover:bg-blue-600 transition">

            Sign In

          </button>

        </Link>

        <Link href="/auth/signup">

          <button className="cursor-pointer px-6 py-3 text-blue-500 border border-blue-500 rounded-lg shadow-md hover:bg-blue-50 transition">

            Sign Up

          </button>

        </Link>

      </div>

    </div>

  );

}
Layout
Inside the layout file, we will import the following:
NavBar,
ToastContainerfrom thereact-toastifythat you installed earlier.
react-toastify/dist/ReactToastify.css, which styles theToastContainerabove.
// Path: nextjs-frontend/src/app/layout.tsx


import type { Metadata } from "next";

import { Geist, Geist_Mono } from "next/font/google";

import "./globals.css";

import NavBar from "@/app/components/NavBar";

import { ToastContainer } from "react-toastify";

import "react-toastify/dist/ReactToastify.css";


const geistSans = Geist({

  variable: "--font-geist-sans",

  subsets: ["latin"],

});


const geistMono = Geist_Mono({

  variable: "--font-geist-mono",

  subsets: ["latin"],

});


export const metadata: Metadata = {

  title: "Create Next App",

  description: "Generated by create next app",

};


export default function RootLayout({

  children,

}: Readonly<{

  children: React.ReactNode;

}>) {

  return (

    <html lang="en">

      <body

        className={`${geistSans.variable} ${geistMono.variable} antialiased`}

      >

        <ToastContainer />

        <NavBar />


        {children}

      </body>

    </html>

  );

}
Now, visit http://localhost:3000 to view your changes.
Create Type Definitions for this Project
Inside the nextjs-frontend/src/app/lib folder, create a file called definitions.ts and add the following code.
// Path : nextjs-frontend/src/app/lib/definitions.ts


// This file contains type definitions for the application.


// Credentials for authentication

export type Credentials = {

  username?: string;

  email?: string;

  identifier?: string;

  currentPassword?: string;

  password?: string;

  confirmPassword?: string;

  newPassword?: string;

  code?: string;

};


// Form state for form handling and server actions

export type FormState = {

  errors: Credentials;

  values: Credentials;

  message?: string;

  success?: boolean;

};


export type SessionPayload = {

  user?: any;

  expiresAt?: Date;

  jwt?: string;

};
The Credentials type will serve for authentication purposes. The FormState type will be for form handling and server actions variable types. And the SessionPayload refers to the type of payload returned from Strapi after successful login.
Now, let's get started!
How to Implement User Signup with Email Confirmation in Strapi and Next.js
Strapi's Users & Permissions plugin provides built-in functionality for email/password registration.
Here is the request for registering a new user.
const STRAPI_ENDPOINT = "http://localhost:1337/";


await axios.post(

  `${STRAPI_ENDPOINT}/api/auth/local/register`,

  {

    username: 'Strapi user',

    email: '[email protected]',

    password: 'strapiPassword',

  },

);
If you want additional fields, you will need to add them to the list of allowed fields in your config file. See the registration configuration guide.
Ways of Registering a New User in Strapi

There are two ways to register a new user.
- Register a new user by confirming their email address.
- Register a new user without confirming their email address
You can decide to choose the latter.
However, you want to make sure the user's email is verified. Therefore, you will need to enable email confirmation in Strapi.
Here are reasons why you need email confirmation:
- User identity verification
- Email delivery success
- Boosted brand reputation, etc.
👋 NOTE: If you are not interested in implementing Email Confirmation, please continue from the "Strapi Email and Password Login" section.
With that being said, let's walk through the steps of registering a new user.
Step 1. Enable Email Confirmation in Strapi
To begin, head over to Settings > USERS AND PERMISSIONS PLUGIN > Advanced Settings and do the following:
- Toggle the
Enable email confirmationtotrue. - Add the redirect URL where a user will be redirected after the user's email is confirmed. The redirect URL for this project should be
http://localhost:3000/auth/signup-success. This is the page that will show the user that the signup process is successful. We will create the signup-success page soon.

🖐️ NOTE: After signup, Strapi sends you a confirmation link that will redirect you to the
http://localhost:3000/auth/signup-successabove. The link looks like this:http://localhost:1337/api/auth/email-confirmation?confirmation=56343d5821391b2b9c1569c5b69672f95bb0caf3. When clicked, it will redirect the user to the signup success page which you specified above.
Since we are now sending emails using SendGrid as the default email provider, edit the email template to continue.
Step 2: Edit Email Confirmation Template
Navigate to Settings > USERS & PERMISSIONS PLUGIN > Email Templates > Email address confirmation.
Change the default shipper email from [email protected] to the email
address you used for your SendGrid configuration, otherwise, email delivery will fail.

Next, we will write a request function to create a new user.
Step 3: Create User Registration Request Function
Inside the nextjs-frontend/src/app/lib folder, create a requests.ts file and add the following code:
// Path: nextjs-frontend/src/app/lib/requests.ts


import { Credentials } from "./definitions";

import axios from "axios";


const STRAPI_ENDPOINT = process.env.STRAPI_ENDPOINT || "http://localhost:1337";


export const signUpRequest = async (credentials: Credentials) => {

  try {

    const response = await axios.post(

      `${STRAPI_ENDPOINT}/api/auth/local/register`,

      {

        username: credentials.username,

        email: credentials.email,

        password: credentials.password,

      }

    );


    return response;

  } catch (error: any) {

    return error?.response?.data?.error?.message || "Error signing up";

  }

};
The signUpRequest() request function takes in a credentials object containing username, email, and password, and sends it to Strapi's /auth/local/register endpoint to create a new user with new credentials.
Next, let's create a server action that will invoke this request.
Step 4: Create Server Action for User Registration
Inside the ./src/app/actions/auth.ts file, create a server action that will do the following:
- Handle a signup form by validating user input (
username,email,password,confirmPassword) - Call the
signUpRequest()request function you created above. - Returns a
FormStateobject type with error messages and form values if there are validation or API errors. - Redirect the user to a confirmation page.
Here is the code below:
// Path: nextjs-frontend/src/app/actions/auth.ts


"use server";


import { redirect } from "next/navigation";

import { FormState, Credentials } from "../lib/definitions";

import { signUpRequest } from "../lib/requests";


export async function signupAction(

  initialState: FormState,

  formData: FormData

): Promise<FormState> {

  // Convert formData into an object to extract data

  const username = formData.get("username");

  const email = formData.get("email");

  const password = formData.get("password");

  const confirmPassword = formData.get("confirmPassword");


  const errors: Credentials = {};


  // Validate the form data

  if (!username) errors.username = "Username is required";

  if (!username) errors.email = "Email is required";

  if (!password) errors.password = "Password is required";

  if (!confirmPassword) errors.confirmPassword = "Confirm password is required";

  if (password && confirmPassword && password !== confirmPassword) {

    errors.confirmPassword = "Passwords do not match";

  }


  // Check if there are any errors

  if (Object.keys(errors).length > 0) {

    return {

      errors,

      values: { username, email, password, confirmPassword } as Credentials,

      message: "Error submitting form",

      success: false,

    };

  }


  // Call backend API

  const res: any = await signUpRequest({

    username,

    email,

    password,

  } as Credentials);


  // Check for errors in the response

  if (res.statusText !== "OK") {

    return {

      errors: {} as Credentials,

      values: { username, email, password, confirmPassword } as Credentials,

      message: res?.statusText || res,

      success: false,

    };

  }


  // redirect to confirm email

  redirect("/auth/confirm-email");

}
Next, set up the email confirmation page because we are redirecting the user to the email confirmation page.
Step 5. Set Up an Email Confirmation Page
Inside the nextjs-frontend/src/app/auth/confirm-email/page.tsx, add the following code:
// Path: nextjs-frontend/src/app/auth/confirm-email/page.tsx


export default function ConfirmEmail() {

  return (

    <div className="flex min-h-screen items-center justify-center bg-gray-100 px-4">

      <div className="w-full max-w-md p-6 space-y-6 bg-white rounded-lg shadow-md text-center">

        <h2 className="text-2xl font-semibold">Confirm Your Email</h2>

        <p className="text-gray-700 text-sm">

          We’ve sent a confirmation link to your email address. Please check

          your inbox and click the link to verify your account before logging

          in.

        </p>

      </div>

    </div>

  );

}
Step 6. Set Up the Signup Success Page.
Locate the nextjs-frontend/src/app/auth/signup-success/page.tsx file and add the following code:
// Path: nextjs-frontend/src/app/auth/signup-success/page.tsx


import Link from "next/link";


export default function EmailConfirmed() {

  return (

    <div className="flex min-h-screen items-center justify-center bg-gray-100 px-4">

      <div className="w-full max-w-md p-6 space-y-6 bg-white rounded-lg shadow-md text-center">

        <h2 className="text-2xl font-semibold text-green-600">

          Email Confirmed ✅

        </h2>


        <p className="text-gray-700 text-sm">

          Your email has been successfully verified. You can now log in to your

          account.

        </p>


        <Link href="/auth/signin">

          <button className="mt-6 w-full py-2 px-4 bg-blue-500 text-white rounded-lg hover:bg-blue-600 transition">

            Go to Login

          </button>

        </Link>

      </div>

    </div>

  );

}
The page above shows the user that the signup or registration is successful.
Next, create the signup form.
Step 7: Create a Signup Form
Create the signup form.
// Path: ./src/app/auth/signup/page.tsx


"use client";


import { useActionState } from "react";

import { signupAction } from "@/app/actions/auth";

import { FormState } from "@/app/lib/definitions";


export default function SignUp() {

  // create a form state

  const initialState: FormState = {

    errors: {},

    values: {},

    message: "",

    success: false,

  };


  // use the action state to handle the form submission

  const [state, formAction, isPending] = useActionState(

    signupAction,

    initialState

  );


  return (

    <div className="flex min-h-screen items-center justify-center bg-gray-100">

      <div className="w-full max-w-md p-6 space-y-6 bg-white rounded-lg shadow-md">

        <h2 className="text-2xl font-semibold text-center">Sign Up</h2>


        <form action={formAction} className="space-y-4">

          <p className="text-red-500 text-center text-sm">

            {!state?.success && state?.message}

          </p>


          {/* Email */}

          <div>

            <label className="block text-gray-700">Username</label>

            <input

              type="text"

              name="username"

              defaultValue={state?.values?.username as string}

              placeholder="Enter your username"

              className="w-full px-4 py-2 border rounded-lg focus:outline-none focus:ring-2 focus:ring-blue-500"

            />

            {state?.errors.username && (

              <p className="text-red-500 text-sm">{state?.errors.username}</p>

            )}

          </div>


          <div>

            <label className="block text-gray-700">Email</label>

            <input

              type="email"

              name="email"

              defaultValue={state?.values?.email as string}

              placeholder="Enter your email"

              className="w-full px-4 py-2 border rounded-lg focus:outline-none focus:ring-2 focus:ring-blue-500"

            />


            {state?.errors.email && (

              <p className="text-red-500 text-sm">{state?.errors.email}</p>

            )}

          </div>


          {/* Password */}

          <div>

            <label className="block text-gray-700">Password</label>

            <input

              type="password"

              name="password"

              defaultValue={state?.values?.password as string}

              placeholder="Create a password"

              className="w-full px-4 py-2 border rounded-lg focus:outline-none focus:ring-2 focus:ring-blue-500"

            />


            {state?.errors.password && (

              <p className="text-red-500 text-sm">{state?.errors.password}</p>

            )}

          </div>


          {/* Confirm Password */}

          <div>

            <label className="block text-gray-700">Confirm Password</label>

            <input

              type="password"

              name="confirmPassword"

              defaultValue={state?.values?.confirmPassword as string}

              placeholder="Confirm your password"

              className="w-full px-4 py-2 border rounded-lg focus:outline-none focus:ring-2 focus:ring-blue-500"

            />


            {state?.errors.confirmPassword && (

              <p className="text-red-500 text-sm">

                {state?.errors.confirmPassword}

              </p>

            )}

          </div>


          {/* Sign Up Button */}

          <button

            type="submit"

            disabled={isPending}

            className="w-full py-2 text-white bg-blue-500 rounded-lg hover:bg-blue-600 transition"

          >

            {isPending ? "Submitting..." : "Sign Up"}

          </button>

        </form>


        {/* Sign In Link */}

        <div className="text-center text-gray-600">

          Already have an account?{" "}

          <a href="/auth/login" className="text-blue-500 hover:underline">

            Sign In

          </a>

        </div>

      </div>

    </div>

  );

}
This is how the signup page should look like:

Now, register a new user!

As you can see above, the signup process works the way we expect.
When you check your Strapi backend, you should see the new user.

Congratulations! You have registered a new user.
What happens when the user of your app doesn't get an email confirmation and would like the confirmation link to be resent?
Or how do you know if an email is already confirmed?
Let's learn how to send an email confirmation after registration in Strapi in the next section.
How to Send Email Confirmation After User Registration in Strapi
By default, Strapi automatically sends a confirmation email upon registration provided that it is enabled in the Strapi backend as discussed previously.
However, in some cases, the user may miss or not receive the email and would love to have it resent to them.
Strapi provides us with the following flow for manually sending or resending a confirmation email:
const STRAPI_ENDPOINT = "http://localhost:1337/";


await axios.post(

  `${STRAPI_ENDPOINT}/api/auth/send-email-confirmation`,

  {

    email: '[email protected]'

  },

);
Send a POST request with the correct email to the endpoint /api/auth/send-email-confirmation to confirm an email address.
What if an Email is Already Confirmed?
Recall that you already confirmed the email of the user you created above. Let's see what happens when you try to confirm it once more.

When you try to confirm an already confirmed email, as shown above, you get the response "Already confirmed".
Resending Email Confirmation Logic
We want to be able to allow the user to request a resend of the confirmation email.
There are many ways to do this, but here is what you will do in this tutorial:
- In the signup or registration section above, once the user registers, Strapi sends a confirmation email, and then you redirect them to the page where they get the message to check their email for the confirmation link.
- You will modify the redirect of the
signUpAction()server action function to include the email. This is so that they can request the confirmation link to be resent to them in case they didn't receive it:
// redirect to confirm email

redirect("/auth/confirm-email?email=" + email);
- The page where they get the message to check their email for the confirmation link will now programmatically allow a resend of the confirmation link by extracting the email from the URL using
useSearchParams.
Let's implement this:
Step 1. Modify Signup Server Action to Include Email Address
Include the email address in the redirect so that we can be able to resend an email confirmation if the user requests such.
// Path : nextjs-frontend/src/app/actions/auth.ts


// ... imports


export async function signupAction(

  initialState: FormState,

  formData: FormData

): Promise<FormState> {


  // ... other codes


  // redirect to confirm email with user email

  redirect("/auth/confirm-email?email=" + email);

}
Step 2. Create Send Email Confirmation Request Function
Inside the nextjs-frontend/src/app/lib/requests.ts file, create the confirmEmailRequest() function to send email confirmation.
// Path: nextjs-frontend/src/app/lib/requests.ts


// ... other codes


export const confirmEmailRequest = async (email: string) => {

  try {

    const response = await axios.post(

      `${STRAPI_ENDPOINT}/api/auth/send-email-confirmation`,

      {

        email,

      }

    );


    return response;

  } catch (error: any) {

    return (

      error?.response?.data?.error?.message ||

      "Error sending confirmation email"

    );

  }

};
Next, create a server action that will call the confirmEmailRequest() function above.
Step 3. Create Server Action for Email Confirmation
Create a server action that will handle the form submission and invoke the confirmRequest() function above.
// Path: nextjs-frontend/src/app/actions/auth.ts


 // ... other imports


import { signUpRequest, confirmEmailRequest } from "../lib/requests";


// ... other actions (signupAction)


export async function resendConfirmEmailAction(

  initialState: FormState,

  formData: FormData

) {

  // Extract email from formData

  const email = formData.get("email");


  // Validate the email

  if (!email) {

    return {

      values: { email } as Credentials,

      message: "Email not found",

      success: false,

    };

  }


  // invoke the resend email function

  const res = await confirmEmailRequest(email as string);


  // Check for errors in the response

  if (res.statusText !== "OK") {

    return {

      errors: {} as Credentials,

      values: { email } as Credentials,

      message: res?.statusText || res,

      success: false,

    };

  }


  return {

    values: { email } as Credentials,

    message: "Confirmation email sent",

    success: true,

  };

}
Step 4: Modify the Confirm Email Message Page
Now, modify the confirm email page, nextjs-frontend/src/app/auth/confirm-email/page.tsx, that tells the user to check their email for the confirmation link. It should now be able to get the email from the URL using useSearchParams.
// Path: nextjs-frontend/src/app/auth/confirm-email/page.tsx


"use client";


import { resendConfirmEmailAction } from "@/app/actions/auth";

import { FormState } from "@/app/lib/definitions";


import { useSearchParams } from "next/navigation";

import { useActionState, useEffect } from "react";


import { toast } from "react-toastify";


export default function PleaseConfirmEmail() {

  // create initial state

  const initialState: FormState = {

    errors: {},

    values: {},

    message: "",

    success: false,

  };


  // useActionState to manage the state of the action

  const [state, formAction, isPending] = useActionState(

    resendConfirmEmailAction,

    initialState

  );


  // useSearchParams to get the email from the URL

  const searchParams = useSearchParams();

  const userEmail = searchParams.get("email") || "";


  useEffect(() => {

    if (state.success) {

      toast.success(state.message, { position: "top-center" });

    }

  }, [state.success]);


  return (

    <div className="flex min-h-screen items-center justify-center bg-gray-100 px-4">

      <div className="w-full max-w-md p-6 space-y-6 bg-white rounded-lg shadow-md text-center">

        <h2 className="text-2xl font-semibold">Confirm Your Email</h2>

        <p className="text-red-500">{!state.success && state.message}</p>

        <p className="text-gray-700 text-sm">

          We’ve sent a confirmation link to your email address. Please check

          your inbox and click the link to verify your account before logging

          in.

        </p>


        <p className="text-gray-500 text-sm">

          Didn’t receive the email? Check your spam folder or try resending it

          below.

        </p>


        {/* Resend Email Button */}

        <form action={formAction}>

          <input

            type="email"

            name="email"

            defaultValue={userEmail}

            className="w-full px-4 py-2 border rounded-lg focus:outline-none focus:ring-2 focus:ring-blue-500"

          />

          <button

            disabled={isPending}

            type="submit"

            className="w-full my-4 py-2 px-4 bg-blue-500 text-white rounded-lg hover:bg-blue-600 transition"

          >

            Resend Confirmation Email

          </button>

          {/* <input type="hidden" name="email" value={userEmail as string} /> */}

        </form>

      </div>

    </div>

  );

}
In the code above:
- The component uses
useActionStateto manage the form state and handle theresendConfirmEmailActionserver action. - The email is prefilled from the URL using
useSearchParams, - And a toast notification appears if the resend is successful.
Enter the email address that you have confirmed and click the "Resend Confirmation Email" button.
You should get the error message "Already confirmed".
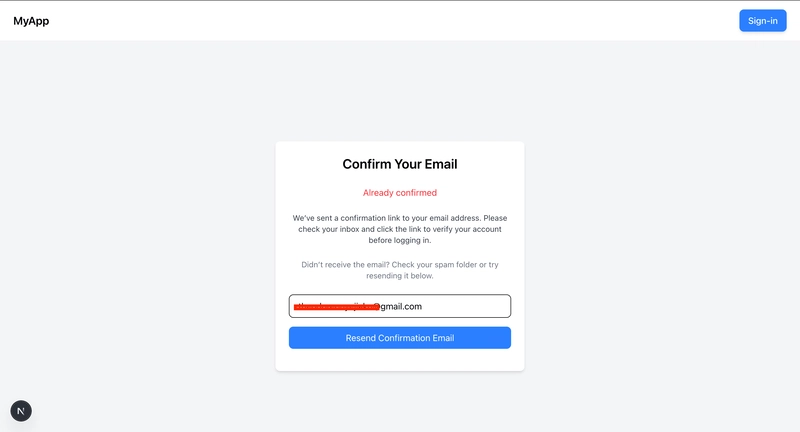
Now with the new logic we have created above, create a new user.

As shown above, when a user signs up, they get redirected to the page that tells them they have been sent a confirmation link. In this modified page, they can also request to get it resent to them.
The email address in the input from the image above comes prefilled from the URL which we extracted using the useSearchParams.
You have implemented user registration or signup, and email confirmation in Strapi. Next, let's implement Strapi email and password login!
Strapi Email and Password Login
After registration, a user will have to log in.
To log in as a user, you make a POST request to /api/auth/local endpoint.
const STRAPI_ENDPOINT = "http://localhost:1337/";


const response = await axios.post(`${BASE_URL}/api/auth/local`, {

  identifier: credentials.identifier,

  password: credentials.password,

});
🖐️ NOTE: The identifier here could be the user's email address or username.
Here is the response you get:
{

  "jwt": "eyJhbGciOiJIUzI1NiIsInR5cCI6IkpXVCJ9.eyJpZCI6MTUsImlhdCI6MTc0NTM1MzMzMSwiZXhwIjoxNzQ3OTQ1MzMxfQ.zvx2Q2OexHIPkNA5aCqaOG3Axn0rlylLOpgiVPifi8c",

  "user": {

    "id": 15,

    "documentId": "npbi8dusjdsdwu5a0zq6ticv",

    "username": "Theodore",

    "email": "[email protected]",

    "provider": "local",

    "confirmed": true,

    "blocked": false,

    "createdAt": "2025-04-22T18:18:01.170Z",

    "updatedAt": "2025-04-22T19:04:51.091Z",

    "publishedAt": "2025-04-22T18:18:01.172Z"

  }

}
The jwt from the response above will be extracted and used to make authorized requests as we will see in the later part of this tutorial.
Let's implement email and password login in Strapi.
Step 1: Create Email and Password Request Function
// Path: nextjs-frontend/src/app/lib/requests.ts


// ... other codes


export const signInRequest = async (credentials: Credentials) => {

  try {

    const response = await axios.post(`${STRAPI_ENDPOINT}/api/auth/local`, {

      identifier: credentials.identifier,

      password: credentials.password,

    });


    return response;

  } catch (error: any) {

    return error?.response?.data?.error?.message || "Error signing in";

  }

};
Step 2: Create Server Action to Handle Form Submission
Create a server action function that does the following:
- Handles form submission for user sign-in by validating
identifierandpasswordfrom theformData. - If either field is missing, it returns a
FormStateobject with error messages and previous values. - If inputs are valid, it calls the
signInRequestfunction above to authenticate the user. - On success, it redirects to the
/profilepage which we will set up soon. - On failure, it returns a generic error message in the state.
// Path: nextjs-frontend/src/app/actions/auth.ts


// ... Other codes


export async function signinAction(

  initialState: FormState,

  formData: FormData

): Promise<FormState> {

  // Convert formData into an object to extract data

  const identifier = formData.get("identifier");

  const password = formData.get("password");


  const errors: Credentials = {};


  if (!identifier) errors.identifier = "Username or email is required";

  if (!password) errors.password = "Password is required";


  if (errors.password || errors.identifier) {

    return {

      errors,

      values: { identifier, password } as Credentials,

      message: "Error submitting form",

      success: false,

    };

  }


  // Call backend API

  const res: any = await signInRequest({

    identifier,

    password,

  } as Credentials);


  if (res.statusText !== "OK") {

    return {

      errors: {} as Credentials,

      values: { identifier, password } as Credentials,

      message: res?.statusText || res,

      success: false,

    };

  }


  redirect("/profile");

}
Next, set up the login page.
Set Up Login Page
Head over to the nextjs-frontend/src/app/auth/login/page.tsx file and add the following code:
// Path: nextjs-frontend/src/app/auth/login/page.tsx


"use client";


import { useActionState } from "react";


import { signinAction } from "@/app/actions/auth";

import { FormState } from "@/app/lib/definitions";

import { toast } from "react-toastify";


export default function SignIn() {

  const initialState: FormState = {

    errors: {},

    values: {},

    message: "",

    success: false,

  };


  const [state, formAction, isPending] = useActionState(

    signinAction,

    initialState

  );


  if (state.success) {

    toast.success(state.message, { position: "top-center" });

  }


  return (

    <div className="flex min-h-screen items-center justify-center bg-gray-100">

      <div className="w-full max-w-md p-6 space-y-6 bg-white rounded-lg shadow-md">

        <h2 className="text-2xl font-semibold text-center">Sign In</h2>


        <form action={formAction} className="space-y-4">

          <p className="text-red-500 text-center text-sm">

            {!state?.success && state?.message}

          </p>


          {/* Email */}

          <div>

            <label className="block text-gray-700">Email</label>

            <input

              type="email"

              name="identifier"

              defaultValue={state?.values?.identifier}

              placeholder="Enter your email"

              className="w-full px-4 py-2 border rounded-lg focus:outline-none focus:ring-2 focus:ring-blue-500"

            />

            {state?.errors.identifier && (

              <p className="text-red-500 text-sm">{state?.errors.identifier}</p>

            )}

          </div>


          {/* Password */}

          <div>

            <label className="block text-gray-700">Password</label>

            <input

              type="password"

              name="password"

              defaultValue={state?.values.password}

              placeholder="Enter your password"

              className="w-full px-4 py-2 border rounded-lg focus:outline-none focus:ring-2 focus:ring-blue-500"

            />

            {state?.errors.password && (

              <p className="text-red-500 text-sm">{state?.errors.password}</p>

            )}

            <div className="text-right mt-1">

              <a

                href="/auth/forgot-password"

                className="text-sm text-blue-500 hover:underline"

              >

                Forgot password?

              </a>

            </div>

          </div>


          {/* Sign In Button */}

          <button

            type="submit"

            className="w-full py-2 text-white bg-blue-500 rounded-lg hover:bg-blue-600 transition"

            disabled={isPending}

          >

            Sign In

          </button>

        </form>


        {/* Sign Up Link */}

        <p className="text-center text-gray-600 text-sm">

          Don't have an account?{" "}

          <a href="/auth/signup" className="text-blue-500 hover:underline">

            Sign Up

          </a>

        </p>

      </div>

    </div>

  );

}
When you visit the login page at http://localhost:3000/auth/login, you should see the page below:

After login, the user is redirected to the profile page. Set up the profile page below:
Create User Profile Page
Inside the nextjs-frontend/src/app folder, create a folder called profile. Inside the profile folder, create a new file called page.tsx and add the following code:
// Path: nextjs-frontend/src/app/profile/page.tsx


import Link from "next/link";

import LogOutButton from "@/app/components/LogOutButton";


export default async function Profile() {


  return (

    <div className="flex min-h-screen items-center justify-center bg-gray-100 px-4">

      <div className="w-full max-w-md bg-white p-6 rounded-lg shadow-md text-center space-y-6">

        {/* Username */}

        <p className="text-xl font-semibold text-gray-800 capitalize">

          Welcome, John Doe!

        </p>


        {/* Action Buttons */}

        <div className="flex flex-col sm:flex-row justify-center gap-4">

          <Link

            href="/auth/change-password"

            className="w-full sm:w-auto px-6 py-2 bg-blue-500 text-white rounded-lg shadow-md hover:bg-blue-600 transition"

          >

            Change Password

          </Link>

          <LogOutButton />

        </div>

      </div>

    </div>

  );

}
When you visit the profile page at http://localhost:3000/profile, this is what you should see:

Login Demo
Log in in the new user:

You are now able to log in as a user. Congratulations! See the complete code for this project below.
GitHub Repository: Full Code for Strapi and Next.js Authentication Project
The complete code for this project can be found in this repo: strapi-email-and-password-authentication
Coming Up Next: Session Management, Password Reset, and Authorization
Some authentication processes have been put in place already.
However, there is more.
- How do you log out a user in Strapi?
- How do you track the user's authentication state across requests in Next.js?
- How do you implement Strapi forgot password and request for password reset in Strapi?
- How do you decide what routes and data the user can access using Next.js?
- How do you log out an authenticated user in Strapi?
Conclusion
In Part 1 of this tutorial, you have learned about authentication using Strapi and Next.js. You implemented Strapi email and password registration and signup using the SendGrid email provider. You also learned how to perform Strapi email verification, and confirmation, and resend the email confirmation link.
And with Next.js you were able to handle form submissions using Server Actions.
In the next part of this tutorial, we will cover and implement the following concepts.
- Implementing forgot password request and reset password in Strapi.
Changing password of authenticated users.
Logging out a User in Next.js
Session Management to help encrypt, decrypt, create a session, and delete the session of an authenticated user.
Data Access Layer for authorization logic, in this case, the profile page and navigation bar.,
Middleware in Next.js to protect some routes.
See you in the next part!
SOCIAL SHARE CARD GENERATOR