



Building an 8-Layer Security Architecture for a $15 Hardware Device
When you're building a hardware password manager, security isn't optional—it's the entire point.
But how do you secure a $15 ESP32 device that stores sensitive data? The answer: defense in depth.
In this post, I'll break down the 8-layer security architecture I built for SecureGen, a hardware TOTP authenticator and password manager. Each layer defends against different attack types, ensuring that breaching one layer doesn't compromise the system.

Why 8 Layers?
Single-layer security is a single point of failure.
If your only protection is encryption and the key gets leaked, game over. If your only protection is authentication and credentials get phished, you're done.
Defense in depth means attackers need to bypass multiple independent layers. Each layer:
- Targets different attack vectors
- Uses different techniques
- Fails independently
- Slows down attackers
Let's break down each layer.
Layer 1: ECDH Key Exchange 🔐
The Problem
Passwords and TOTP secrets need to be encrypted. But if you hardcode encryption keys, anyone with the source code can decrypt your data.
The Solution
Generate unique encryption keys dynamically using Elliptic Curve Diffie-Hellman (ECDH) with the P-256 curve.
How It Works
// Generate ephemeral key pair

mbedtls_ecdh_context ctx;

mbedtls_ecdh_setup(&ctx, MBEDTLS_ECP_DP_SECP256R1);  // P-256

mbedtls_ecdh_gen_public(&ctx, &olen, public_key, 65,

                        mbedtls_ctr_drbg_random, &ctr_drbg);


// Compute shared secret

mbedtls_ecdh_calc_secret(&ctx, &olen, shared_secret, 32,

                         mbedtls_ctr_drbg_random, &ctr_drbg);


// Derive encryption key

mbedtls_sha256(shared_secret, 32, encryption_key, 0);
What this prevents: Man-in-the-middle (MITM) attacks
Even if someone intercepts the traffic during key exchange, they can't compute the shared secret without the private keys. And since keys are ephemeral (generated per session), they can't be reused.
Real-World Impact
Before ECDH:
[Attacker intercepts traffic]

→ Attacker sees: Encrypted data with static key

→ Attacker bruteforces key offline

→ Game over
After ECDH:
[Attacker intercepts traffic]

→ Attacker sees: Public keys (useless without private)

→ Attacker can't compute shared secret

→ Encrypted data remains secure
Layer 2: Session Encryption 🔒
The Problem
Bluetooth (BLE) has built-in encryption, but it's not enough for sensitive data like passwords.
The Solution
Double encryption: AES-128 at the BLE layer + AES-256 at the application layer.
How It Works
// BLE layer (automatic)

esp_ble_gap_set_security_param(ESP_BLE_SM_AUTHEN_REQ_MODE,

                                &auth_req, sizeof(uint8_t));

auth_req = ESP_LE_AUTH_REQ_SC_MITM_BOND;  // AES-128


// Application layer (manual)

void encrypt_password(const char* password, uint8_t* output) {

    mbedtls_aes_context aes;

    mbedtls_aes_setkey_enc(&aes, session_key, 256);  // AES-256


    uint8_t iv[16];

    esp_fill_random(iv, 16);  // Random IV per encryption


    mbedtls_aes_crypt_cbc(&aes, MBEDTLS_AES_ENCRYPT,

                          strlen(password), iv,

                          (uint8_t*)password, output);

}
What this prevents: Eavesdropping and packet sniffing
Even if an attacker breaks BLE encryption (unlikely but possible), they still face AES-256 application-layer encryption.
Real-World Impact
Single encryption:
[BLE vulnerability discovered]

→ Attacker breaks BLE encryption

→ Passwords visible in plaintext

→ Total compromise
Double encryption:
[BLE vulnerability discovered]

→ Attacker breaks BLE encryption

→ Attacker sees: More encrypted data (AES-256)

→ Passwords still secure
Layer 3: Dynamic API Endpoints 🎲
The Problem
Static API endpoints are easy targets for automated scanners. Tools like dirb, gobuster, and nikto can discover them in seconds.
The Solution
Obfuscate endpoint URLs using SHA-256 and change them on every device boot.
How It Works
// Generate dynamic endpoint

String generate_endpoint(const char* base, uint32_t seed) {

    char hash_input[64];

    snprintf(hash_input, sizeof(hash_input), "%s-%u", base, seed);


    uint8_t hash[32];

    mbedtls_sha256((uint8_t*)hash_input, strlen(hash_input), hash, 0);


    char endpoint[65];

    for(int i = 0; i < 32; i++) {

        sprintf(&endpoint[i*2], "%02x", hash[i]);

    }


    return String("/") + String(endpoint);

}


// Real endpoint on device

uint32_t boot_seed = esp_random();

String totp_endpoint = generate_endpoint("totp", boot_seed);

// Result: /a7f3c9e8b2d4f1a6c8e5d7f9b3a1c5e8d2f4a6b8c0e2d4f6a8b0c2e4f6a8b0c2
What this prevents: Automated API discovery and vulnerability scanning
Scanners expect endpoints like /api/totp or /passwords. When they get /a7f3c9e8b2d4f1a6..., they don't know what it does without manual analysis.
Real-World Impact
Before (static endpoints):
$ gobuster dir -u http://device.local -w wordlist.txt

Found: /api/totp

Found: /api/passwords

Found: /api/admin


[Automated exploit tools target these]
After (dynamic endpoints):
$ gobuster dir -u http://device.local -w wordlist.txt

No matches found


[Attacker needs to reverse-engineer endpoint generation]
Layer 4: Header Obfuscation 🎭
The Problem
HTTP headers reveal your tech stack. Headers like Server: nginx/1.18.0 or X-Powered-By: Express 4.17.1 tell attackers exactly which vulnerabilities to target.
The Solution
Dynamically map and obfuscate all HTTP headers. Hide metadata.
How It Works
// Header mapping (changes per session)

std::map header_map;


void init_header_obfuscation() {

    header_map["Content-Type"] = "X-" + random_string(8);

    header_map["Authorization"] = "X-" + random_string(8);

    header_map["Server"] = "X-" + random_string(8);

}


void send_response(AsyncWebServerRequest *request, String content) {

    AsyncWebServerResponse *response = request->beginResponse(200,

        header_map["Content-Type"], content);


    // Remove revealing headers

    response->addHeader(header_map["Server"], "Unknown");


    // Add fake misleading headers

    response->addHeader("X-AspNetMvc-Version", "5.2.7");  // Not using ASP.NET

    response->addHeader("X-Powered-By", "PHP/7.4.3");     // Not using PHP


    request->send(response);

}
What this prevents: Tech stack fingerprinting and targeted exploits
Real-World Impact
Before:
HTTP/1.1 200 OK

Server: ESP-AsyncWebServer/1.2.3

Content-Type: application/json

X-ESP32-Chip: ESP32-D0WDQ6


[Attacker knows: ESP32, specific library versions]

[Searches for CVEs in those versions]
After:
HTTP/1.1 200 OK

X-k8f3a2: application/json

X-9e4c7: Unknown

X-AspNetMvc-Version: 5.2.7

X-Powered-By: PHP/7.4.3


[Attacker sees: Conflicting information]

[Wastes time targeting wrong stack]
Layer 5: Anti-Fingerprinting 👻
The Problem
Even without obvious headers, devices can be fingerprinted by response patterns, timing, and behaviors.
The Solution
Inject fake headers, randomize response patterns, and make the device appear different on each request.
How It Works
void add_fingerprint_confusion(AsyncWebServerResponse *response) {

    // Random fake headers

    const char* fake_frameworks[] = {

        "Django/3.2.4", "Rails/6.1.3", "Laravel/8.40.0",

        "Express/4.17.1", "Spring/5.3.8"

    };


    response->addHeader("X-Framework",

        fake_frameworks[esp_random() % 5]);


    // Randomize response time (within reason)

    delay(esp_random() % 50 + 10);  // 10-60ms


    // Vary content encoding

    if(esp_random() % 2) {

        response->addHeader("Content-Encoding", "gzip");

    }


    // Change protocol hints

    response->addHeader("Vary", "Accept-Encoding, User-Agent, Accept-Language");

}
What this prevents: Device fingerprinting and traffic analysis
Real-World Impact
Before:
Request 1: Response in 45ms, Server: ESP32

Request 2: Response in 44ms, Server: ESP32

Request 3: Response in 46ms, Server: ESP32


[Pattern: ESP32 device, consistent timing]

[Attacker: "I know what this is"]
After:
Request 1: Response in 23ms, Framework: Django

Request 2: Response in 51ms, Framework: Rails

Request 3: Response in 18ms, Framework: Laravel


[Pattern: Inconsistent, conflicting data]

[Attacker: "What the hell is this thing?"]
Layer 6: Honey Pot 🍯
The Problem
You want to know if someone is trying to break in. Passive defenses are invisible.
The Solution
Create fake "vulnerable" endpoints that look tempting but are actually traps. Log all access attempts.
How It Works
// Honey pot endpoints

server.on("/admin", HTTP_GET, [](AsyncWebServerRequest *request){

    log_intrusion_attempt(request->client()->remoteIP().toString(),

                          "/admin", "Unauthorized access attempt");


    // Return realistic fake data

    String fake_response = R"({

        "users": [

            {"username": "admin", "role": "superuser"},

            {"username": "root", "role": "admin"}

        ],

        "version": "2.4.1",

        "debug": true

    })";


    request->send(200, "application/json", fake_response);

});


server.on("/api/users", HTTP_GET, [](AsyncWebServerRequest *request){

    // Check for SQL injection attempts

    String query = request->arg("id");

    if(query.indexOf("OR 1=1") != -1 || query.indexOf("'") != -1) {

        log_intrusion_attempt(request->client()->remoteIP().toString(),

                              "/api/users", "SQL injection attempt detected");

    }


    request->send(200, "application/json", "[]");  // Empty response

});


// Path traversal trap

server.on("/../../etc/passwd", HTTP_GET, [](AsyncWebServerRequest *request){

    log_intrusion_attempt(request->client()->remoteIP().toString(),

                          request->url(), "Path traversal attempt");


    // Fake passwd file

    String fake_passwd = "root:x:0:0:root:/root:/bin/bash\n"

                         "admin:x:1000:1000:Admin:/home/admin:/bin/bash\n";

    request->send(200, "text/plain", fake_passwd);

});
What this prevents: Brute force attacks and automated exploitation
Real-World Impact
[Attacker scans device]

Attacker: "/admin endpoint found! Jackpot!"

[Accesses /admin]


[Device logs]

IP: 192.168.1.100

Endpoint: /admin

Time: 2026-02-15 14:23:11

User-Agent: python-requests/2.28.1

Action: Rate limited + alerted via web interface


[Attacker wastes time on fake data]

[You get early warning + attacker's IP]
Layer 7: Method Tunneling 🔀
The Problem
Many automated scanners look for specific HTTP methods (GET, POST, DELETE) on endpoints.
The Solution
Tunnel all requests through POST with an encrypted method field. Mask the real HTTP method.
How It Works
// Client-side (JavaScript)

async function apiRequest(endpoint, method, data) {

    const encrypted_method = await encrypt(method, session_key);


    const response = await fetch(endpoint, {

        method: 'POST',  // Always POST

        headers: {

            'Content-Type': 'application/json',

            'X-Method': encrypted_method  // Real method hidden here

        },

        body: JSON.stringify(data)

    });


    return response.json();

}


// Server-side (ESP32)

server.on("/api/*", HTTP_POST, [](AsyncWebServerRequest *request){

    String encrypted_method = request->header("X-Method");

    String real_method = decrypt_method(encrypted_method);


    if(real_method == "GET") {

        handle_get(request);

    } else if(real_method == "DELETE") {

        handle_delete(request);

    } else if(real_method == "PUT") {

        handle_put(request);

    }

});
What this prevents: Pattern-based automated attacks
Real-World Impact
Before:
$ curl -X DELETE http://device.local/api/passwords/1

Password deleted


[Automated scanner detects DELETE is enabled]

[Tries to delete everything]
After:
$ curl -X DELETE http://device.local/api/passwords/1

405 Method Not Allowed


$ curl -X POST http://device.local/api/passwords/1

Missing X-Method header


[Scanner confused: POST required but doesn't work normally]

[Manual analysis needed]
Layer 8: Timing Attack Protection ⏱️
The Problem
Attackers can infer information by measuring response times. For example:
- Wrong password: 5ms response
- Correct password but wrong PIN: 50ms response
- Correct everything: 100ms response
This leaks information without ever succeeding.
The Solution
Add random delays to all security-critical operations. Make timing unpredictable.
How It Works
bool verify_credentials(const char* password, const char* pin) {

    // Start timer

    uint32_t start_time = millis();


    // Actual verification

    bool password_valid = constant_time_compare(password, stored_password);

    bool pin_valid = constant_time_compare(pin, stored_pin);


    bool result = password_valid && pin_valid;


    // Calculate elapsed time

    uint32_t elapsed = millis() - start_time;


    // Target response time: 100-150ms

    uint32_t target_time = 100 + (esp_random() % 50);


    // Add delay to reach target (if needed)

    if(elapsed < target_time) {

        delay(target_time - elapsed);

    }


    return result;

}


// Constant-time string comparison (prevents timing leaks)

bool constant_time_compare(const char* a, const char* b) {

    size_t len_a = strlen(a);

    size_t len_b = strlen(b);


    // Always compare full length (even if lengths differ)

    size_t max_len = (len_a > len_b) ? len_a : len_b;


    int result = len_a ^ len_b;  // 0 if lengths match


    for(size_t i = 0; i < max_len; i++) {

        char char_a = (i < len_a) ? a[i] : 0;

        char char_b = (i < len_b) ? b[i] : 0;

        result |= char_a ^ char_b;

    }


    return result == 0;

}
What this prevents: Timing side-channel attacks and password length inference
Real-World Impact
Before (no timing protection):
# Attacker script

import requests

import time


passwords = ["a", "ab", "abc", "abcd", ...]


for pwd in passwords:

    start = time.time()

    response = requests.post("/auth", json={"password": pwd})

    elapsed = time.time() - start


    print(f"{pwd}: {elapsed:.3f}s")


# Output:

# a: 0.005s      ← Wrong immediately

# ab: 0.005s     ← Wrong immediately

# abc: 0.007s    ← Took slightly longer! (closer match)

# abcd: 0.005s   ← Back to fast


# Conclusion: Real password starts with "abc"
After (with timing protection):
# Attacker script (same)

# Output:

# a: 0.123s

# ab: 0.147s

# abc: 0.108s

# abcd: 0.135s


# Conclusion: ??? (no pattern)
Putting It All Together
Here's how all 8 layers work in a real scenario:
Attack Scenario: Automated Exploitation Attempt
1. Attacker scans device

   → Layer 3: Dynamic endpoints confuse scanner

   → Layer 4: Fake headers mislead fingerprinting


2. Attacker finds /admin endpoint (honey pot)

   → Layer 6: Access logged, IP recorded

   → Fake data returned, attacker wastes time


3. Attacker tries SQL injection

   → Layer 6: Honey pot detects pattern, logs attempt

   → Layer 5: Randomized responses confuse automation


4. Attacker intercepts BLE traffic

   → Layer 1: ECDH-generated keys are useless without private key

   → Layer 2: Double encryption still protects data


5. Attacker attempts timing attack on auth

   → Layer 8: Random delays hide password validation timing

   → No information leaked


6. Attacker tries brute force via web API

   → Layer 7: Method tunneling breaks automated tools

   → Layer 8: Consistent random timing prevents optimization


Result: Attack fails, you have logs of attempt, attacker wasted hours
Lessons Learned
1. Layering isn't redundancy—it's strategy
Each layer should target different attack vectors. Having 8 encryption layers doesn't help if they all use the same algorithm and key.
Good layering:
- Layer 1: Key exchange (MITM protection)
- Layer 2: Encryption (eavesdropping protection)
- Layer 6: Honey pot (intrusion detection)
Bad layering:
- Layer 1: AES-256
- Layer 2: AES-256 again
- Layer 3: AES-256 again (just slower)
2. Security is about time, not impossibility
No system is unbreakable. But security can make attacks:
- Take too long (months/years)
- Cost too much (hardware, time, expertise)
- Be too risky (early detection, logging)
For a $15 DIY device storing personal passwords, being harder to crack than a corporate server is enough deterrent.
3. Observability matters
The honey pot layer isn't about stopping attacks—it's about knowing they're happening. Early warning is invaluable.
4. Open source security works
Making the code public doesn't weaken security. The architecture still requires:
- Physical access to the device
- Extracting hardware-unique keys
- Bypassing multiple independent layers
"Security through obscurity" is not security. Security through architecture is.
Implementation Complexity
| Layer | Code Complexity | Performance Impact | Maintenance |
|---|---|---|---|
| ECDH | Medium (mbedTLS) | Low (once per session) | Low |
| Session Encryption | Low (built-in) | Low | Low |
| Dynamic Endpoints | Low | None | Low |
| Header Obfuscation | Low | None | Medium |
| Anti-Fingerprinting | Low | Low (~50ms) | Low |
| Honey Pot | Low | None | Low |
| Method Tunneling | Medium | Low | Medium |
| Timing Protection | Medium | Medium (~100ms) | Low |
Total added overhead: ~150ms per critical operation
Memory overhead: ~15KB for security code
Development time: ~2 weeks (with testing)
What's Next?
Current architecture is strong, but there's always room for improvement:
Planned additions:
Hardware secure element (ATECC608A) for key storage
Encrypted SD card backup with versioning
Multi-device sync via encrypted mesh protocol
U2F/FIDO2 support for hardware security keys
Testing improvements:
- Automated penetration testing suite
- Fuzzing for API endpoints
- Load testing for timing attack resistance
- Third-party security audit
Conclusion
Building secure embedded systems doesn't require enterprise budgets or closed-source magic. It requires:
Understanding threat models (what attacks are likely?)
Layered defenses (multiple independent protections)
Testing and validation (verify it actually works)
Open, auditable code (trust through transparency)
The 8-layer architecture in SecureGen demonstrates that even a $15 ESP32 device can implement defense-in-depth security rivaling commercial products.
The full source code is available on GitHub: github.com/makepkg/SecureGen
Every security decision, every line of code, every trade-off is documented and auditable. Because verifiable security is the only real security.
Resources
- SecureGen GitHub Repository
- Part 1: Memory Management on ESP32
- Part 2: BLE Security Implementation
- ESP32 Security Features (Espressif)
- OWASP Embedded Application Security
Questions? Comments? Drop them below! I'm happy to discuss specific layers, trade-offs, or alternative approaches.
Building something similar? I'd love to hear about your security architecture!
esp32 #security #embedded #architecture #defenseinдепth #encryption #opensource
---
## 📸 Images to Include
### 1. **Cover Image**
Your 8-layers infographic (already have)
### 2. **Code Comparison Images**
Create these in VS Code with dark theme, screenshot:
**Image: "
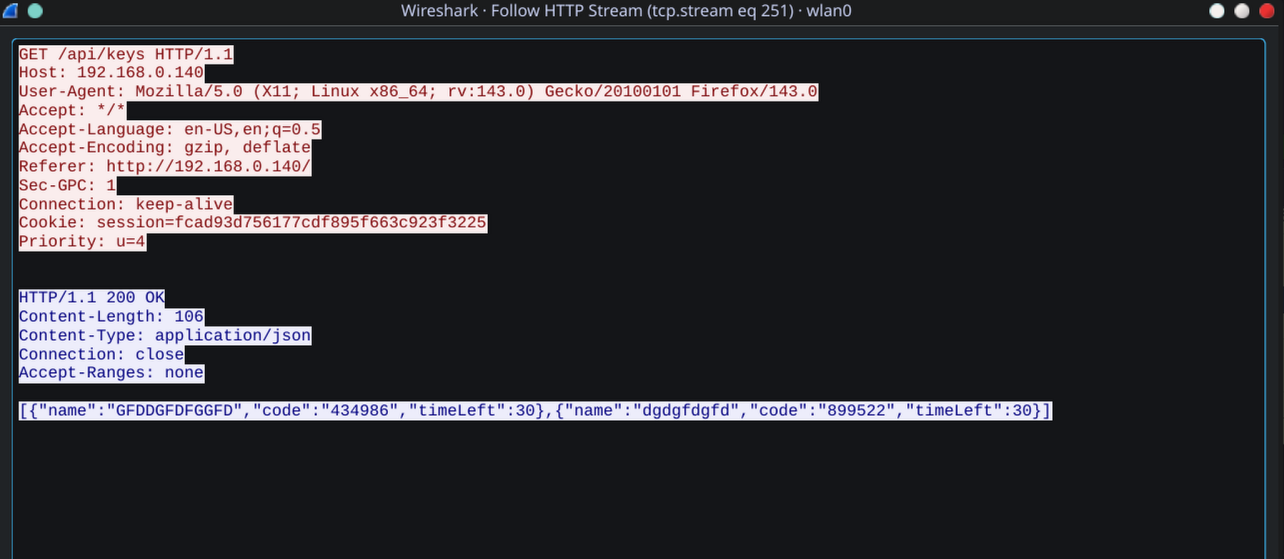"**
BEFORE:
GET /api/totp
GET /api/passwords
DELETE /api/passwords/1
AFTER:
POST /a7f3c9e8b2d4f1a6...
POST /9e4f1b8c3a7d2f5e...
POST /c3f7a9e1b5d8f2a4...
**Image: "
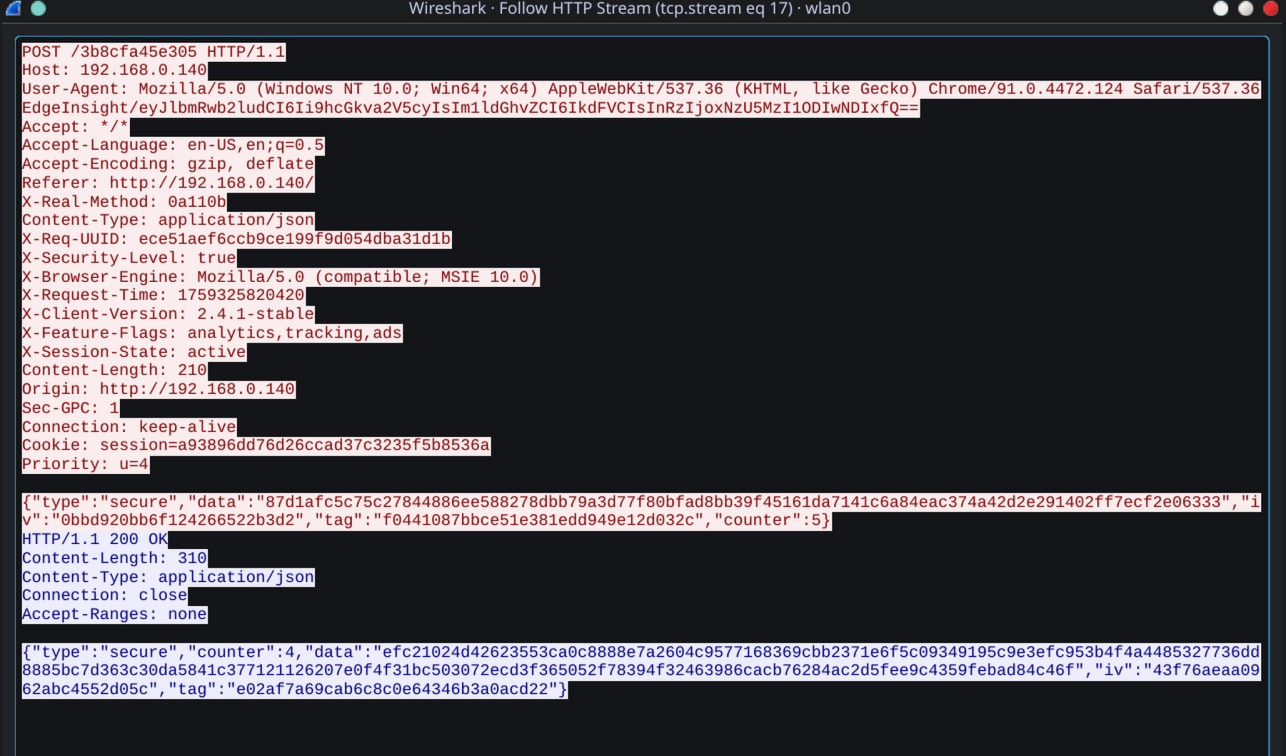"**
BEFORE:
Server: ESP-AsyncWebServer/1.2.3
X-ESP32-Chip: ESP32-D0WDQ6
Content-Type: application/json
AFTER:
X-k8f3a2: application/json
X-AspNetMvc-Version: 5.2.7
X-Powered-By: PHP/7.4.3
### 3. **Timing Attack Graph**

Simple graph showing response times:

- Without protection: clear pattern

- With protection: random scatter


Simple graph showing response times:

- Without protection: clear pattern

- With protection: random scatter
SOCIAL SHARE CARD GENERATOR